How to Connect a Domain to Squarespace
If you already have a site built at Squarespace, you can use our Quick Connect tool to link it to your domain. There are two steps to connecting a domain to Squarespace, both of which we’ve outlined below.
Setting Up Your Domain at Squarespace
- 1
-
If you don’t already have a Squarespace account, you’ll need to create one. If you already have an account you can skip this step.
- 2
-
Log into Squarespace, if you haven't already. From the main Squarespace dashboard, Click the menu icon on the right-hand side next to your site and select "SETTINGS".
(If you're in your site editor, you can also get to this menu by clicking the gear icon in the bottom left of your Website dashboard) -


-
- 3
-
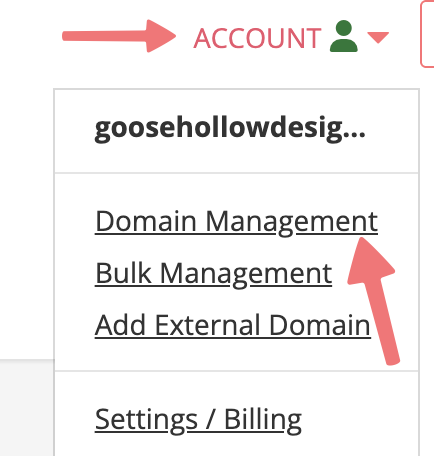
Click "Domains & Email."

-
- 4
-
On the next screen, click Domains. Then select "USE A DOMAIN I OWN."

-
- 5
-
Type your domain under "Use a Third-Party Domain" and select the arrow to the right of the domain you just entered.

-
- 6
-
Once you click the arrow, two options will appear below. Locate the "Connect Domain" section and click the arrow inside that section.

-
- 7
-
Select a domain provider of "Other" and click "CONNECT DOMAIN."

-
- 8
-
A message box will appear. Click "CONTINUE".

-
- 9
-
The DNS Settings box will appear. Take special note of the entry under the Host column with a Required Data entry of verify.squarespace.com. This is your verification code. Don't close this browser window! You'll need to refer back to it in a few minutes.

The first step to connect a domain to Squarespace is preparing Squarespace for your domain! Follow these steps first:


Connecting a Domain to Squarespace
Now that you've prepared your domain, it's time to use Quick Connect to connect a domain to Squarespace.


That's it! You’ve successfully learned how to connect a domain to Squarespace and your domain should begin resolving worldwide to your Squarespace site within the next hour (though it can take up to 48 hours in some cases).
If you need any further assistance connecting your domain to Squarespace, feel free to reach out to our support team.