How to Connect a Domain to ChatGPT Sites
After a long day of telling ChatGPT "don't make any mistakes this time" and "that text looks weird, please fix", you've finally finished building your perfect website. Now you're wondering how to connect that site to the domain you've registered on Porkbun so you can start showing off the site to your friends. You've come to the right place! We'll walk you through the process step by step.
ChatGPT can do some of these steps for you, but if you get stuck or if you would prefer to just do it manually, we'll show you every step in detail. Let's get started!
Add the domain on ChatGPT Sites
1
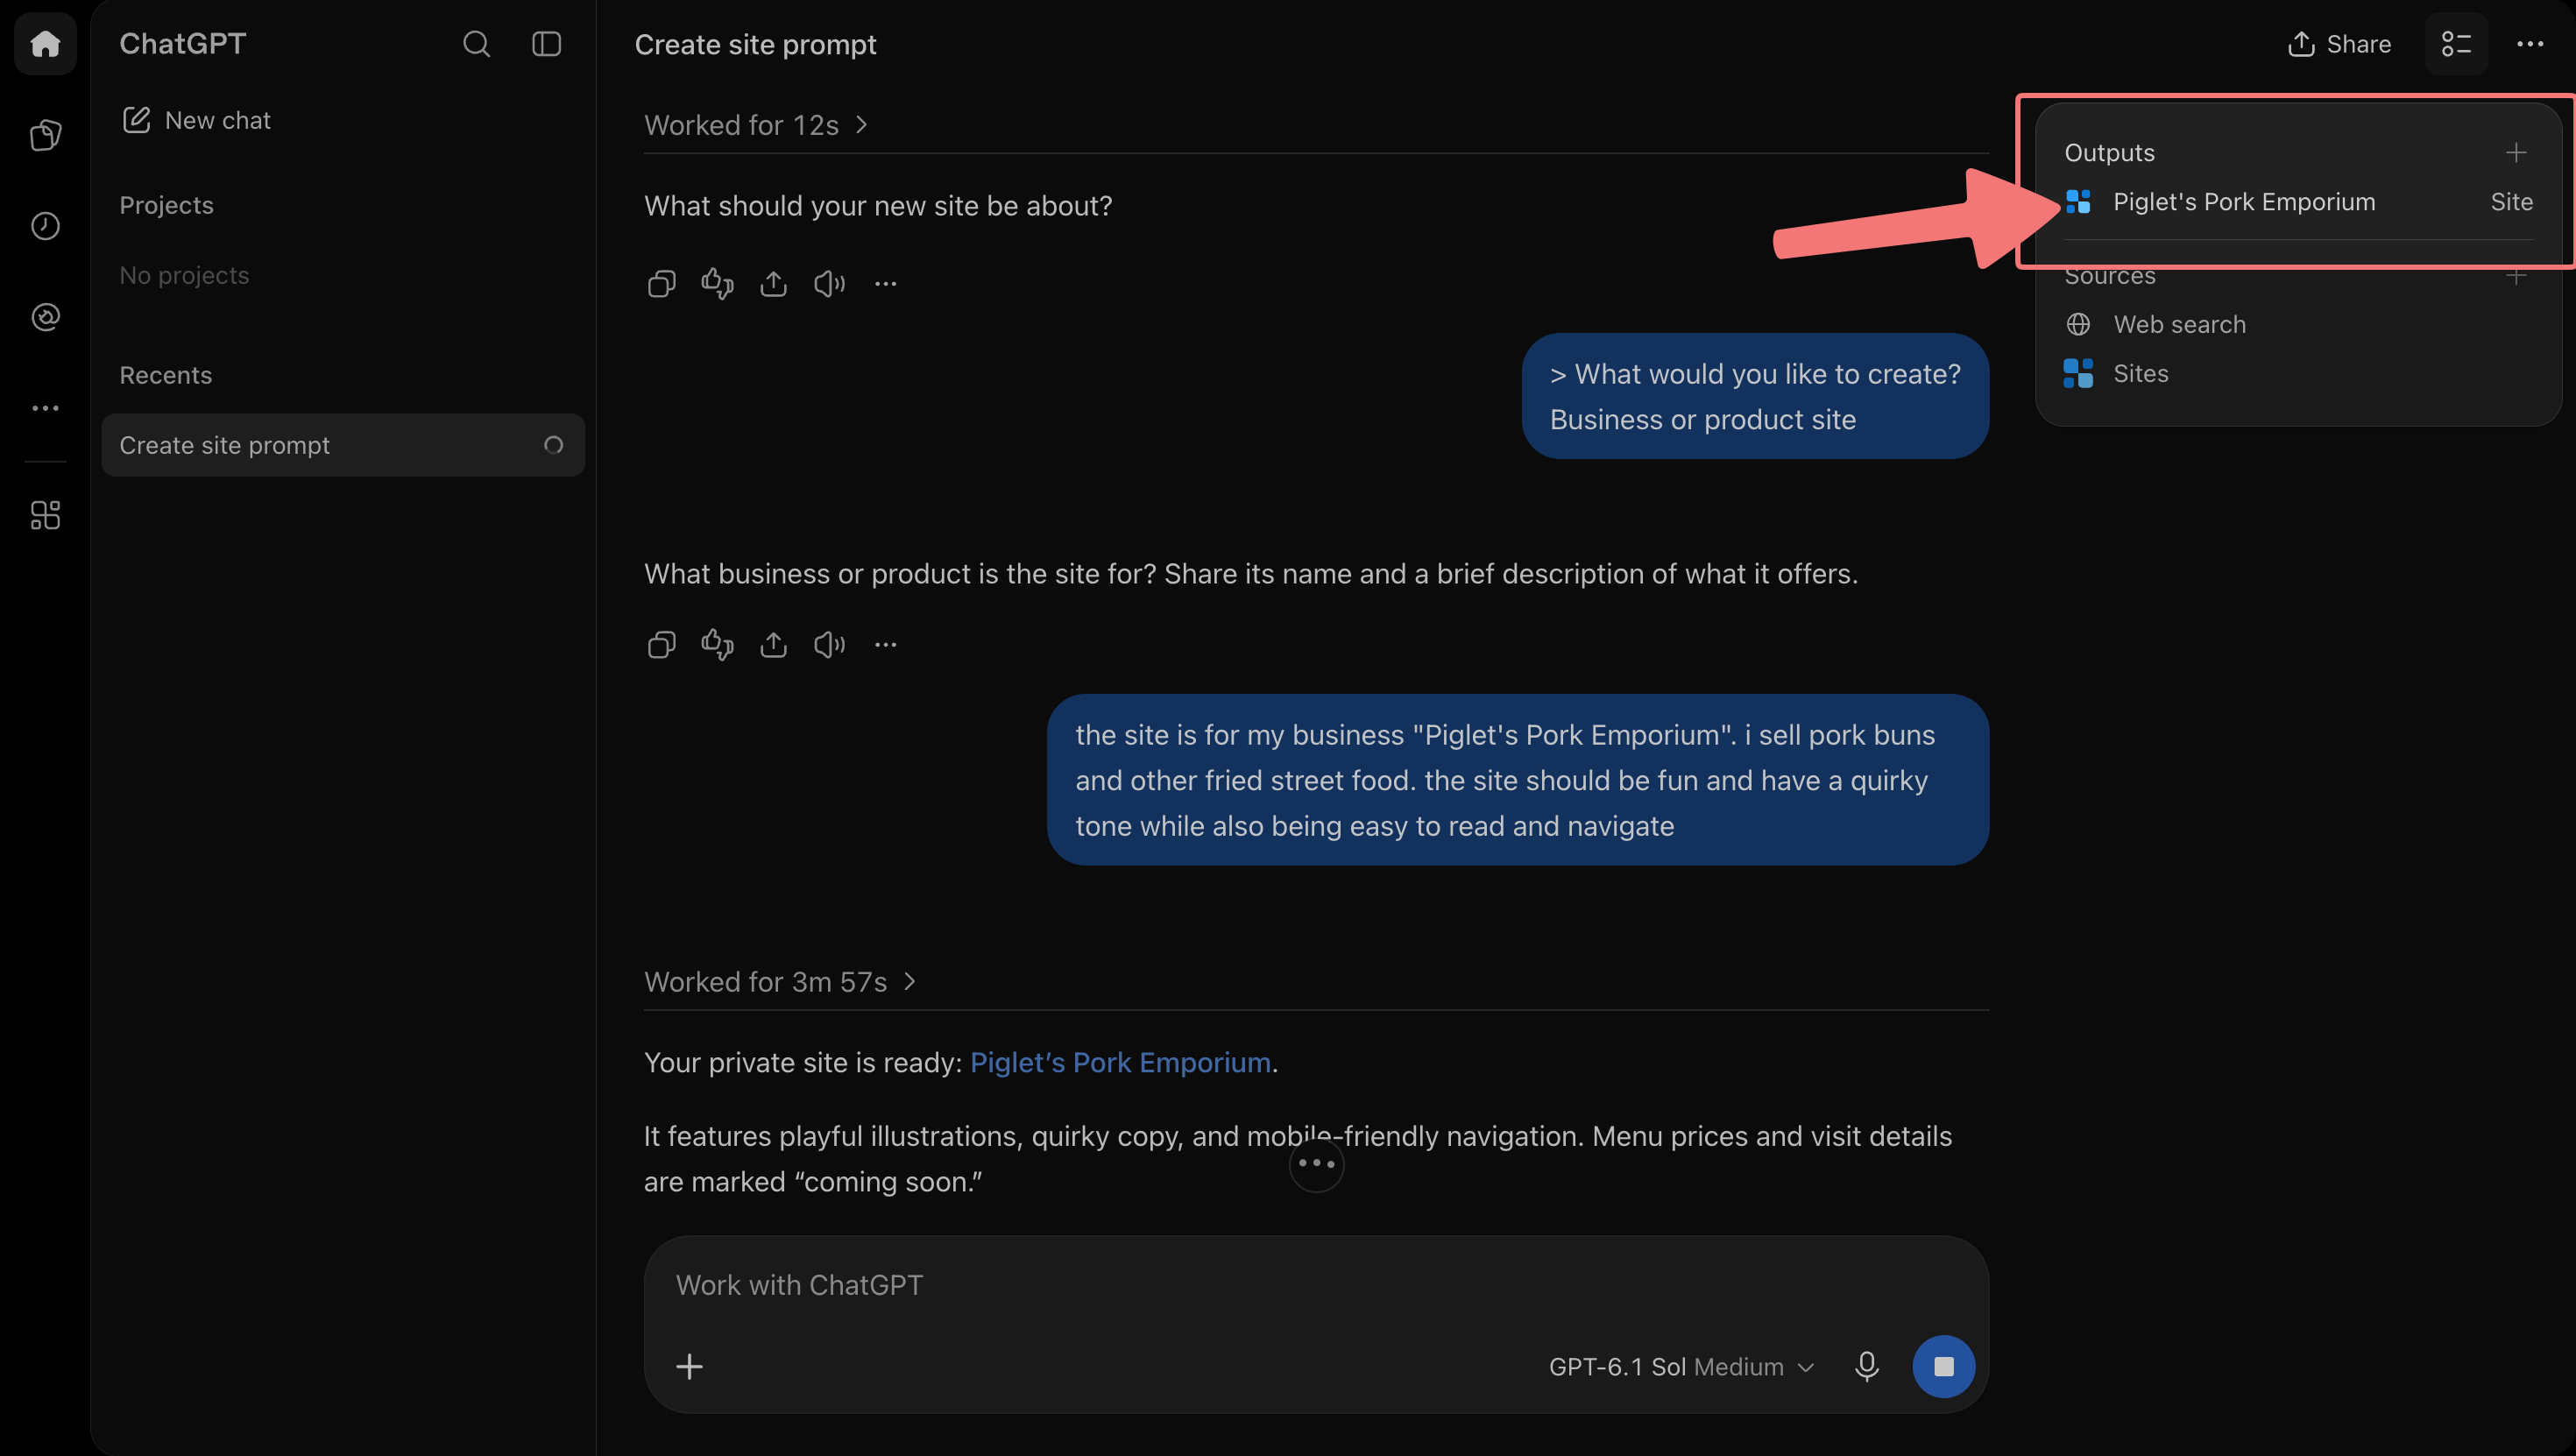
Open the project in ChatGPT Sites. On the right-hand menu under "Outputs", click on the site you've built to open the preview.
2
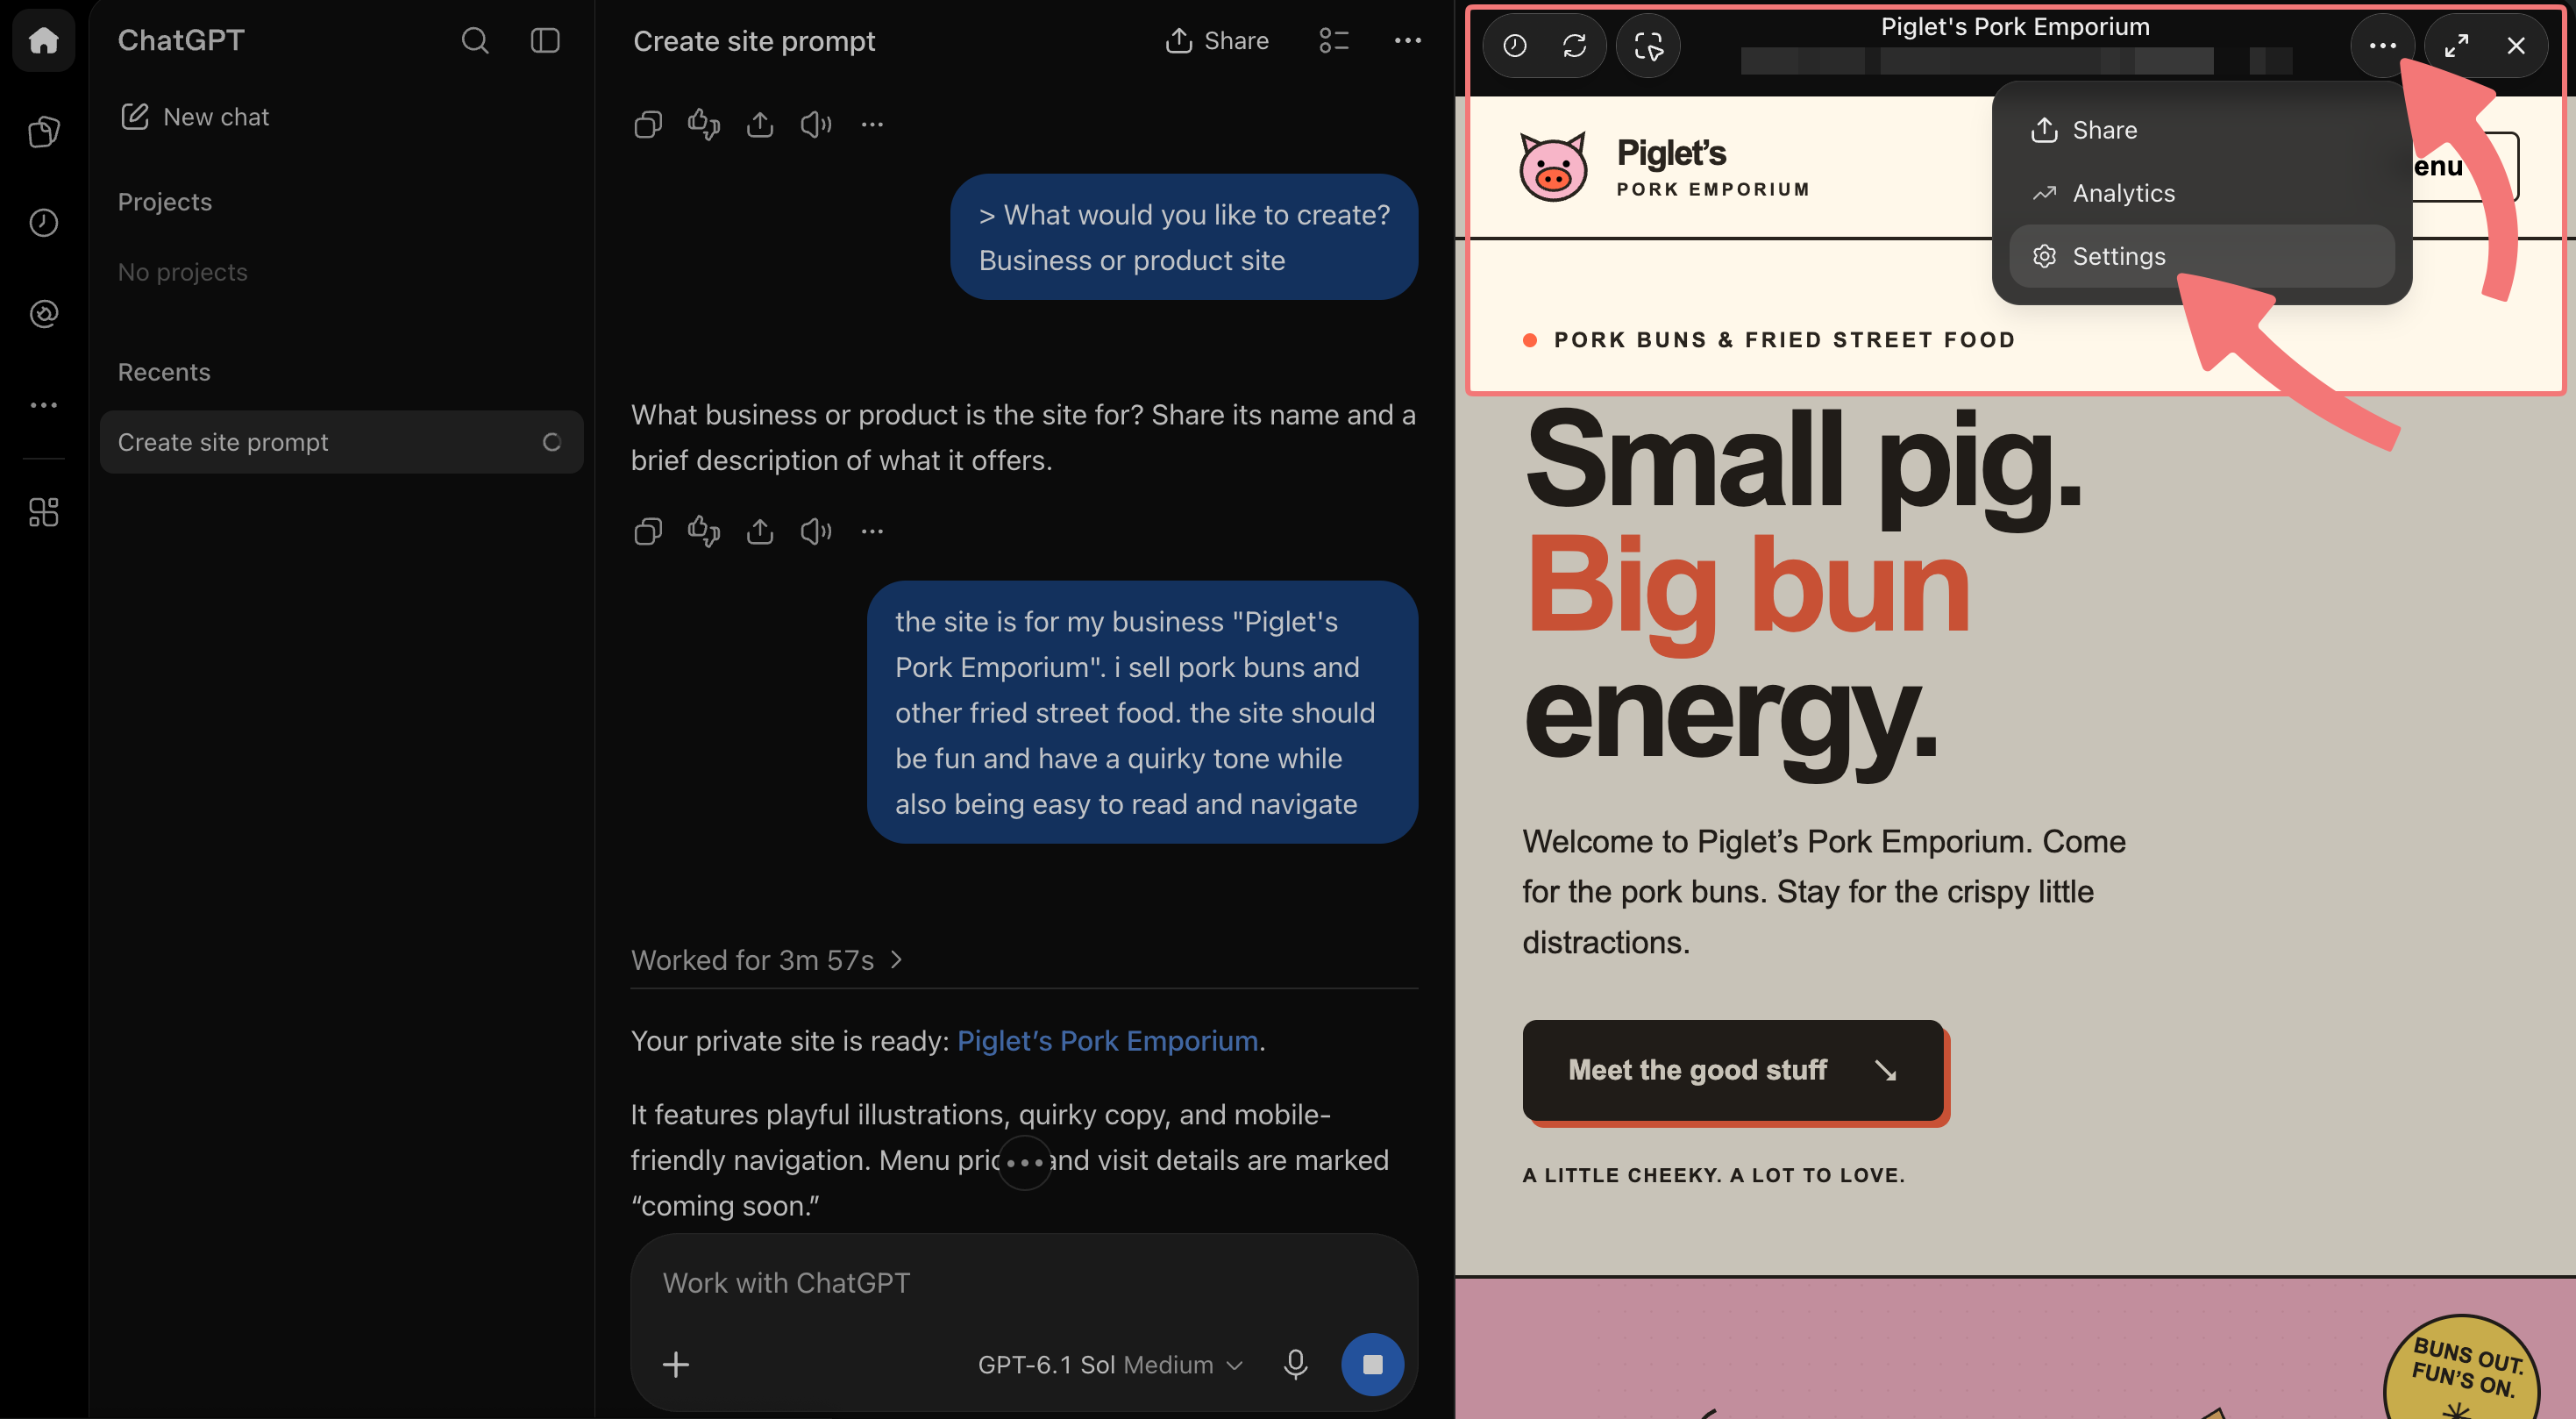
With the site preview open, click the options button, then click on Settings.
3
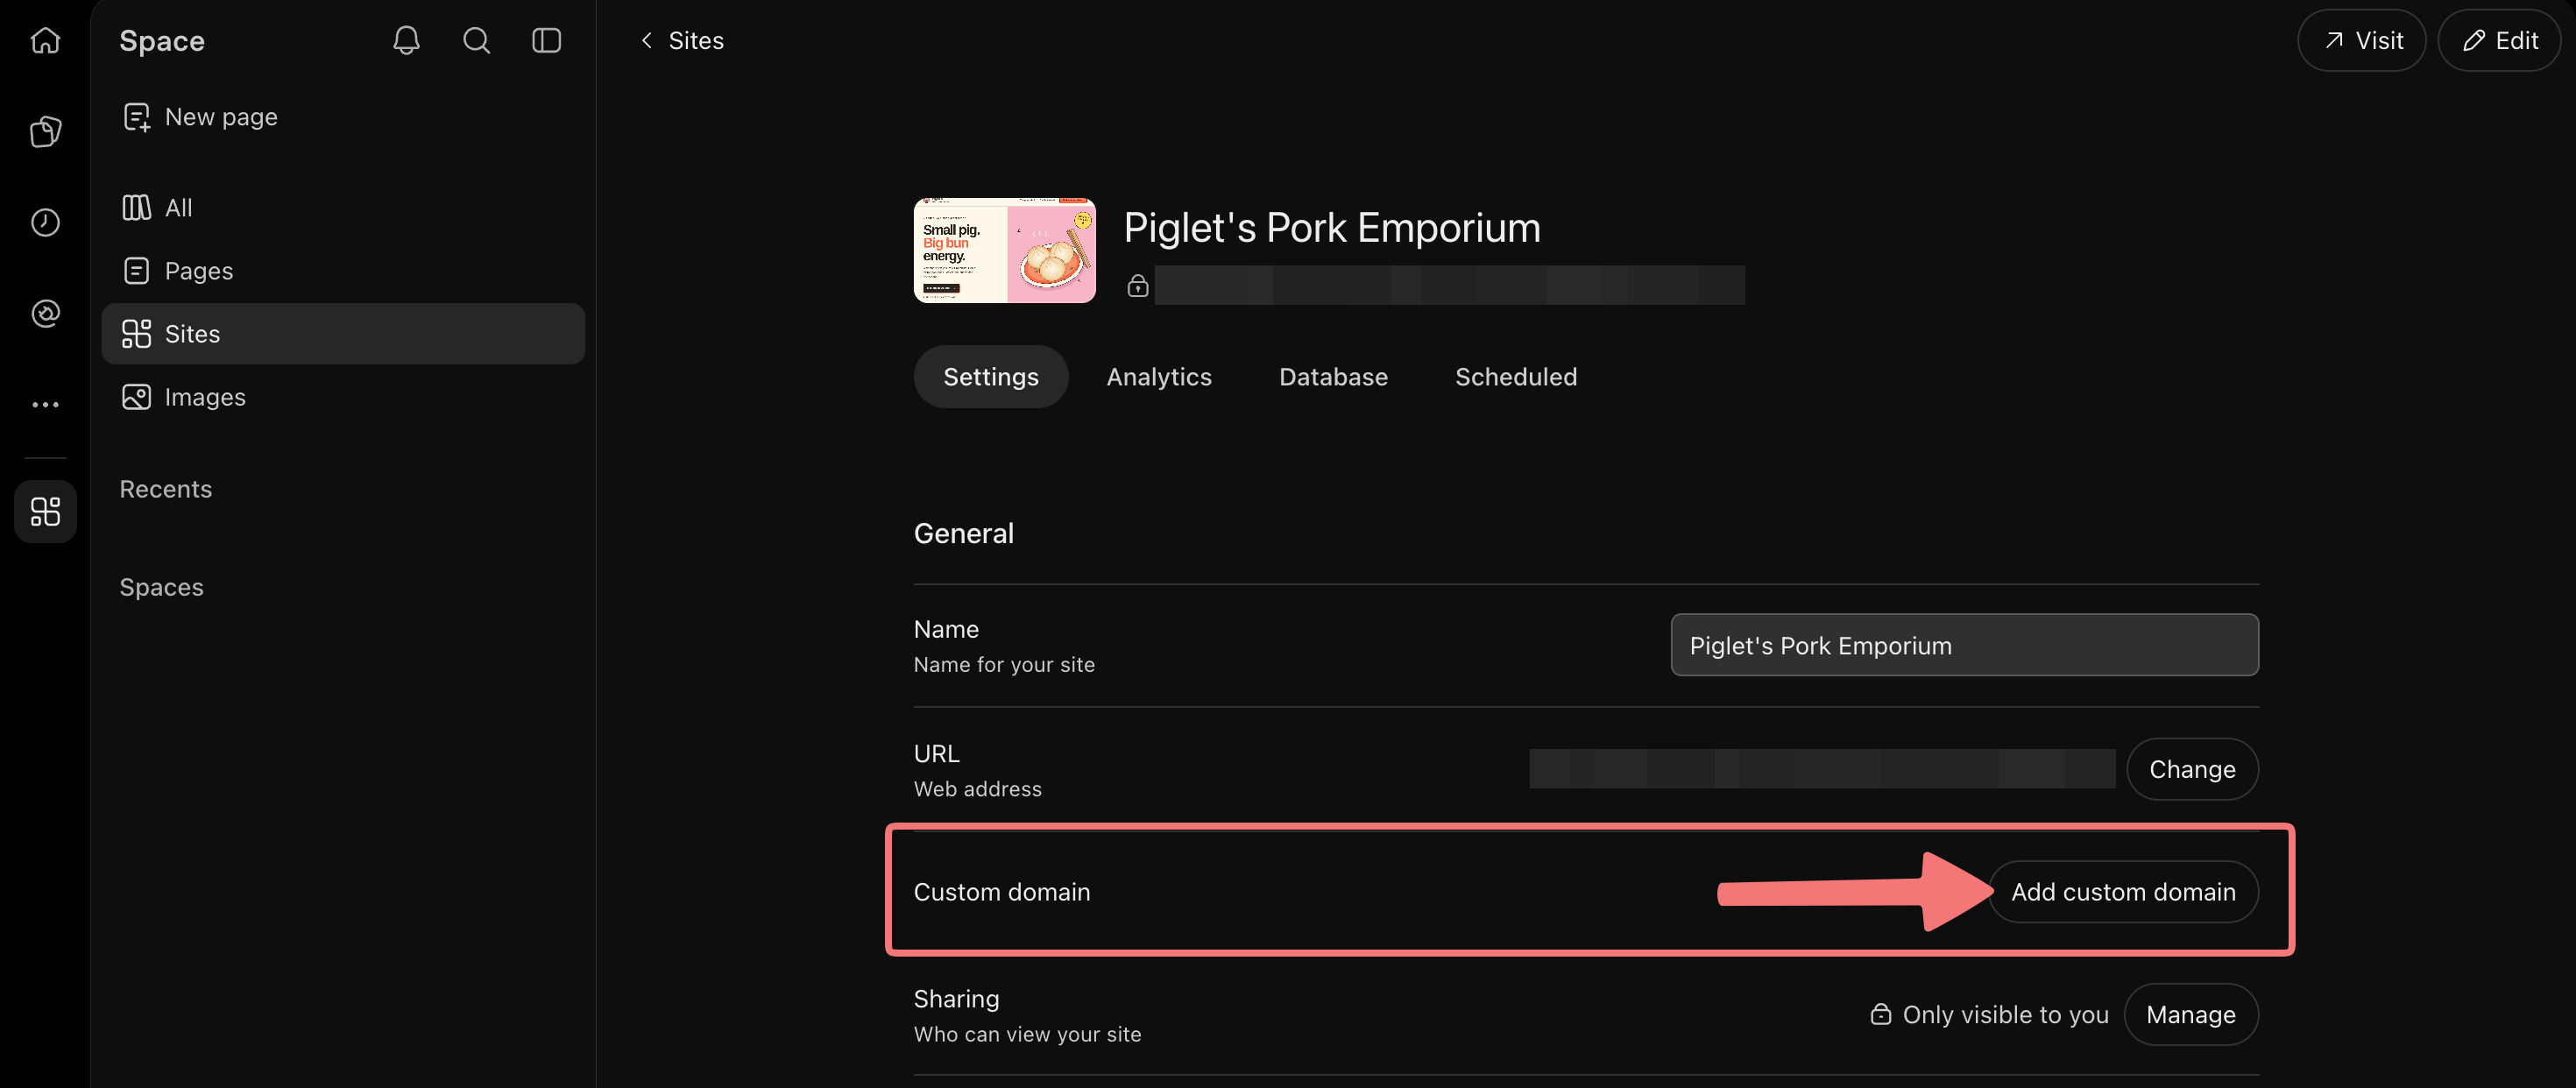
The site's settings page will open in a new tab. Look for the Custom domain option and click on "Add custom domain".
4
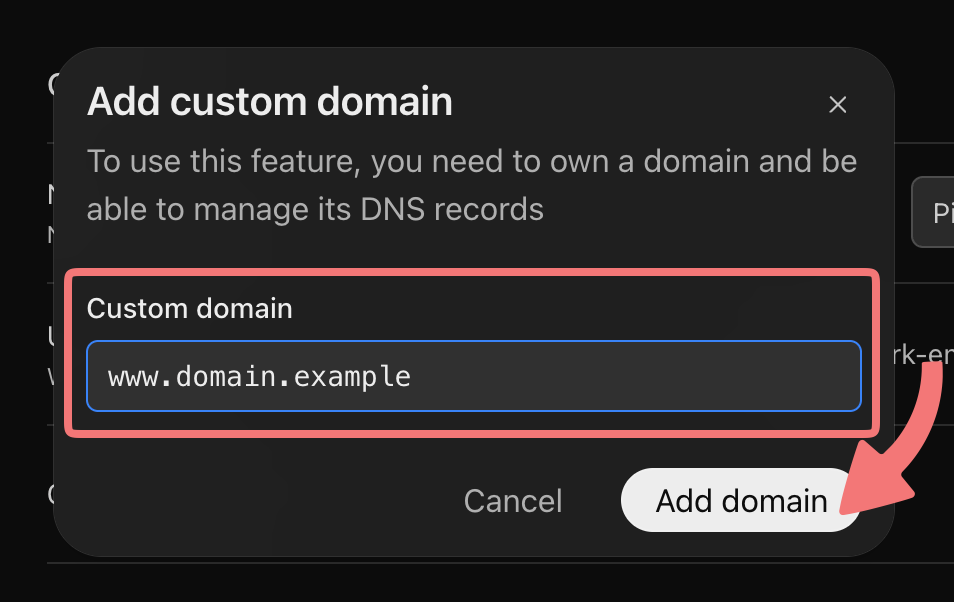
A window will pop up asking for your domain name. Enter your custom domain name that you registered on Porkbun (with "www." in front of it), then click "Add domain".
Note
You can also enter the "apex" domain here, which is the domain without "www" in front of it. However, this will result in different DNS records that need to be added to your domain. We recommend following along with us and using the "www" version of your site unless you know what you're doing.
5
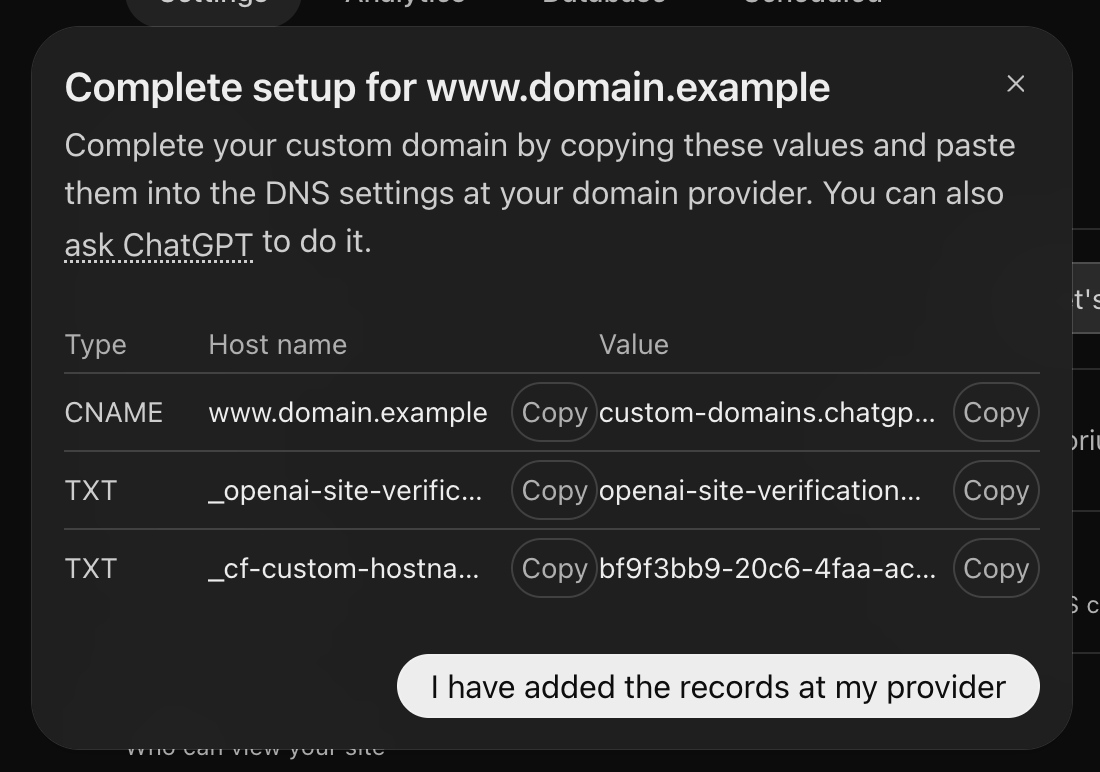
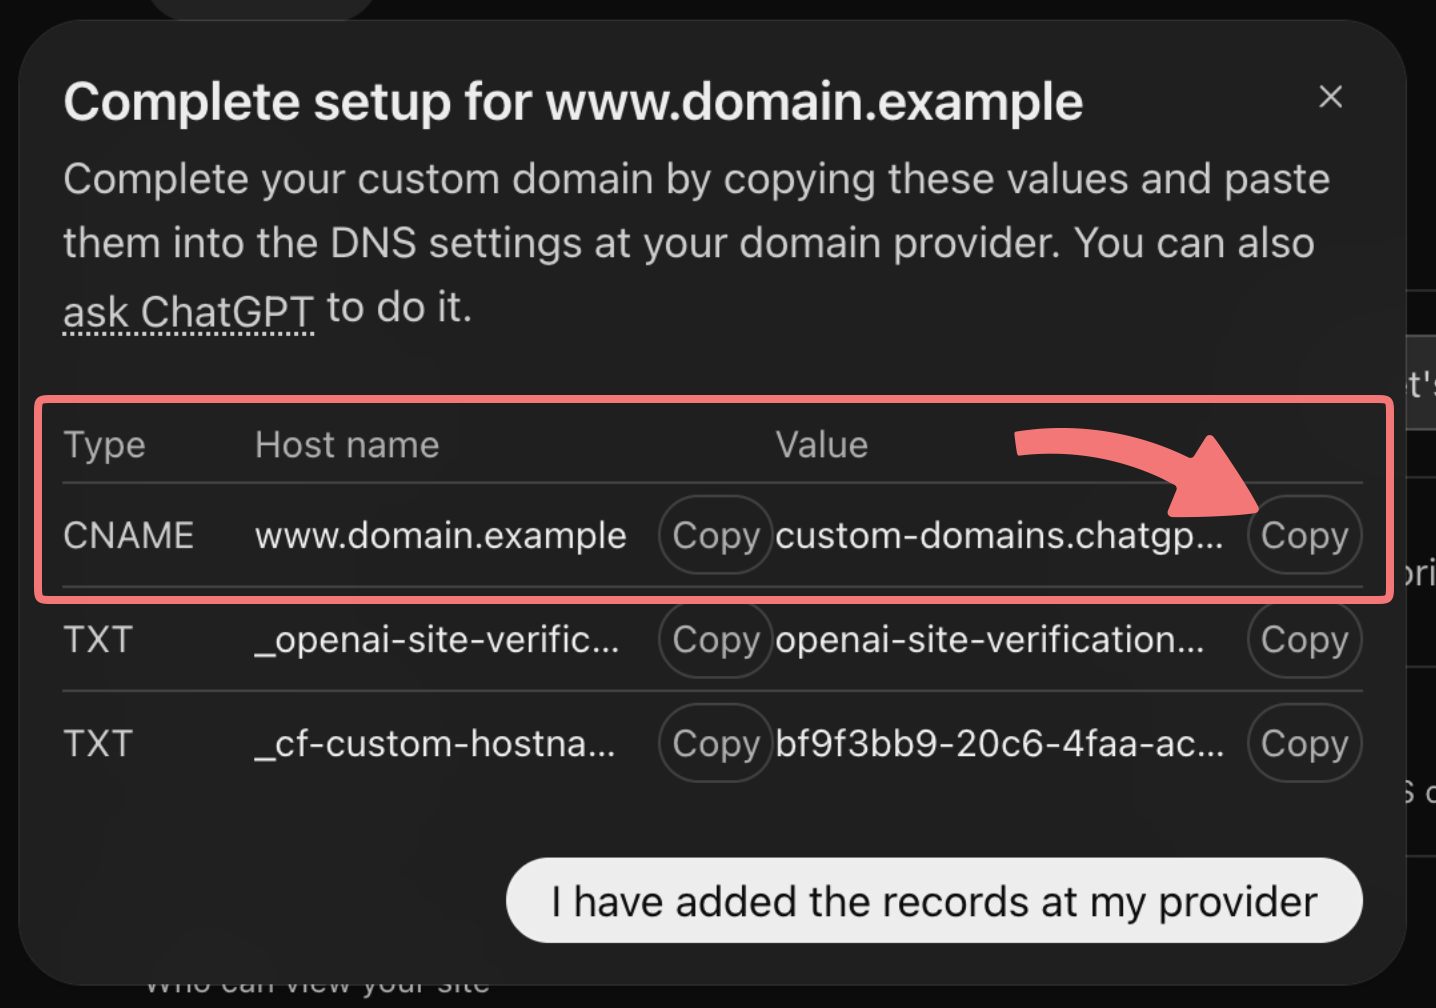
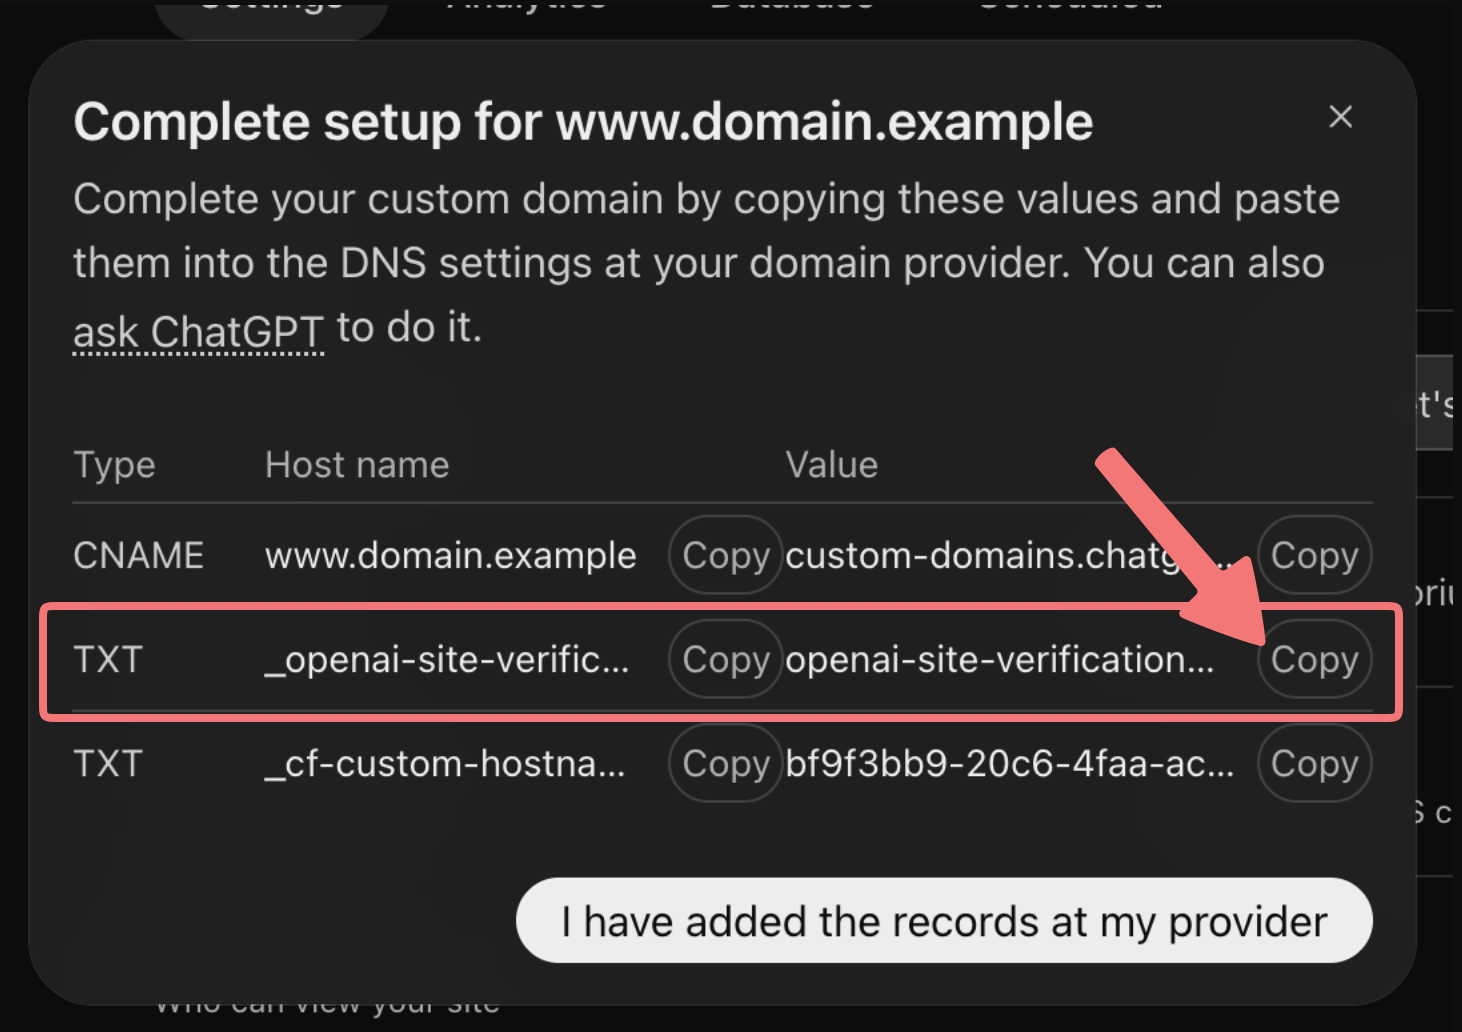
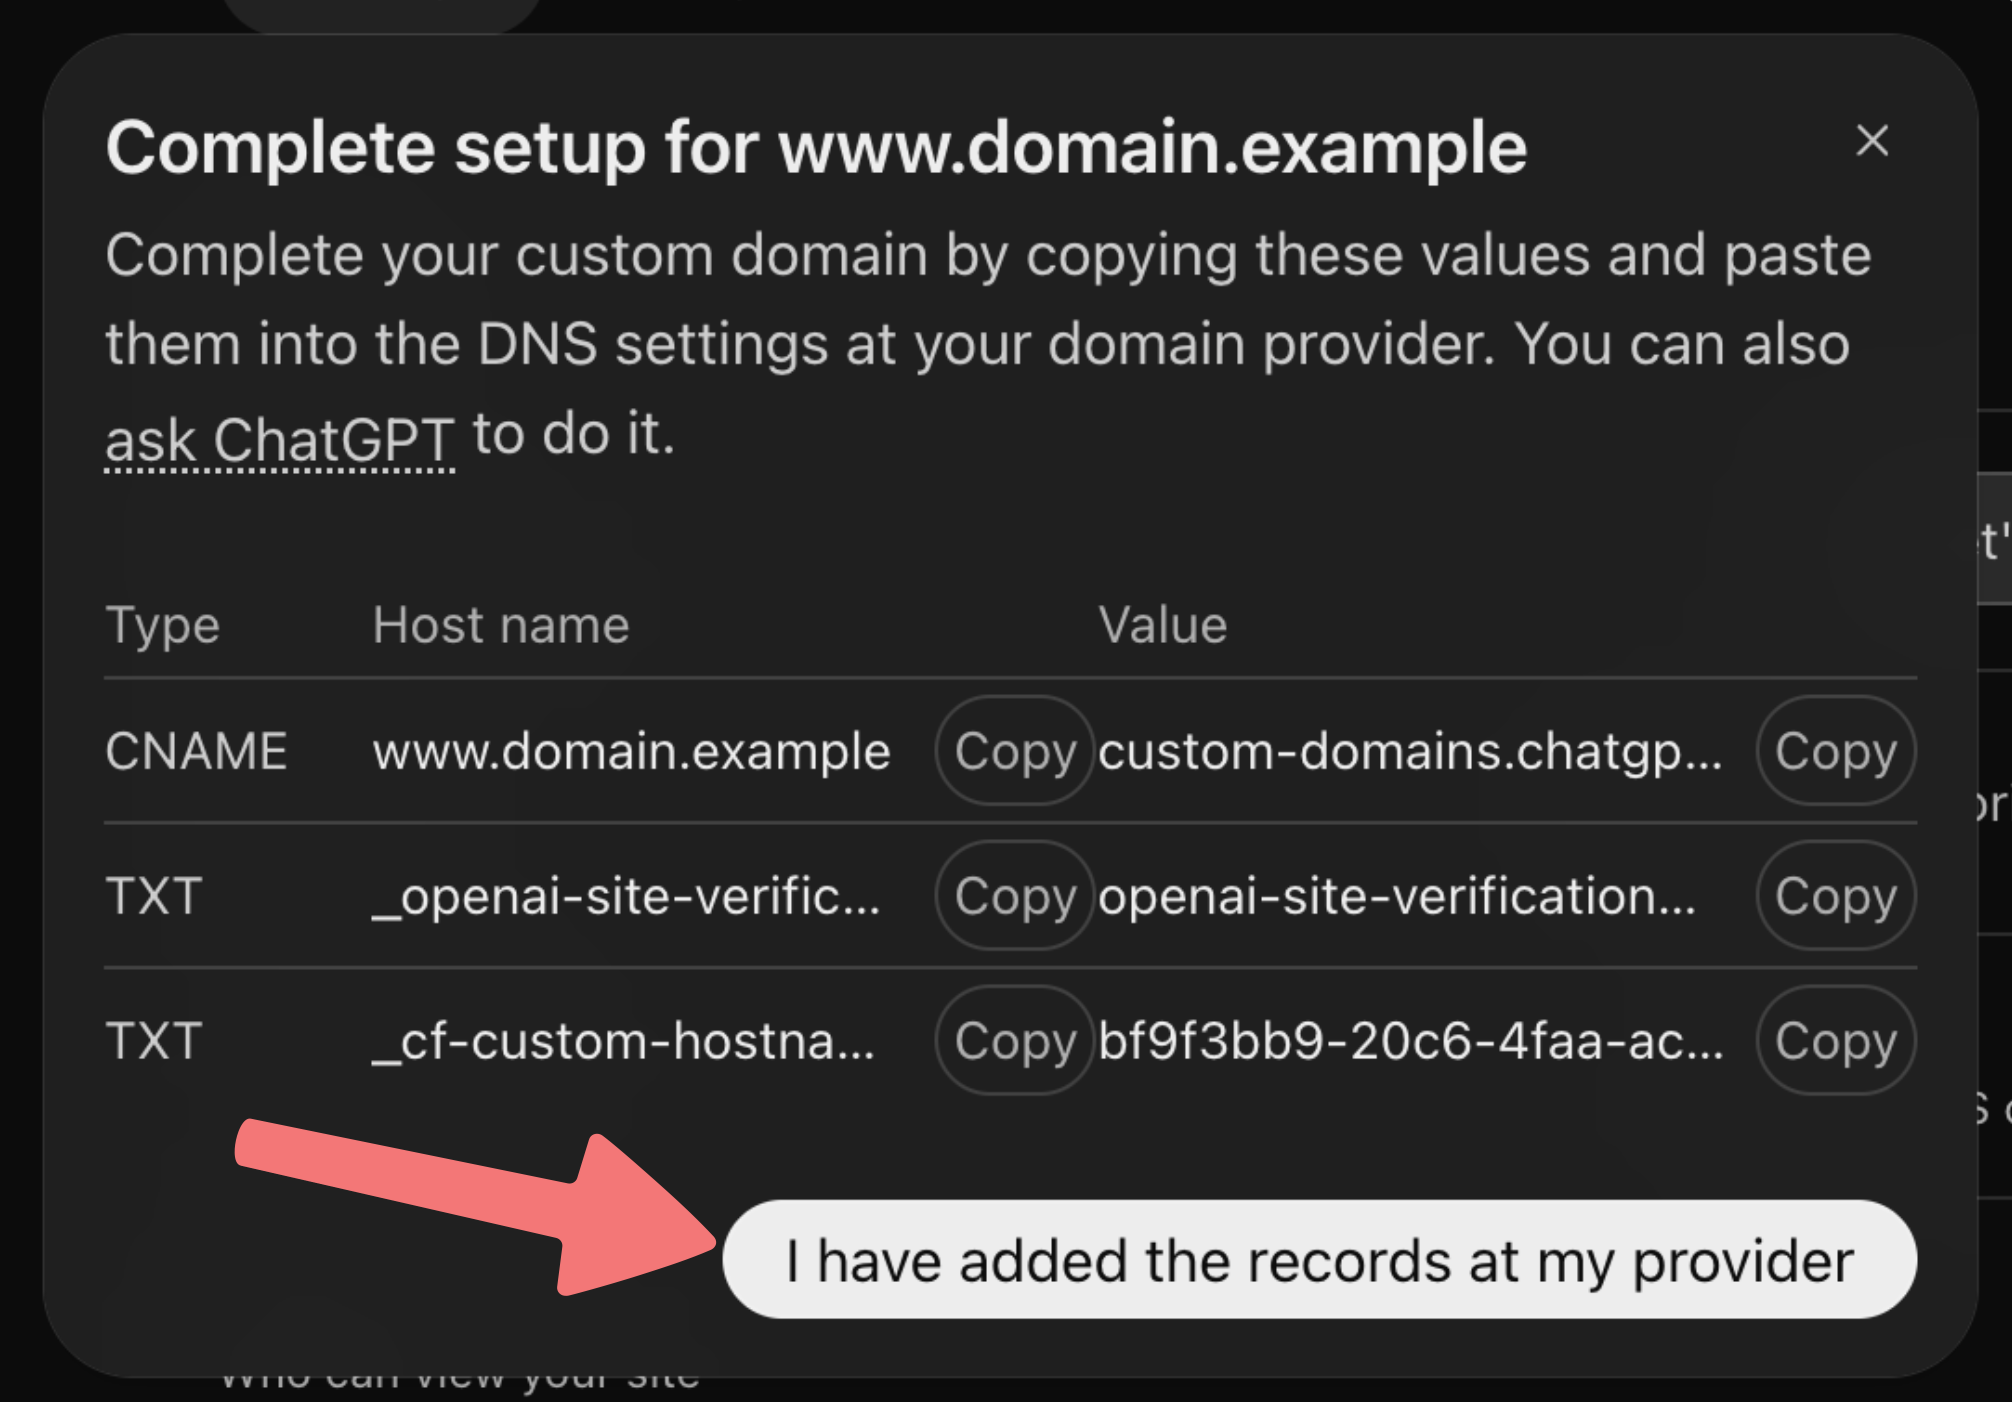
After a moment, another window will appear that provides a list of DNS records. These will need to be added to your domain on Porkbun in order to connect everything together and bring your website online.
We will be copying and pasting all of these records into Porkbun. Leave this window open, and in a new tab or window you will need to log in to your Porkbun account so you can follow the next section of this guide.
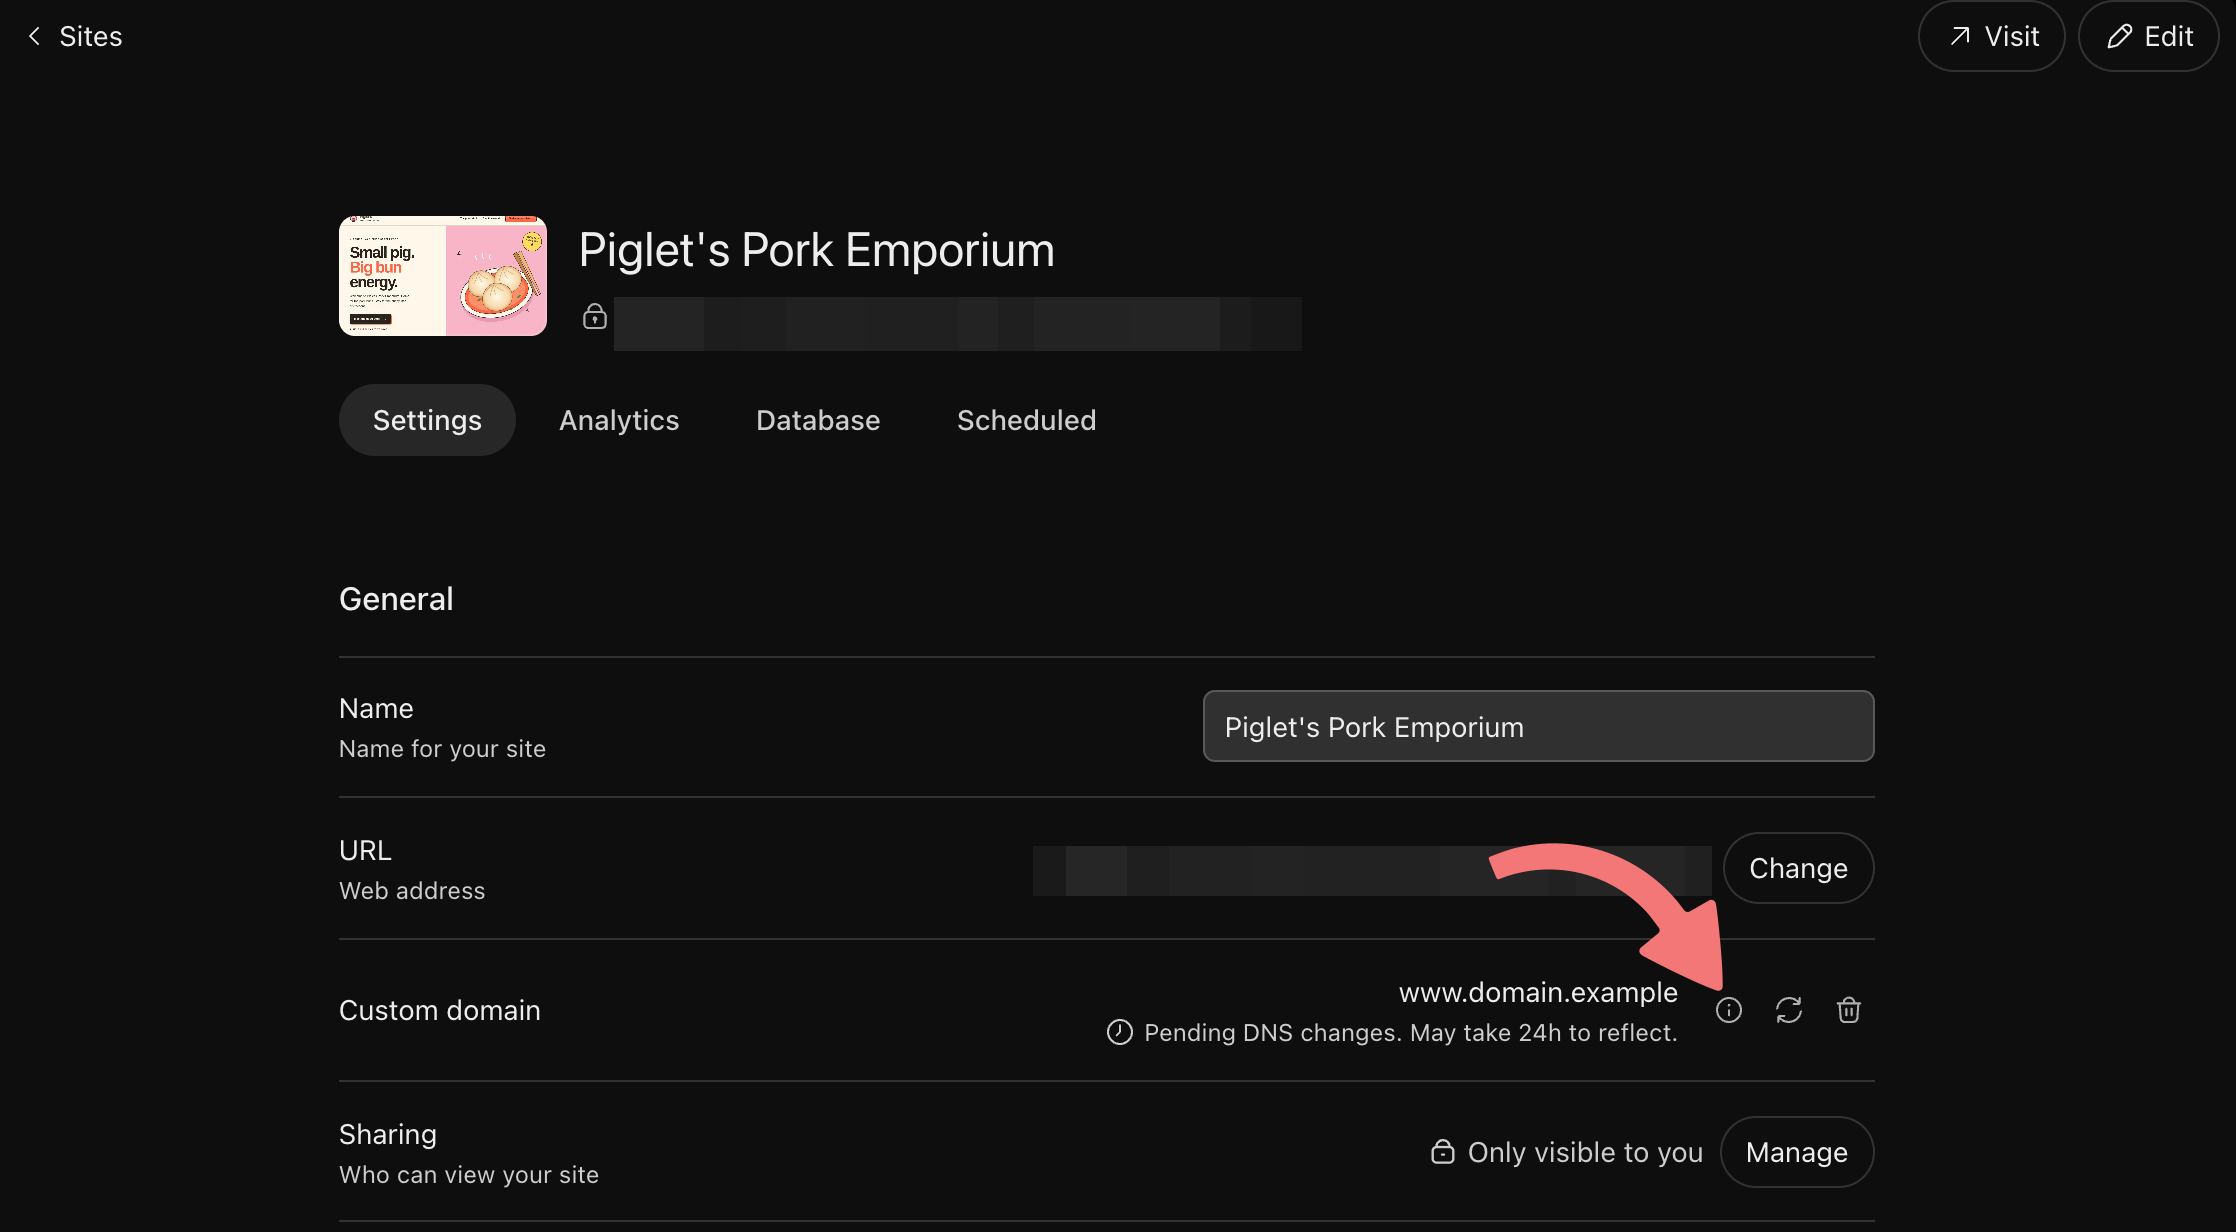
We're getting there! The next section will show you where to enter all of these records on Porkbun. If you lose track of the DNS records on ChatGPT Sites for any reason, you can always return to the Settings menu and click on the icon shown below to see the DNS records again:
Configure the domain on Porkbun
Now that you've added the domain on ChatGPT Sites and have been given some DNS records, you just need to get those added to your domain on Porkbun. Here's how!
1
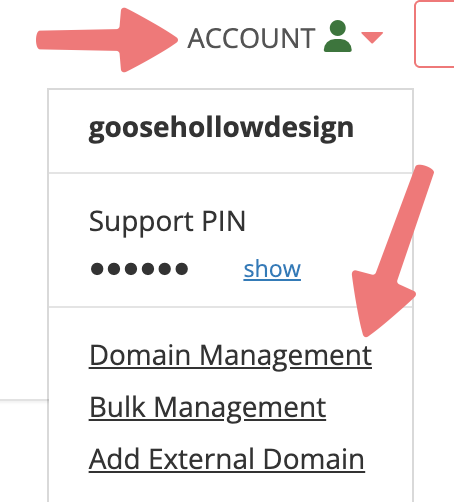
Log in to your Porkbun account and you should arrive at the Domain Management screen. If you're already logged in, click on ACCOUNT in the top-right corner and select "Domain Management" from the dropdown menu.
2
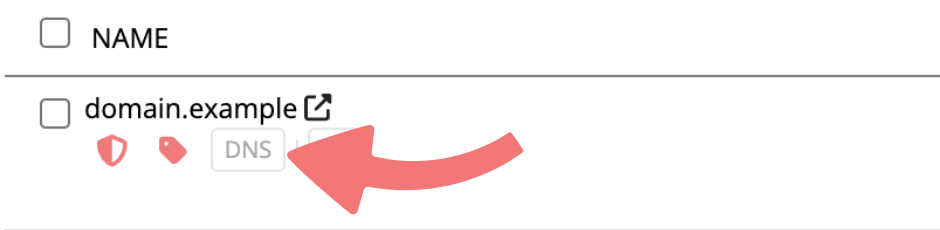
Scroll down until you find your domain name. There are two ways you can open the DNS records menu. The first way is to click on the small "DNS" button right below the domain name:
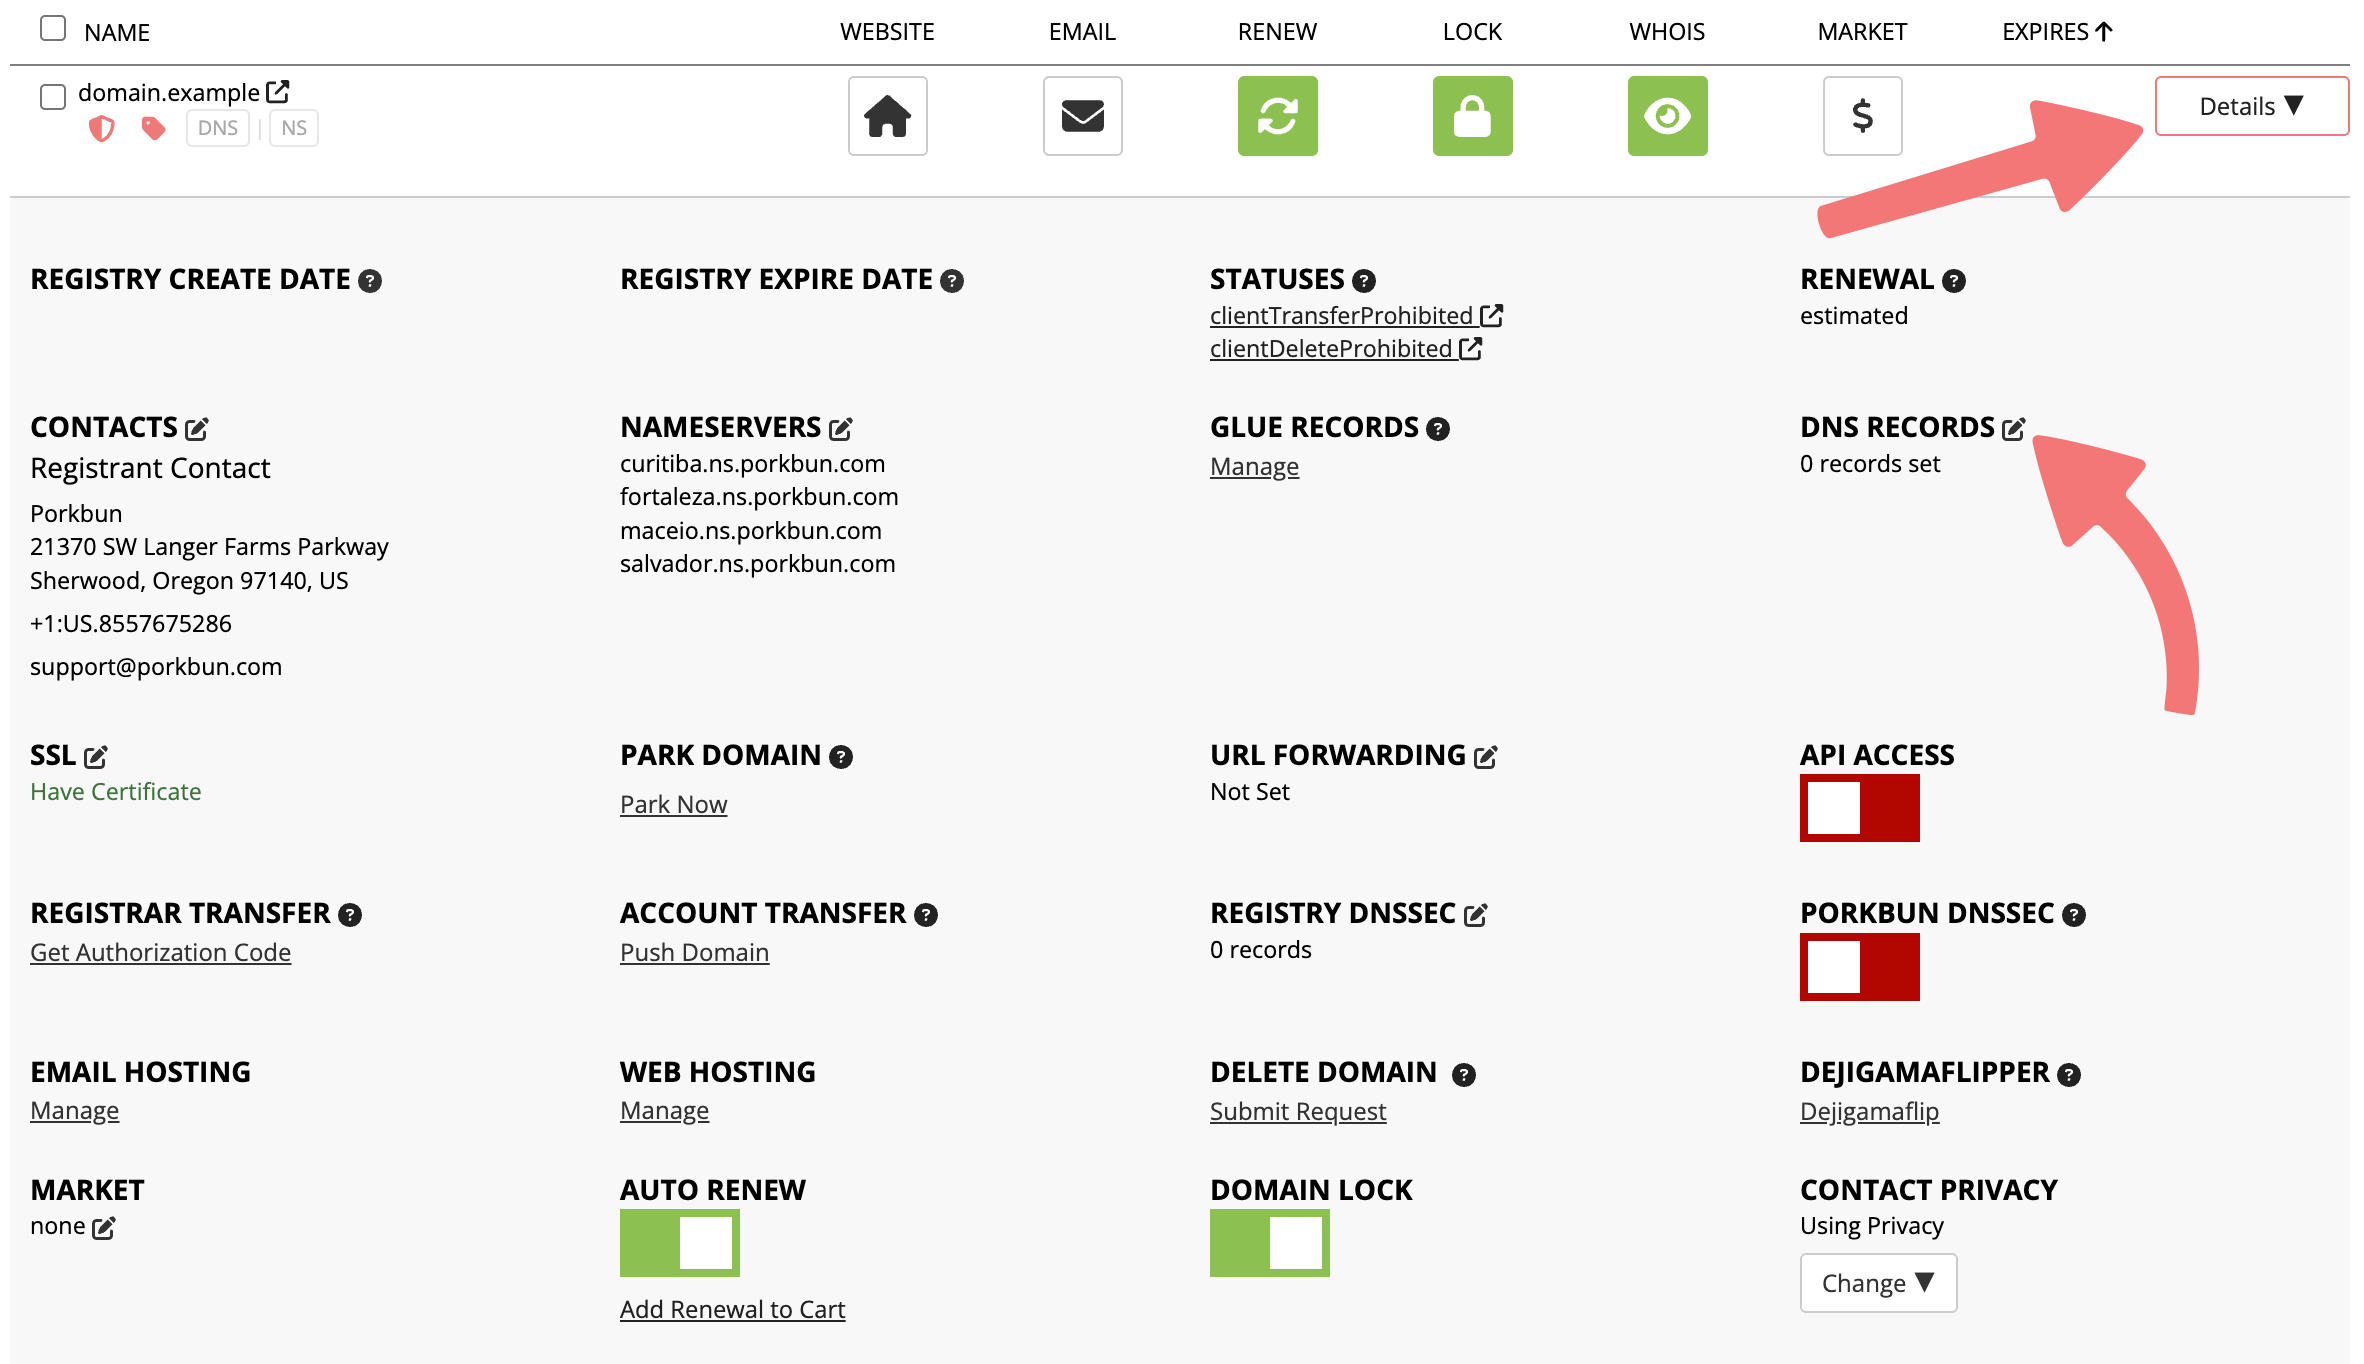
You can also click on the "Details" button all the way to the right of the domain, then look for the "DNS Records" option and click on the edit icon:
3
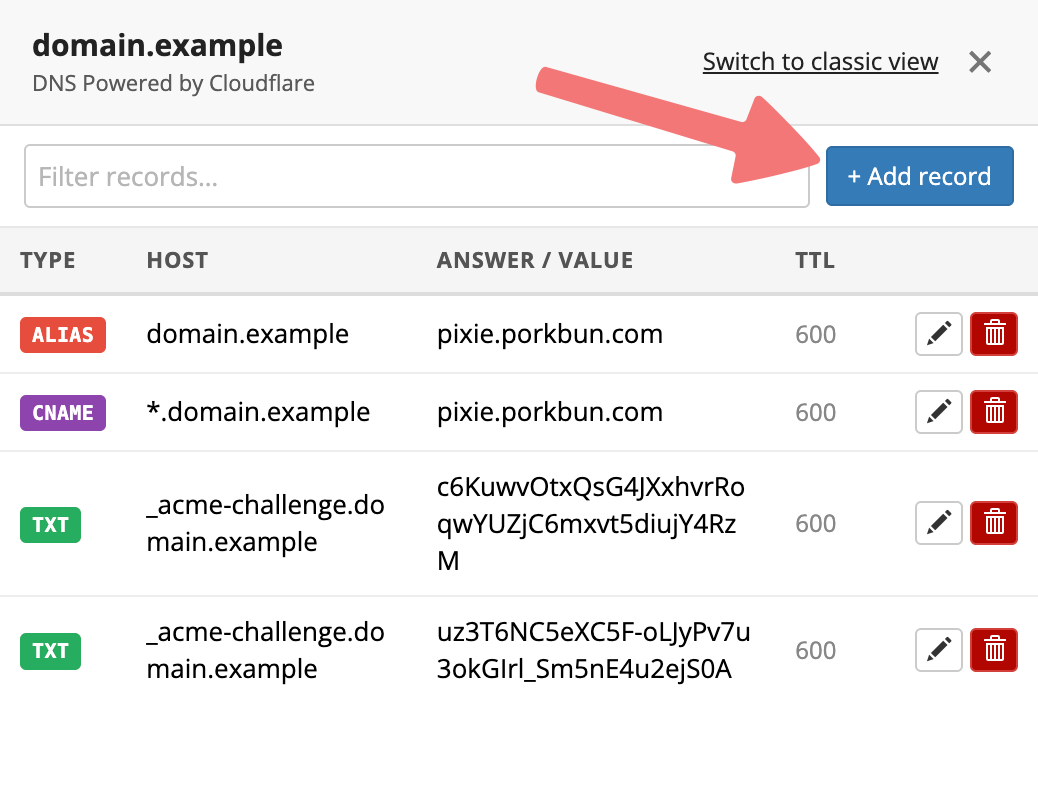
A menu will appear showing a list of DNS records currently applied to your domain. In the upper right corner, click "Add record".
4
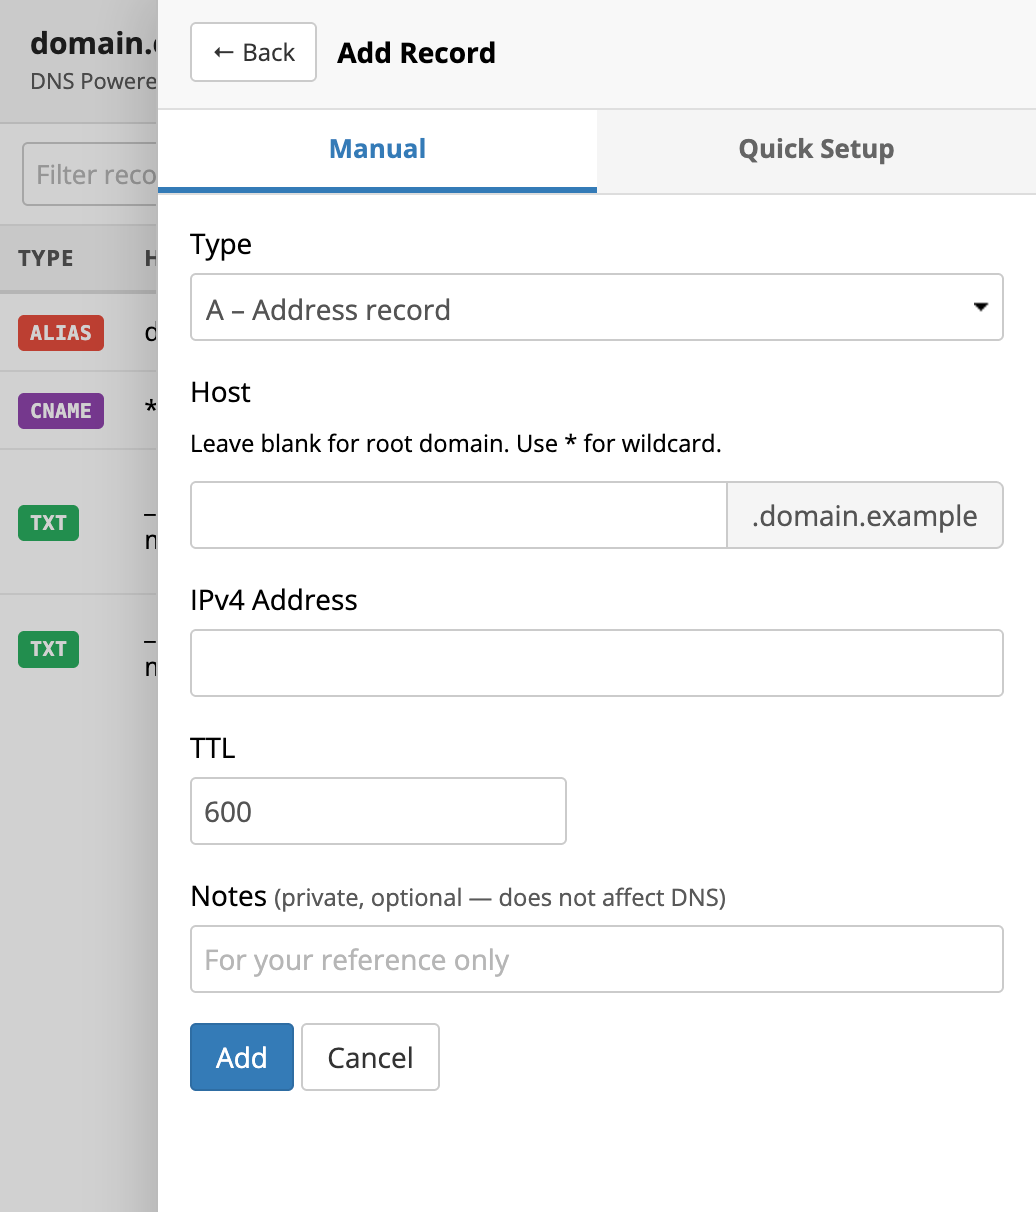
Another menu will appear that allows you to add new records. We will enter the values given by ChatGPT Sites here in order to connect your domain. Keep this tab open.
5
Swap back over to the other window with ChatGPT Sites open. We'll review and copy these records one at a time.
6
Take note that each record has a "Type", a "Host name", and a "Value". Let's start with the first record. Under the "Value" column, click on the Copy button to copy the value to your clipboard.
7
Switch back to your other tab with the Porkbun account open. We need to make everything match what ChatGPT Sites has provided.
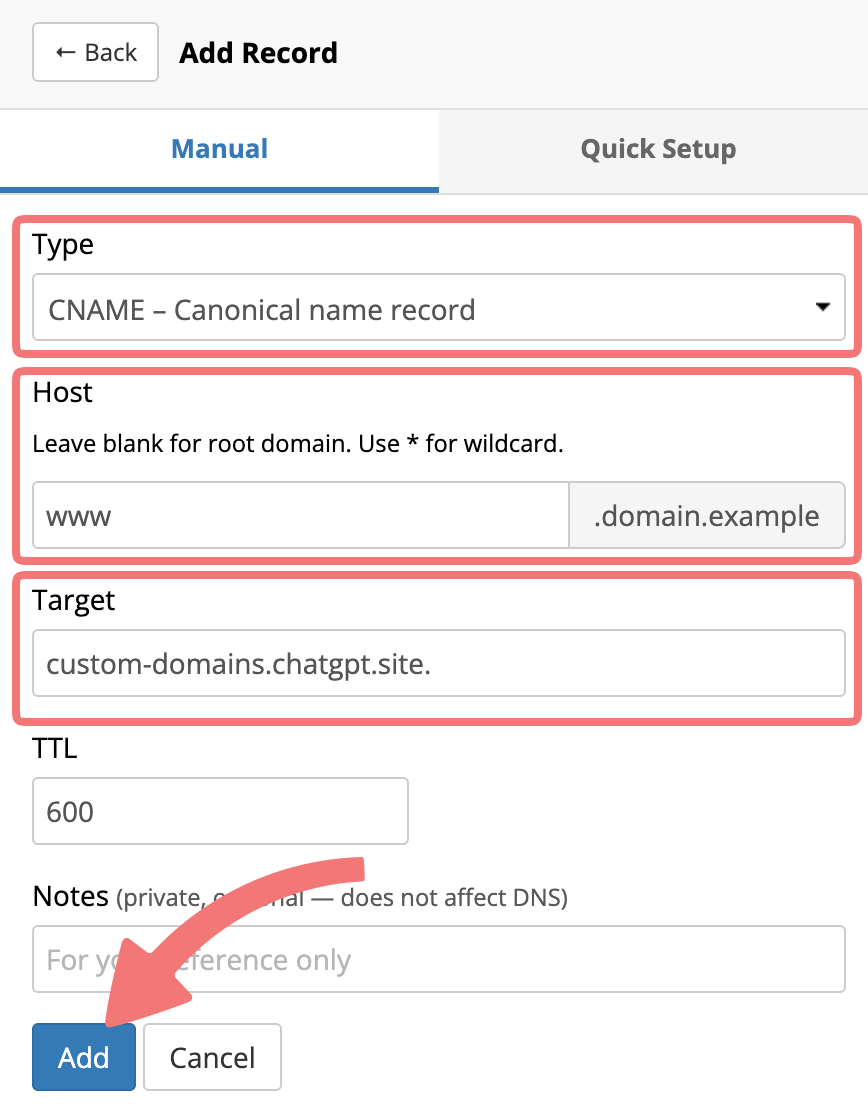
Under the "Type" option, select "CNAME: Canonical name record". For the "Host" field, type in www (without anything before or after it). We automatically add your domain name at the end of the "Host" field, so you don't need to type it out yourself. Finally, in the "Target" field, paste the text you copied in the previous step.
Once you've done all of that, your record should be formatted like this:
After you've entered the required info, click on "Add" to finish adding the record to your domain. If the values disappear after a moment and you don't see any error messages, you've done everything correctly! Now we can move on to the next record.
8
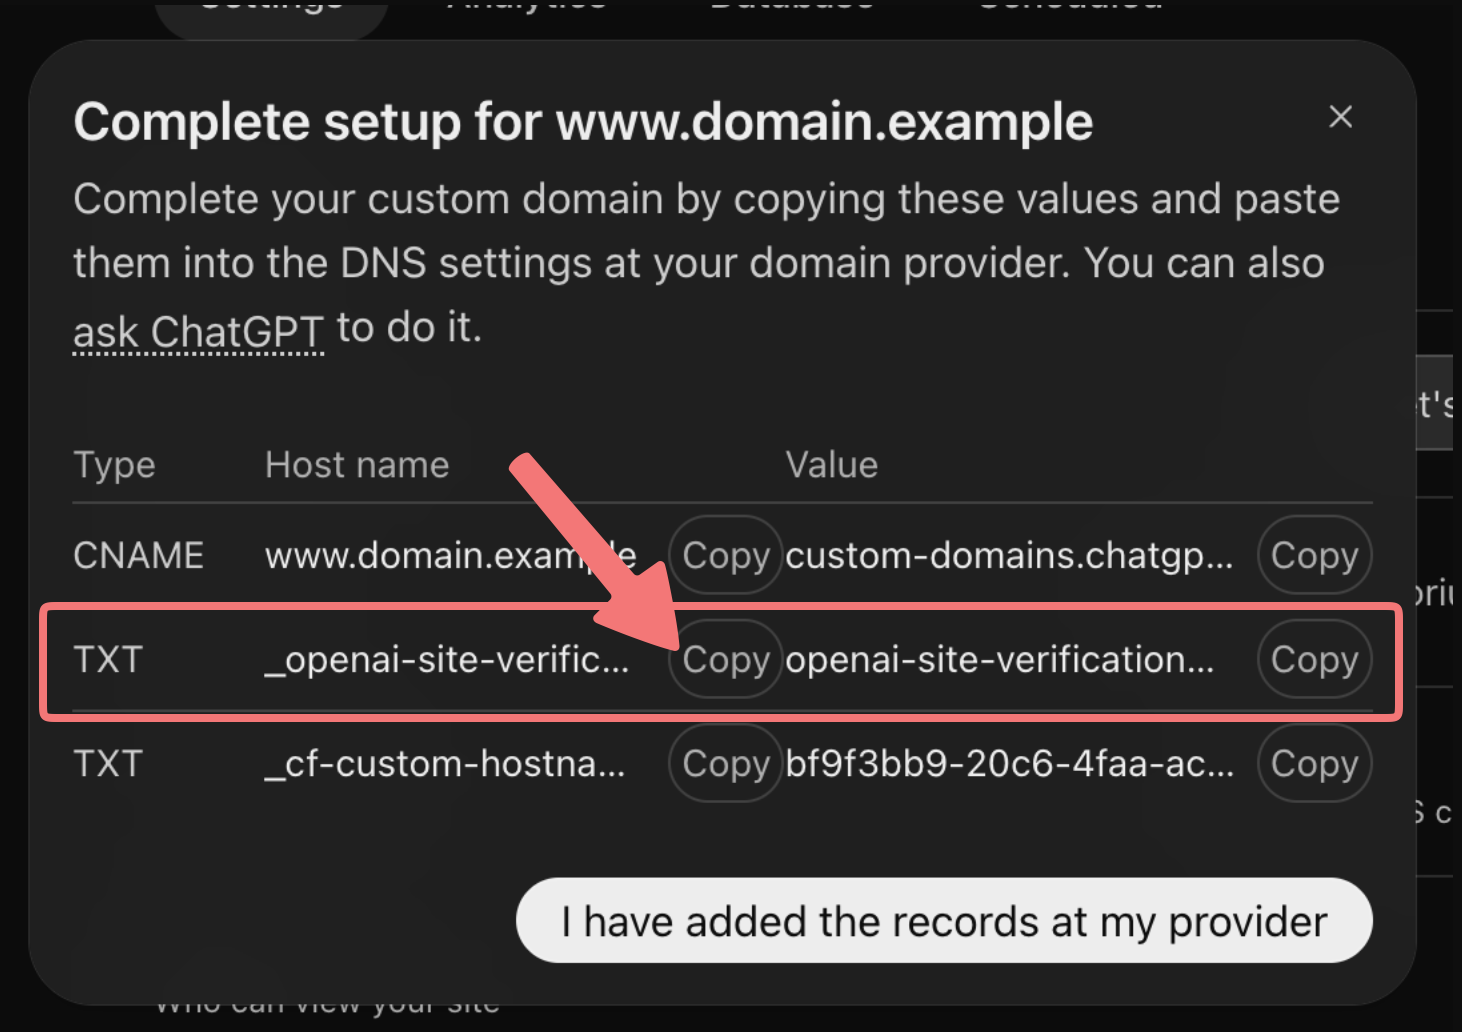
Swap back over to ChatGPT Sites again. Note that the next two records have a type of "TXT". Under the "Host" column for the second record, click on the Copy button to copy the host name.
9
Swap over to Porkbun again. On the same menu as before, change the "Type" option to "TXT - Text record".
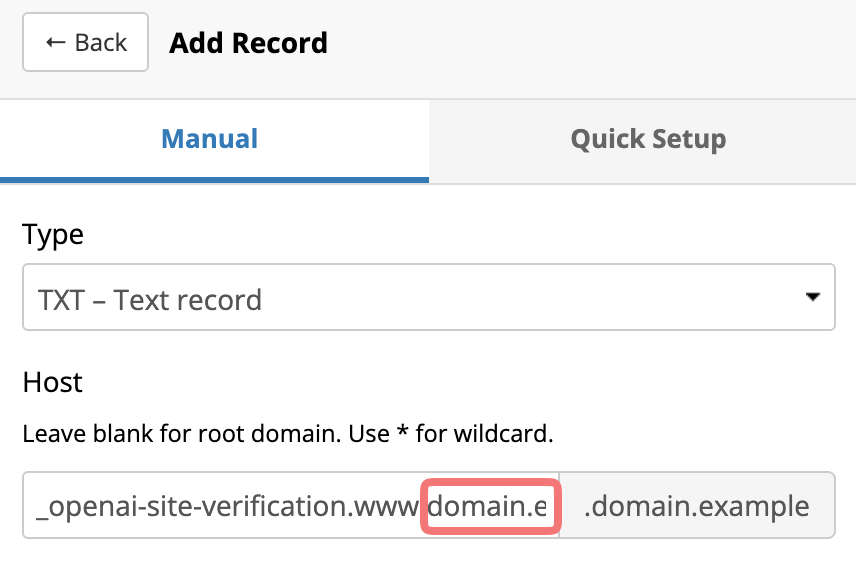
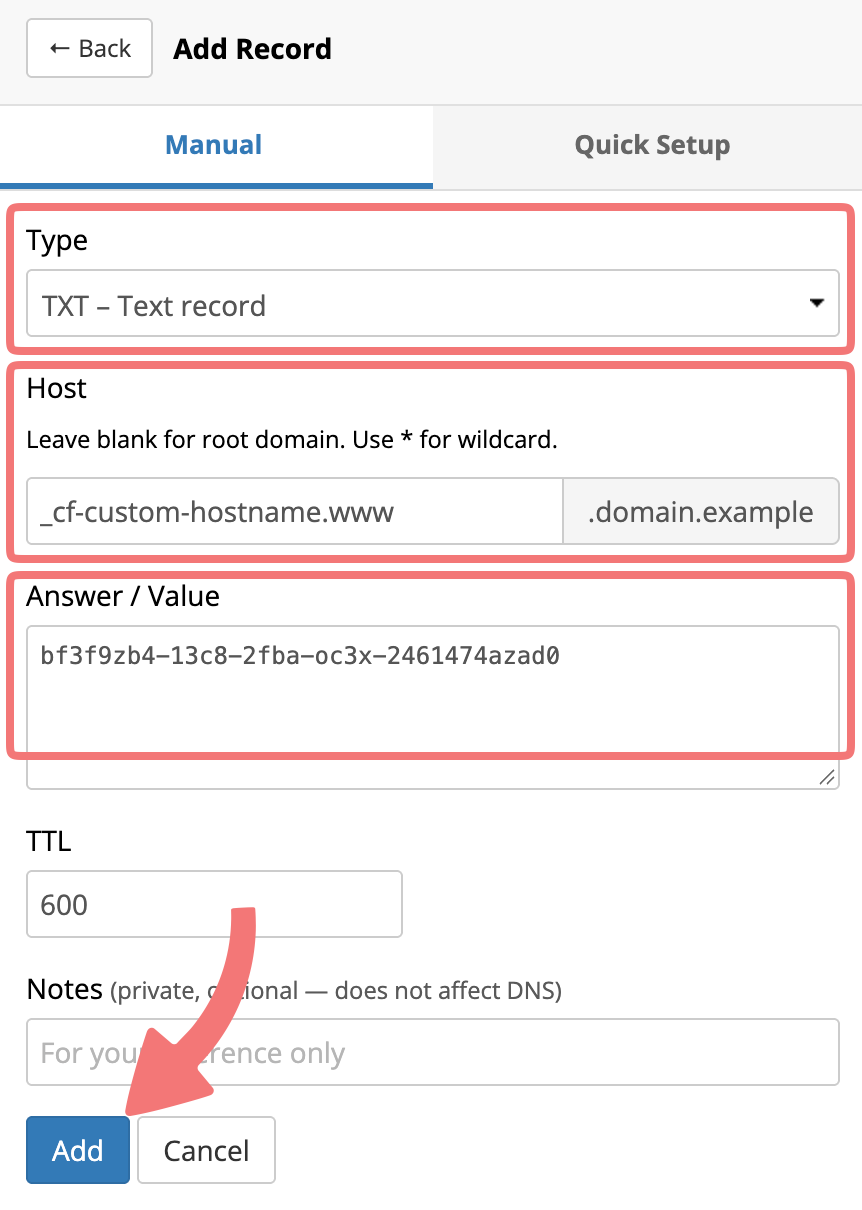
In the "Host" field, paste the host name that you just copied in the previous step, and note that your domain name is included at the end:
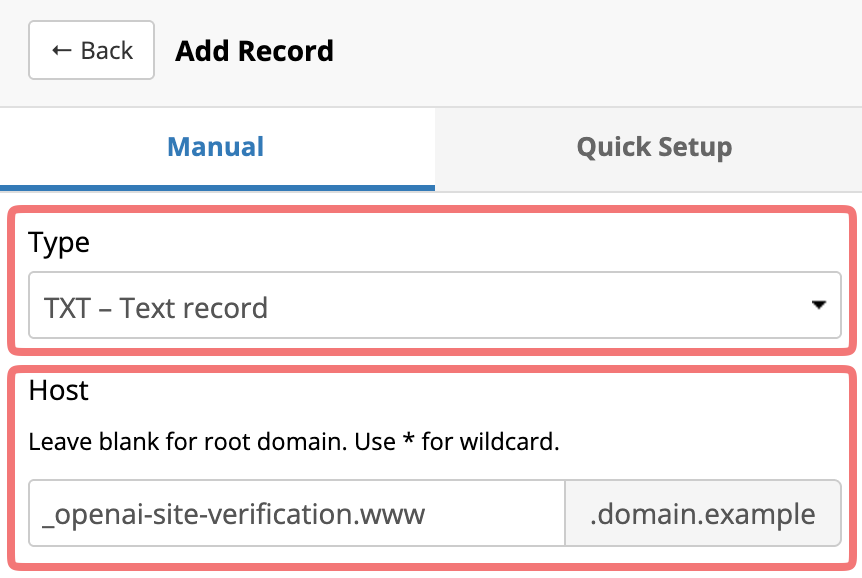
This isn't going to work, since we automatically put your domain name at the end when you create records. To format this record correctly, remove everything after "www" in the Host field. The Host field should end up looking like this:
Switch back to ChatGPT Sites. This time, under the "Value" column for the second record, click the Copy button.
Swap back over to Porkbun again, and paste that value into the "Target" field. After all of that is done, your record should be formatted like this:
Click on "Add" to finish adding the record to your domain. We're almost done!
10
You get the idea by now. You'll need to switch back over to ChatGPT Sites one more time and copy the "Host name" and "Value" for the final record, then add it to your domain.
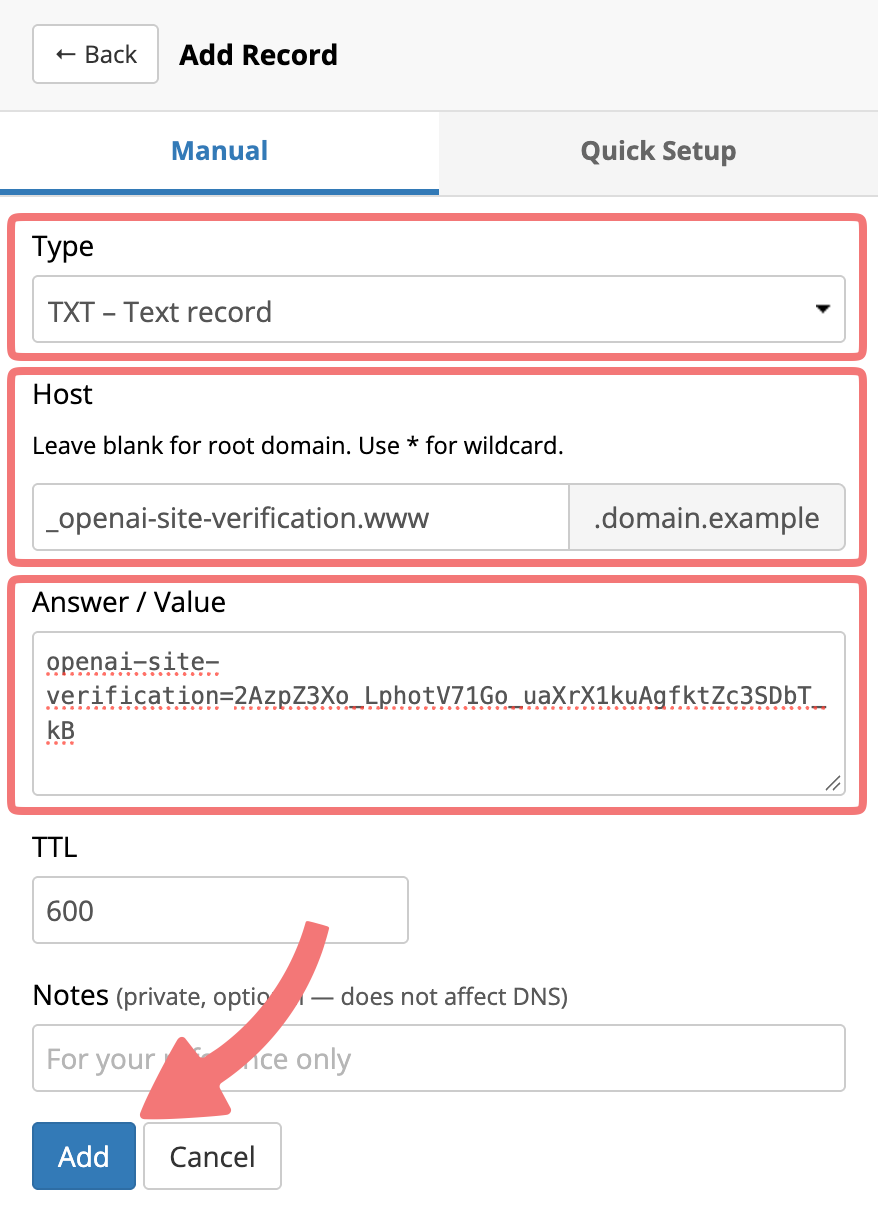
Again, the "Host name" will have your domain name attached to the end automatically, so remove anything that shows up after "www" to properly format the record. When you've finished, your final record should be formatted like this:
Click on "Add" to finish adding the final DNS record. The difficult part is over!
11
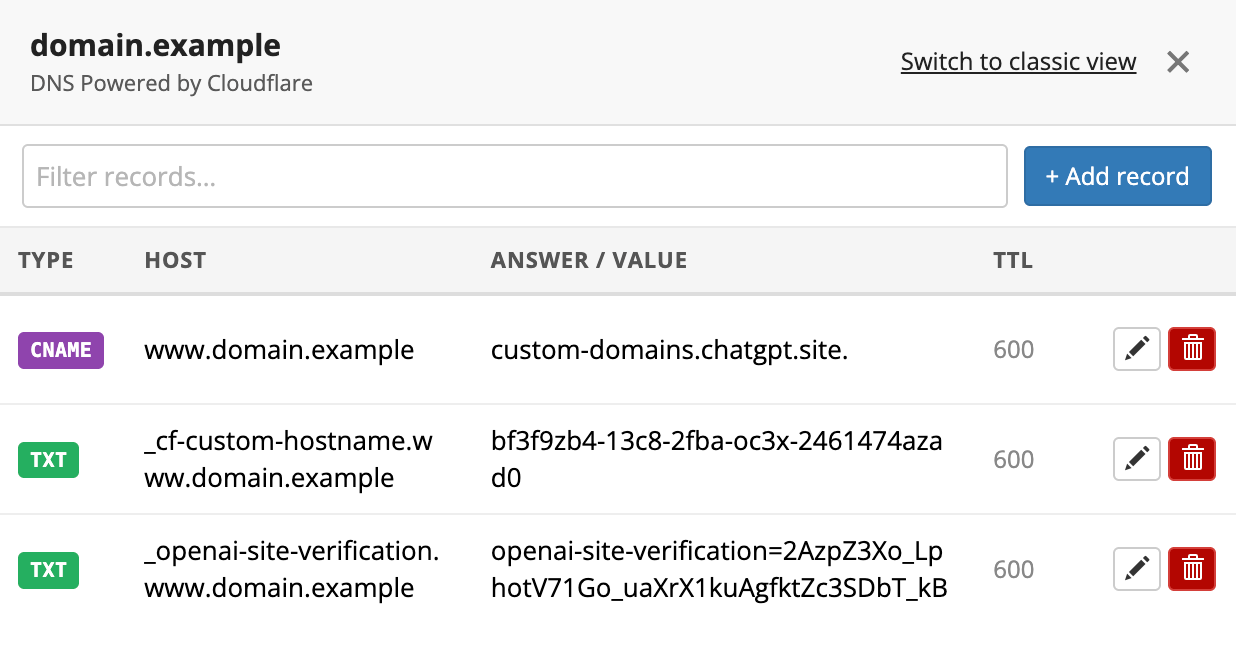
To make sure everything looks correct, after adding your records click on the "Back" button at the top of the menu to go back to the list of your domain's DNS records. You should now see the three records you created in the list!
Warning
In the "Host" field you should only see your domain name show up once in each record. If you see your domain name twice, you didn't remove the unnecessary part of the Host name from what ChatGPT Sites provided you, per the instructions above. Take another look at how those should be formatted.
12
Time for the moment of truth. Swap back over to ChatGPT Sites one more time, and click on "I have added the records at my provider".
13
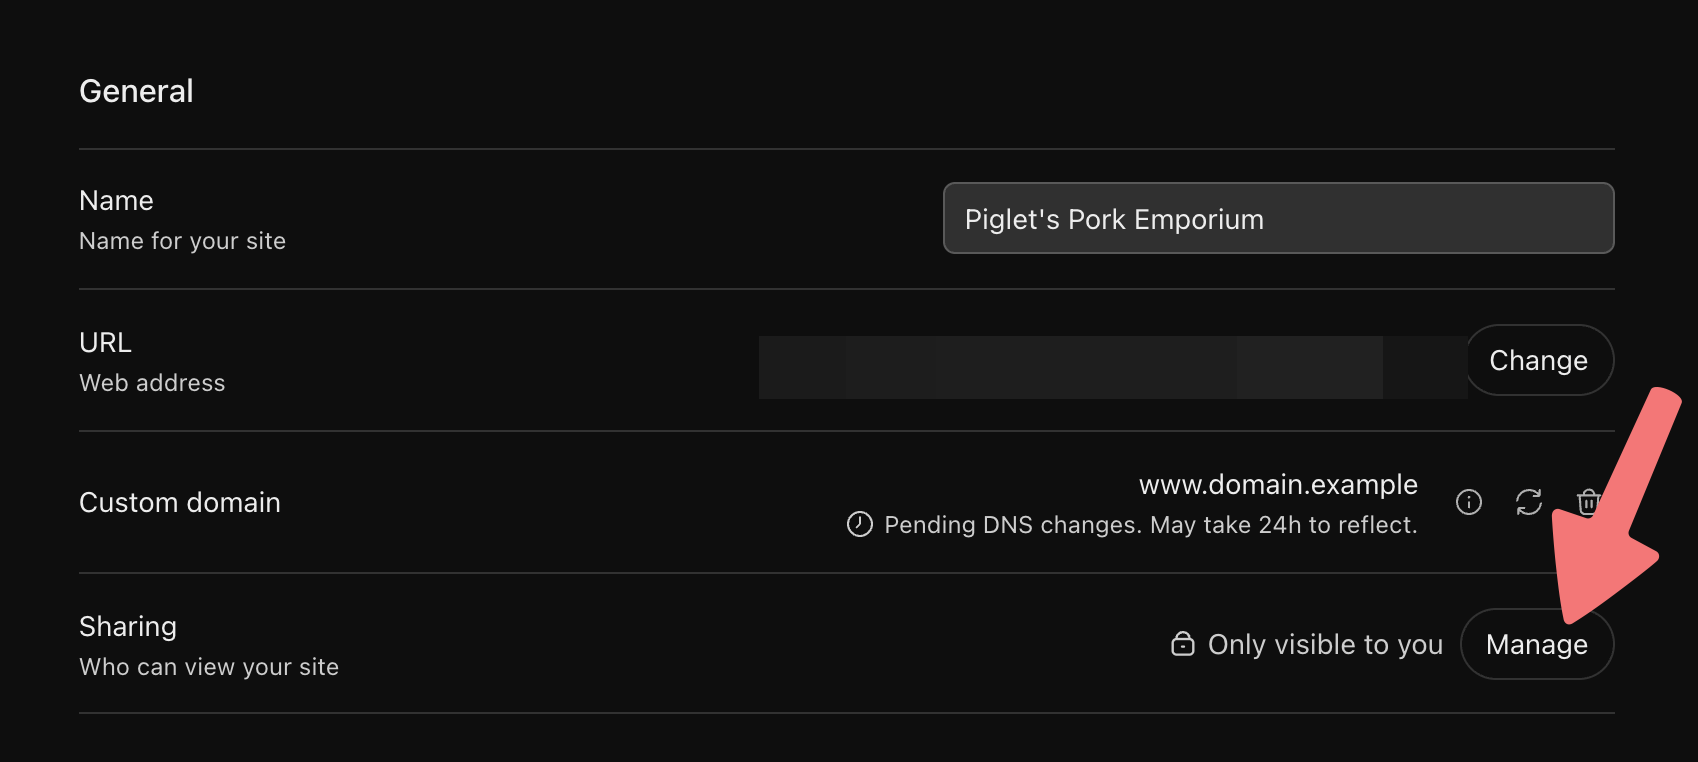
The window will disappear, and back on the Settings page you'll see your domain name in the Custom domain field, and a message stating the DNS changes are still pending.
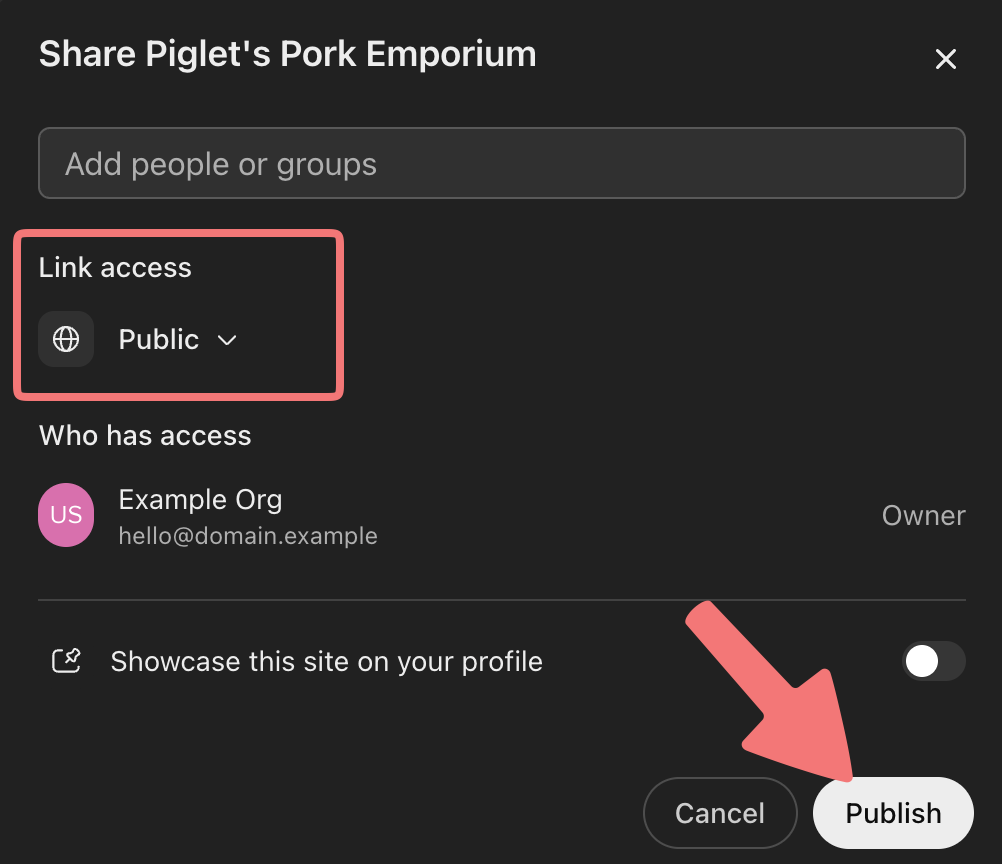
Make sure that you change the "Sharing" option from "Only visible to you" to Public, then publish the site one more time.
14
Now you just need to wait. These DNS changes can sometimes take up to 24 hours to fully process, but usually it only takes an hour or two. You can check back on the status of the domain connection on the Settings page, and it will eventually show the domain name with no other statuses, confirming everything is connected:
Congratulations! You've successfully connected your domain to the website you built on ChatGPT Sites, and within the next hour or two you should be able to enter your domain name in your browser and see the website. Also, in the future whenever you publish new changes to the site, they'll show up on your domain automatically.
If you want to get your website working without having to type "www" before it every time, the next section will show you how that's done. It's optional, but we recommend setting that up too.
Bonus: Get the root domain working
Now that your website is up and running, you'll notice that it's only accessible when you type "www" in front of the domain name. If you want it to work on the "root" domain too, we'll show you how to set up a URL forward on Porkbun to accomplish that!
1
Log in to your Porkbun account. Click on ACCOUNT in the top-right corner, then select "Domain Management".
2
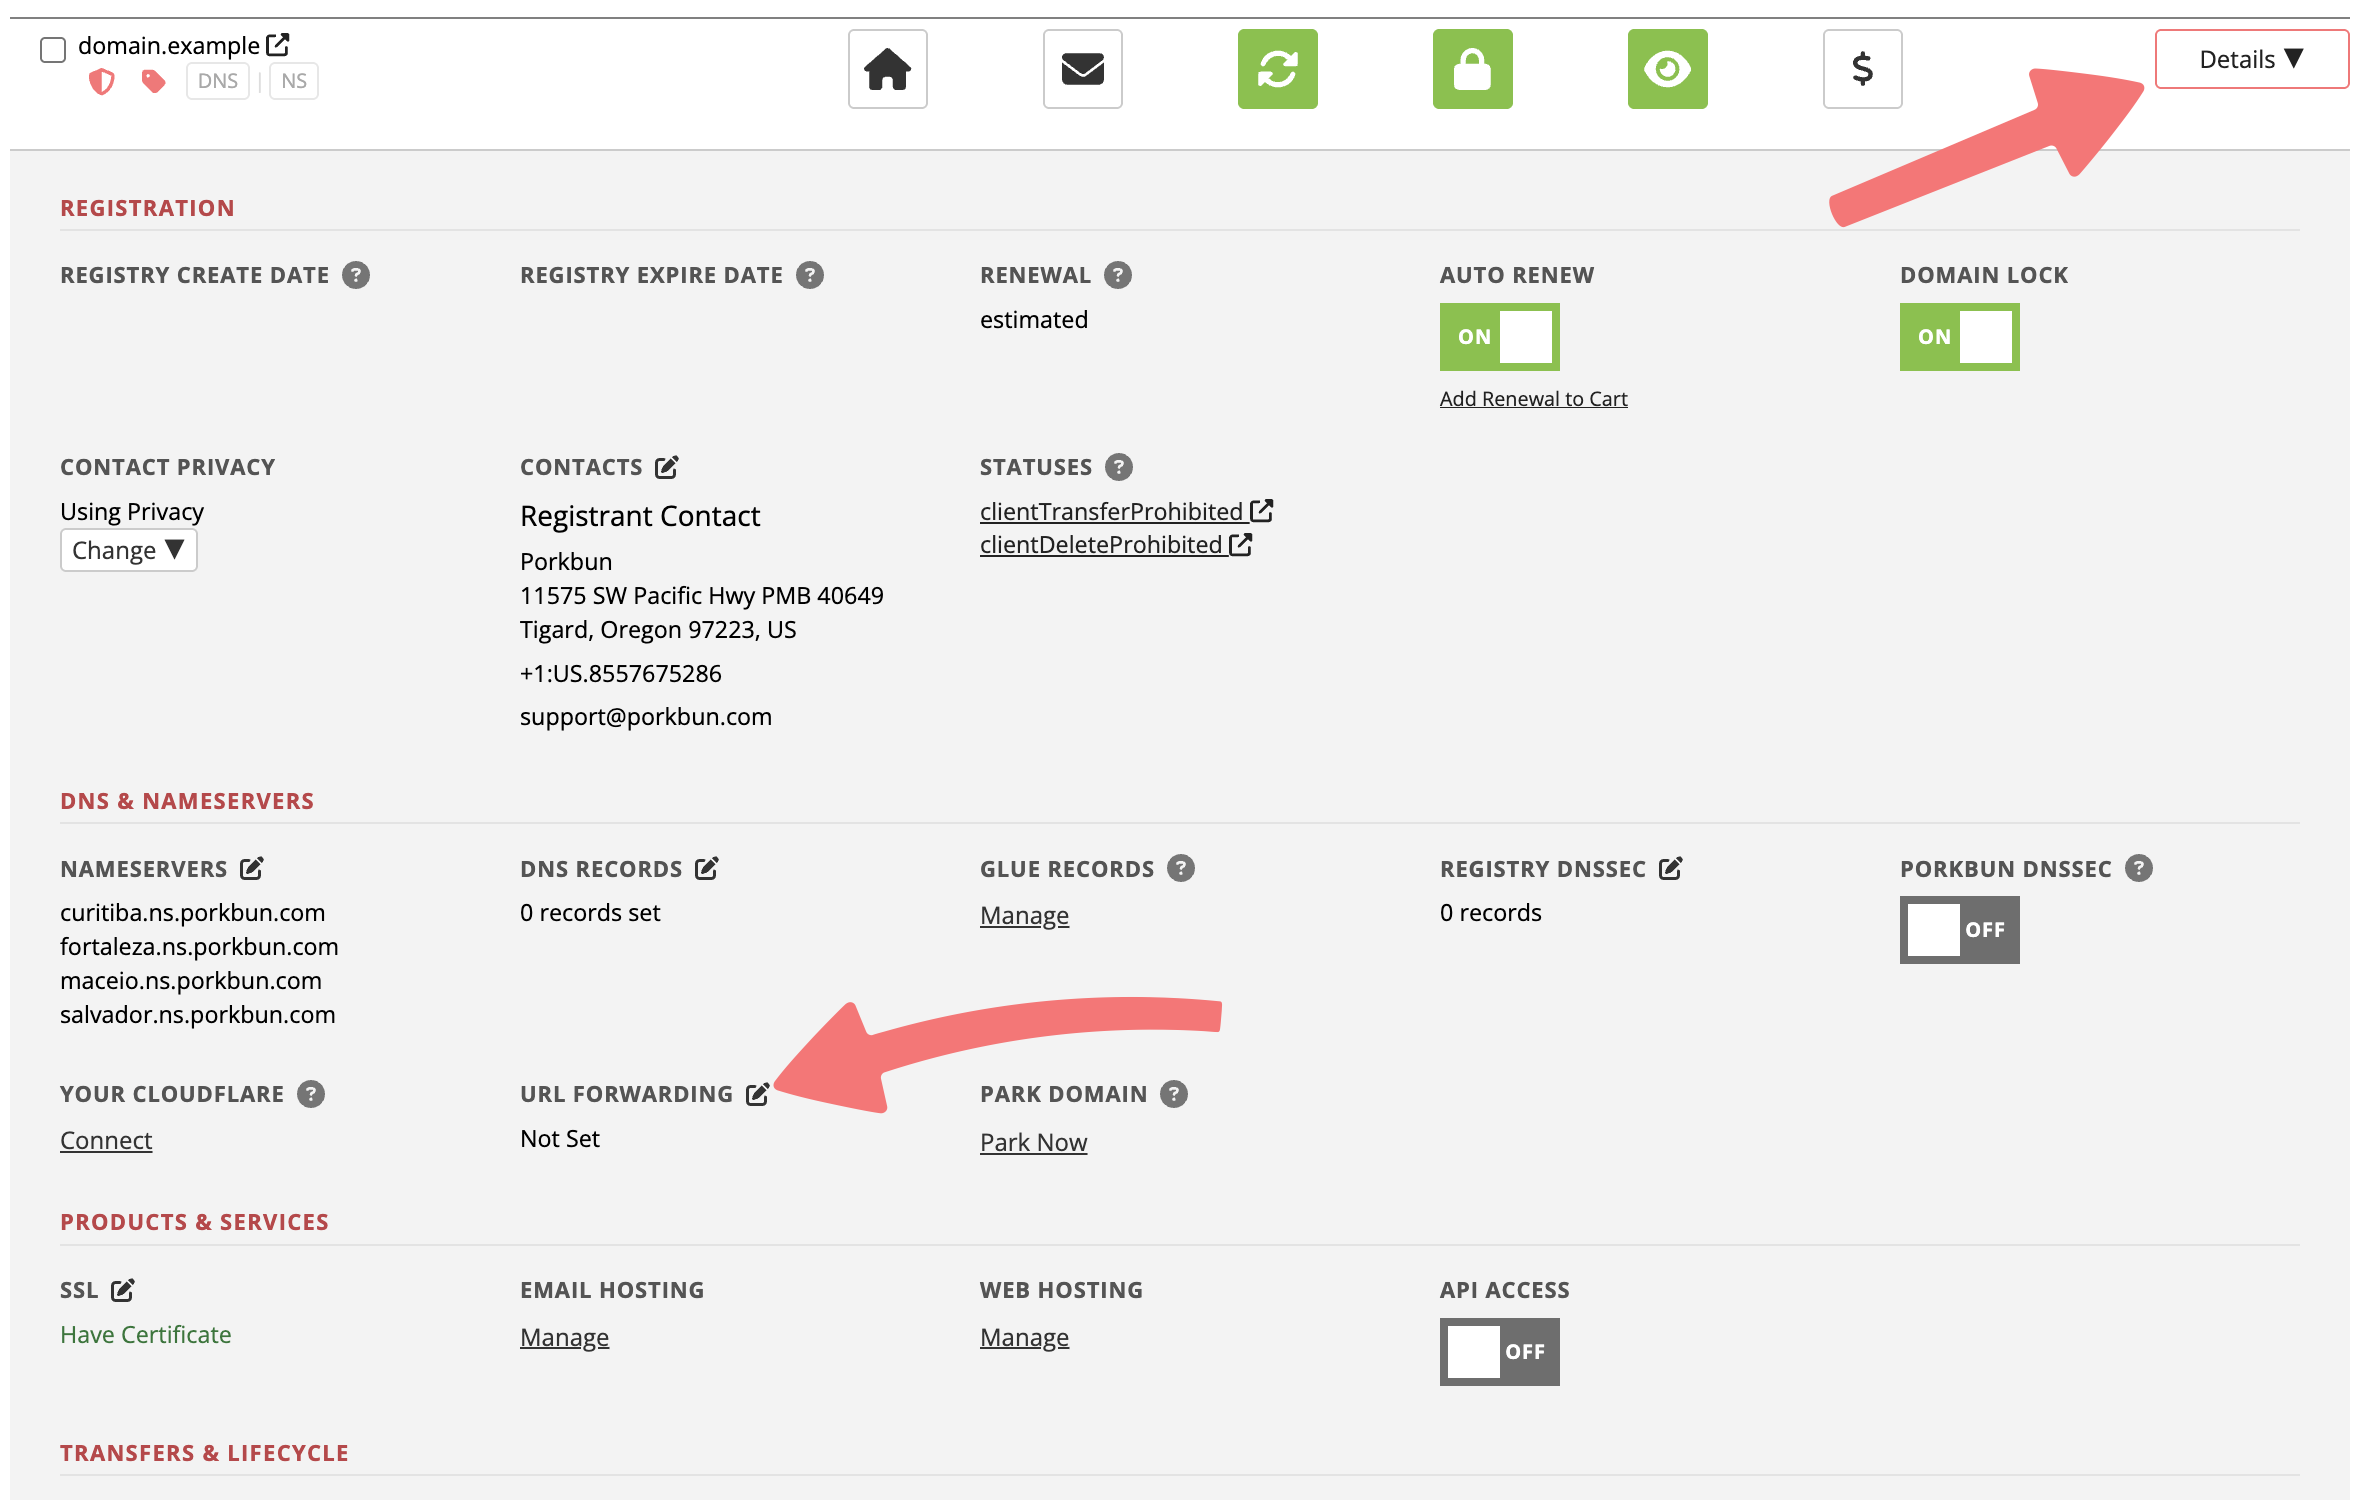
Scroll down to the domain you connected to ChatGPT Sites. All the way on the right side, click on the "Details" button to open a menu with more options.
3
Look for the "URL Forwarding" option, then click the edit icon to open a new menu.
4
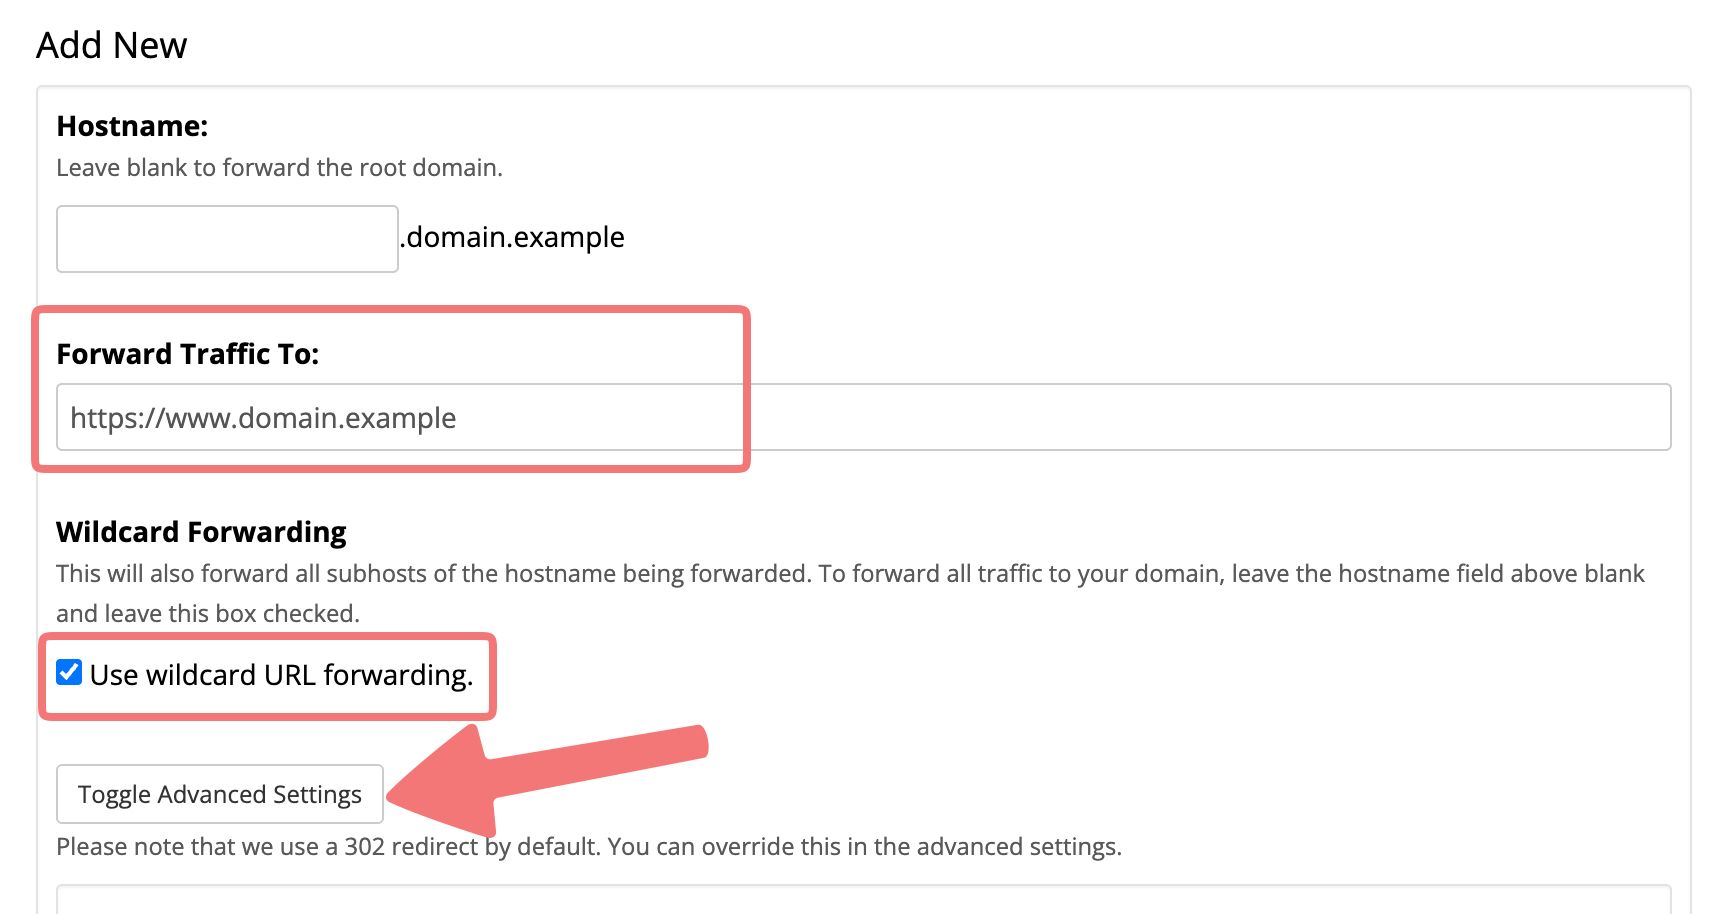
The "Edit URL Forwarding" menu will appear. You'll want to leave the "Hostname" field blank since we are forwarding your root domain. In the "Forward Traffic To" field, enter your full domain name including https://www to make sure the forward works correctly.
Enable the "Use wildcard URL forwarding" option, then click on Toggle Advanced Settings to view more options.
5
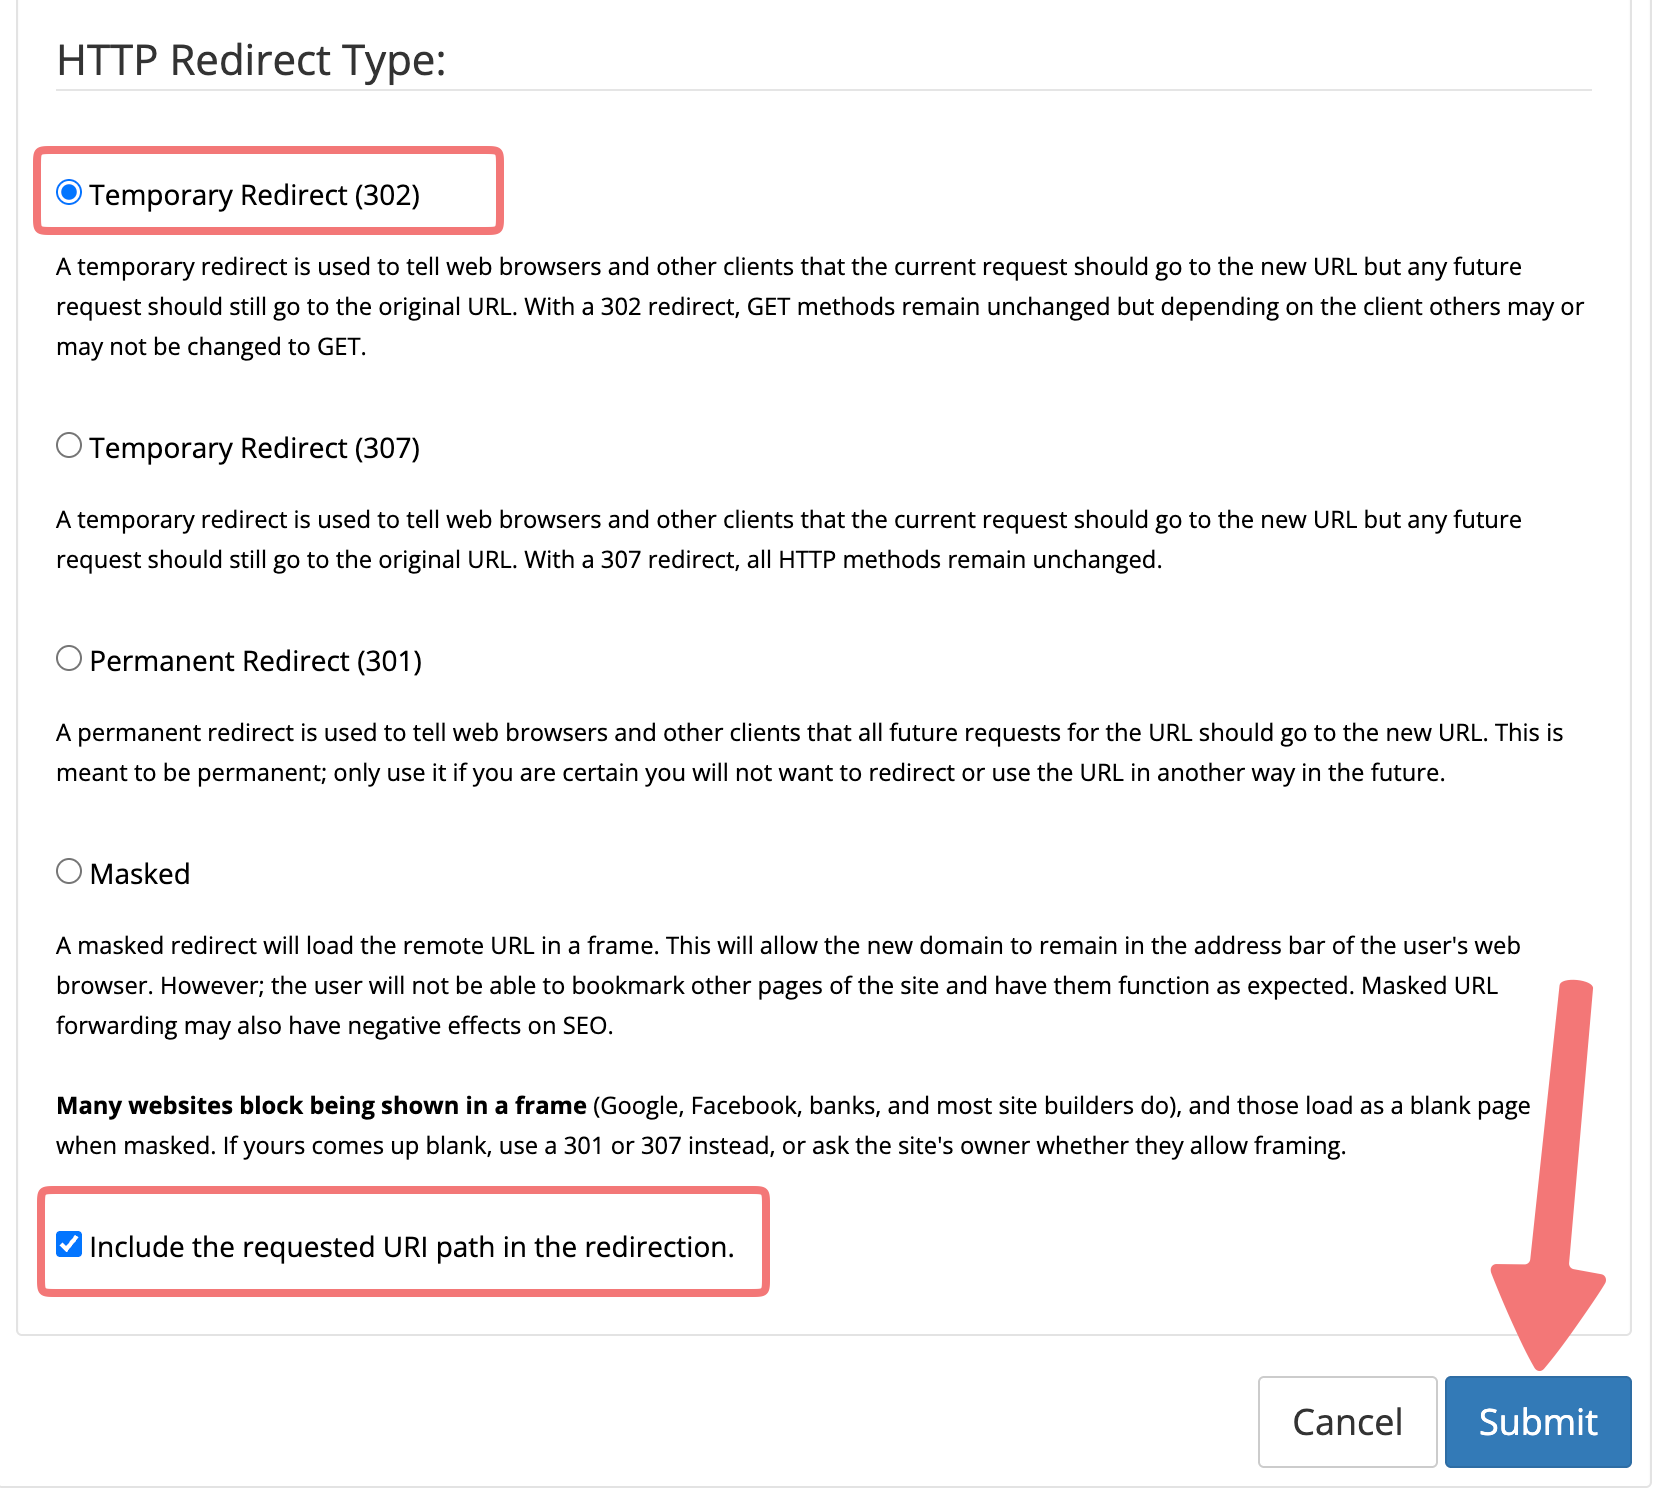
Scroll down to view more settings. We typically recommend leaving the redirect type at the default "Temporary Redirect (302)" value, but you can change it if you want to.
Make sure to check the "Include the requested URI path in the redirection" box too. This will make it so the redirect works properly even if you go to a specific page on the site. So domain.example/about would properly forward to www.domain.example/about if this setting is enabled.
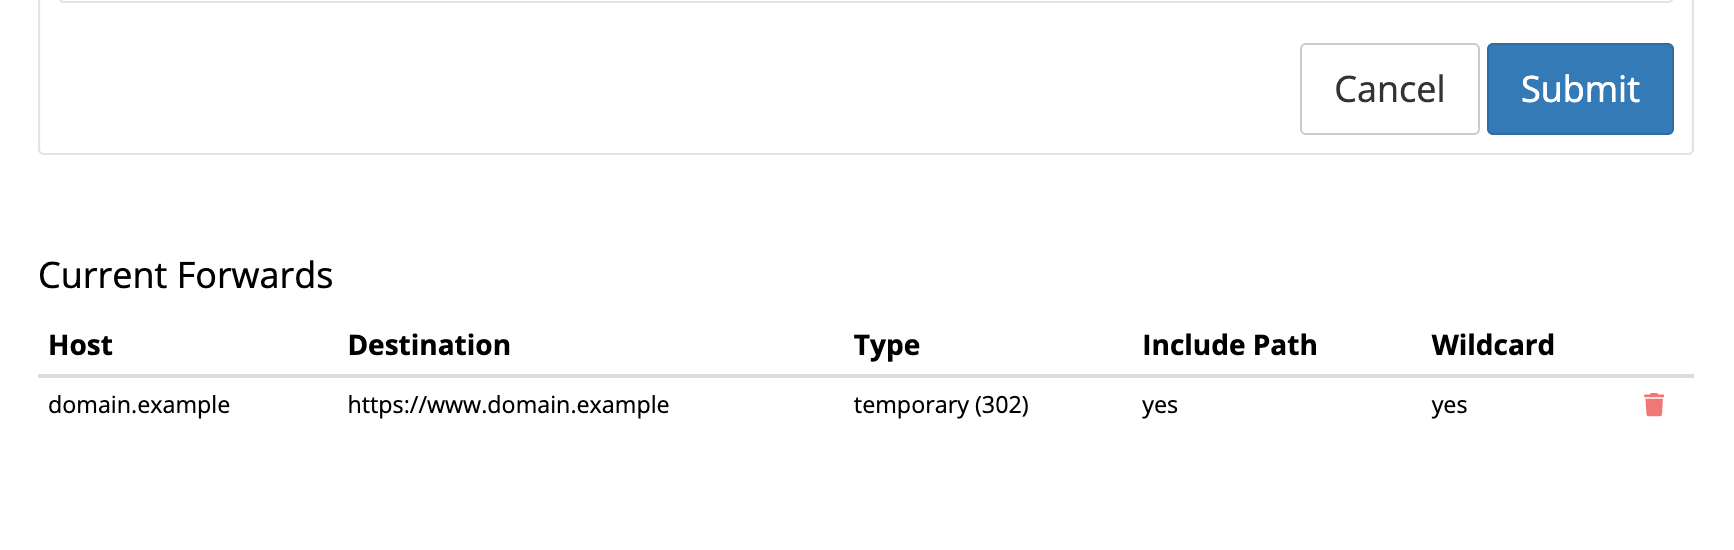
Once you've set it up as needed, click on "Submit". Afterwards, the bottom section of the menu will show the forward you created successfully.
6
If your domain didn't already have an SSL certificate from Porkbun attached to it, our system will now generate one, and after that's complete your domain's redirect will work with a secure connection. For more information on our SSL certificates, check out our guide on the subject.
That's it! You've successfully connected your domain to the ChatGPT Sites website, and you set up a redirect to get your root domain working properly too. Feel free to reach out to our support team if you run into any issues with this process.