How to Connect a Domain to Google Workspace Email
If you want to connect the domain you registered on Porkbun to Google Workspace for email hosting, you'll need to update your domain's DNS records to route mail to Google's mail servers. We'll show you how to get it all set up so you can start sending and receiving emails from your domain!
How to start the Google Workspace setup process
The first thing you'll need to do is start the Google Workspace setup tool and enter your domain name that you registered on Porkbun.
1
Go to the Google Workspace setup tool at the following url:
https://workspace.google.com/business/signup
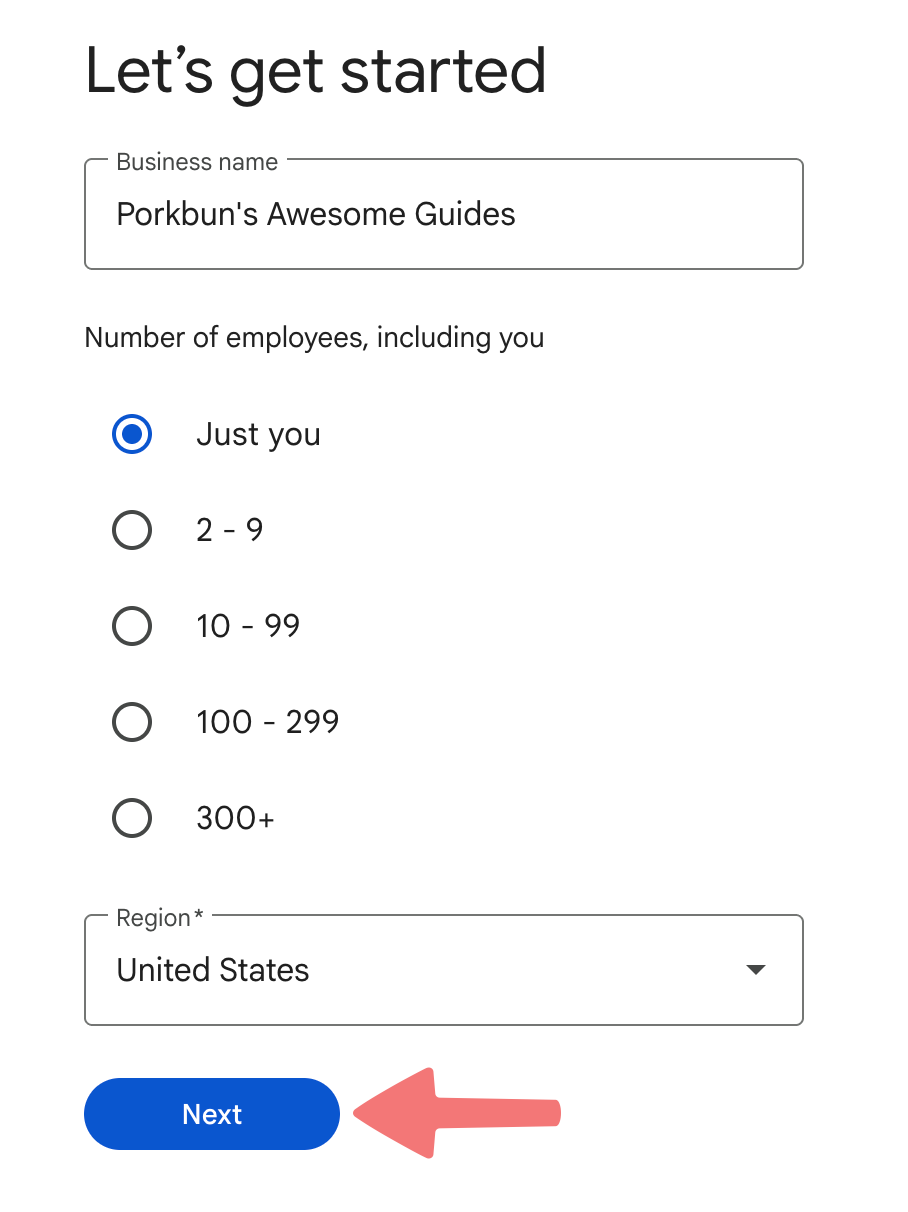
On the first page, enter the name of your business or organization and select the appropriate amount of employees/users based on what you need, then click "Next".
2
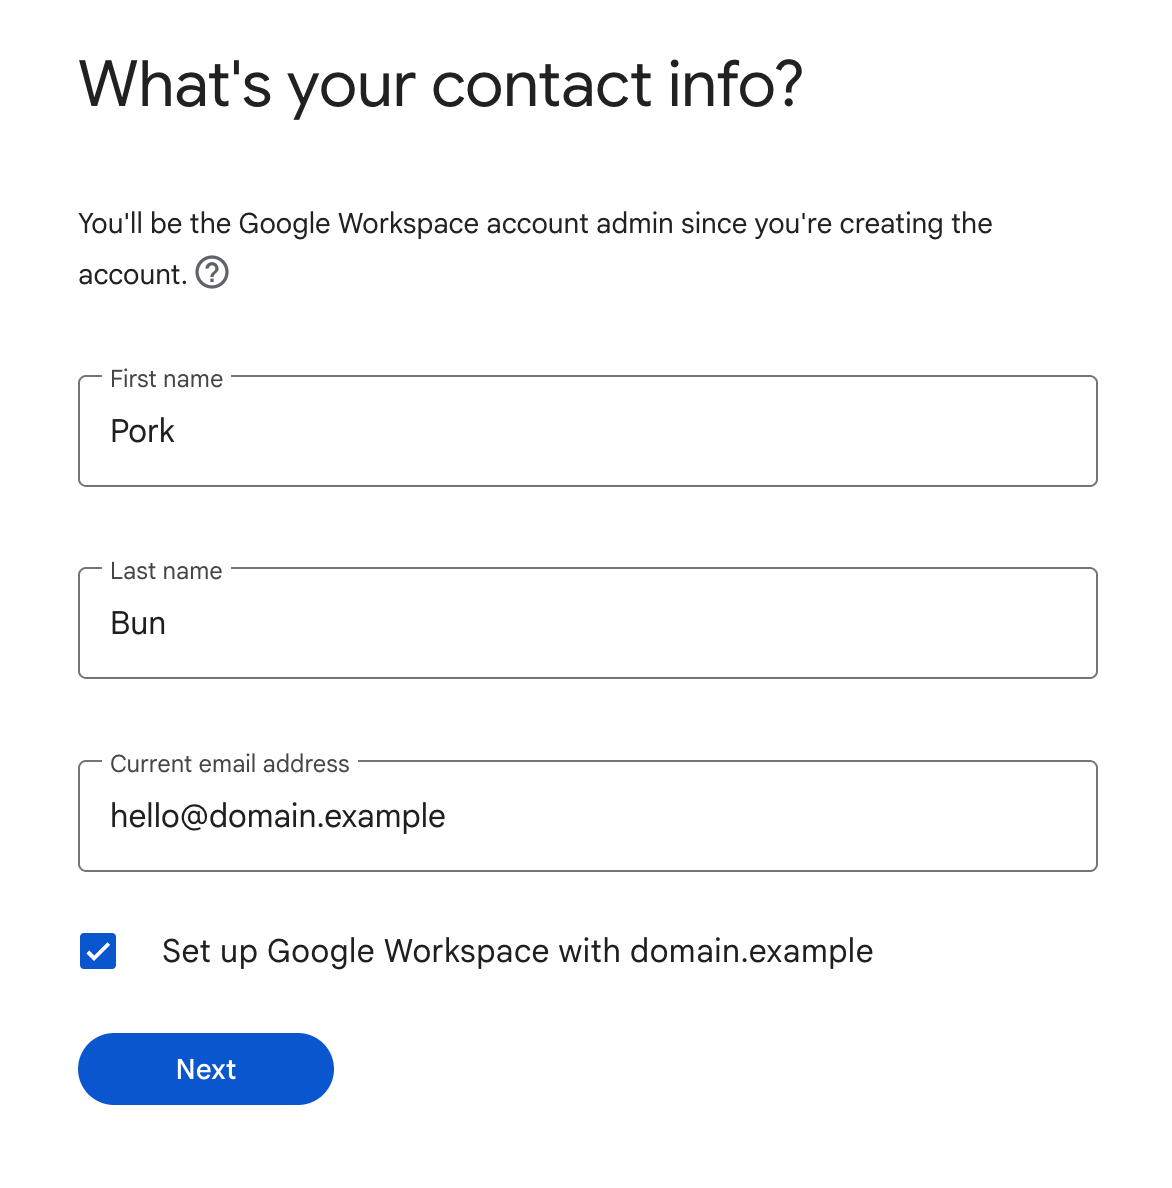
On the next page, enter your first and last name, and the email address you intend to use to manage the Google Workspace account. This can be an existing email address (such as a personal Gmail address) or the new email address you intend to set up on your domain.
Note
It's important to remember what email address you enter on this step. If you get locked out of your Google Workspace account later on, the email address you specify on this step is the one you'll end up having to regain access to.
If you're inputting the new email address that you intend to set up on the domain, make sure to select the checkbox that allows you to set up Google Workspace on that domain, as shown in the screenshot below. After entering all of the required info, click "Next".
3
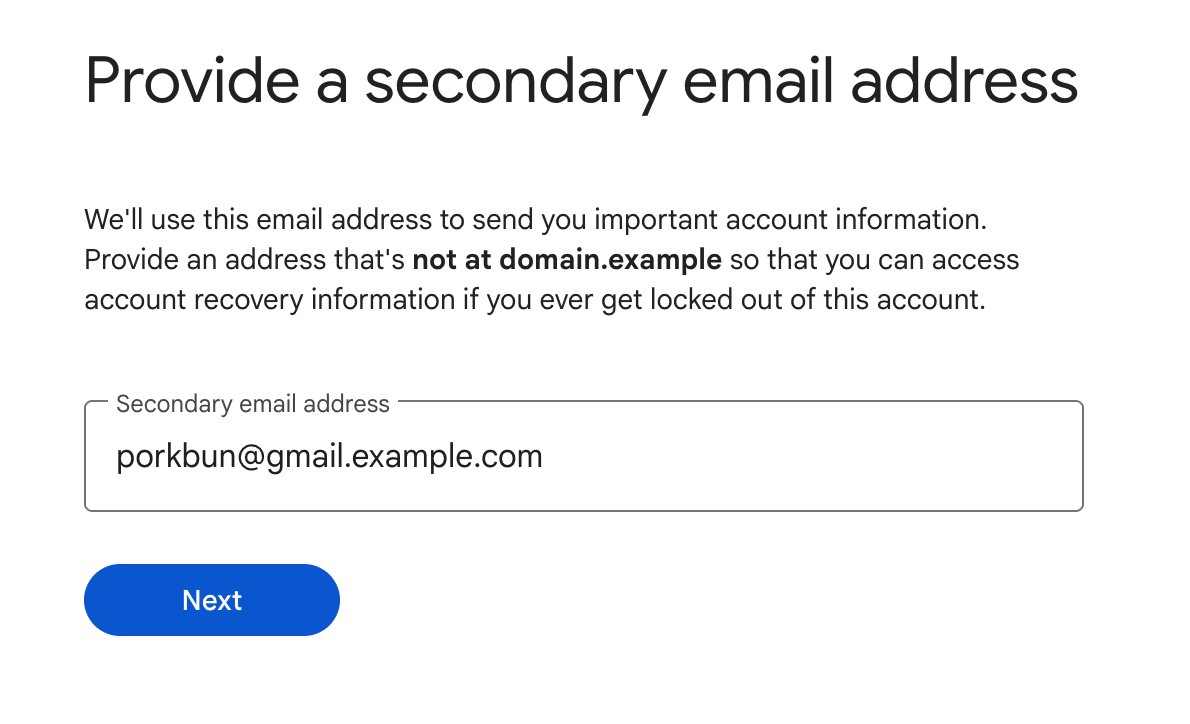
If you entered a new email address that you're setting up on the domain, the next step will ask you to supply a secondary email address. We highly recommend using a personal email address of some kind (Gmail, Outlook, etc.) for this step, since it's important to have an accessible email address available in case you ever have to recover your account.
Enter your secondary/backup email address, then click "Next".
4
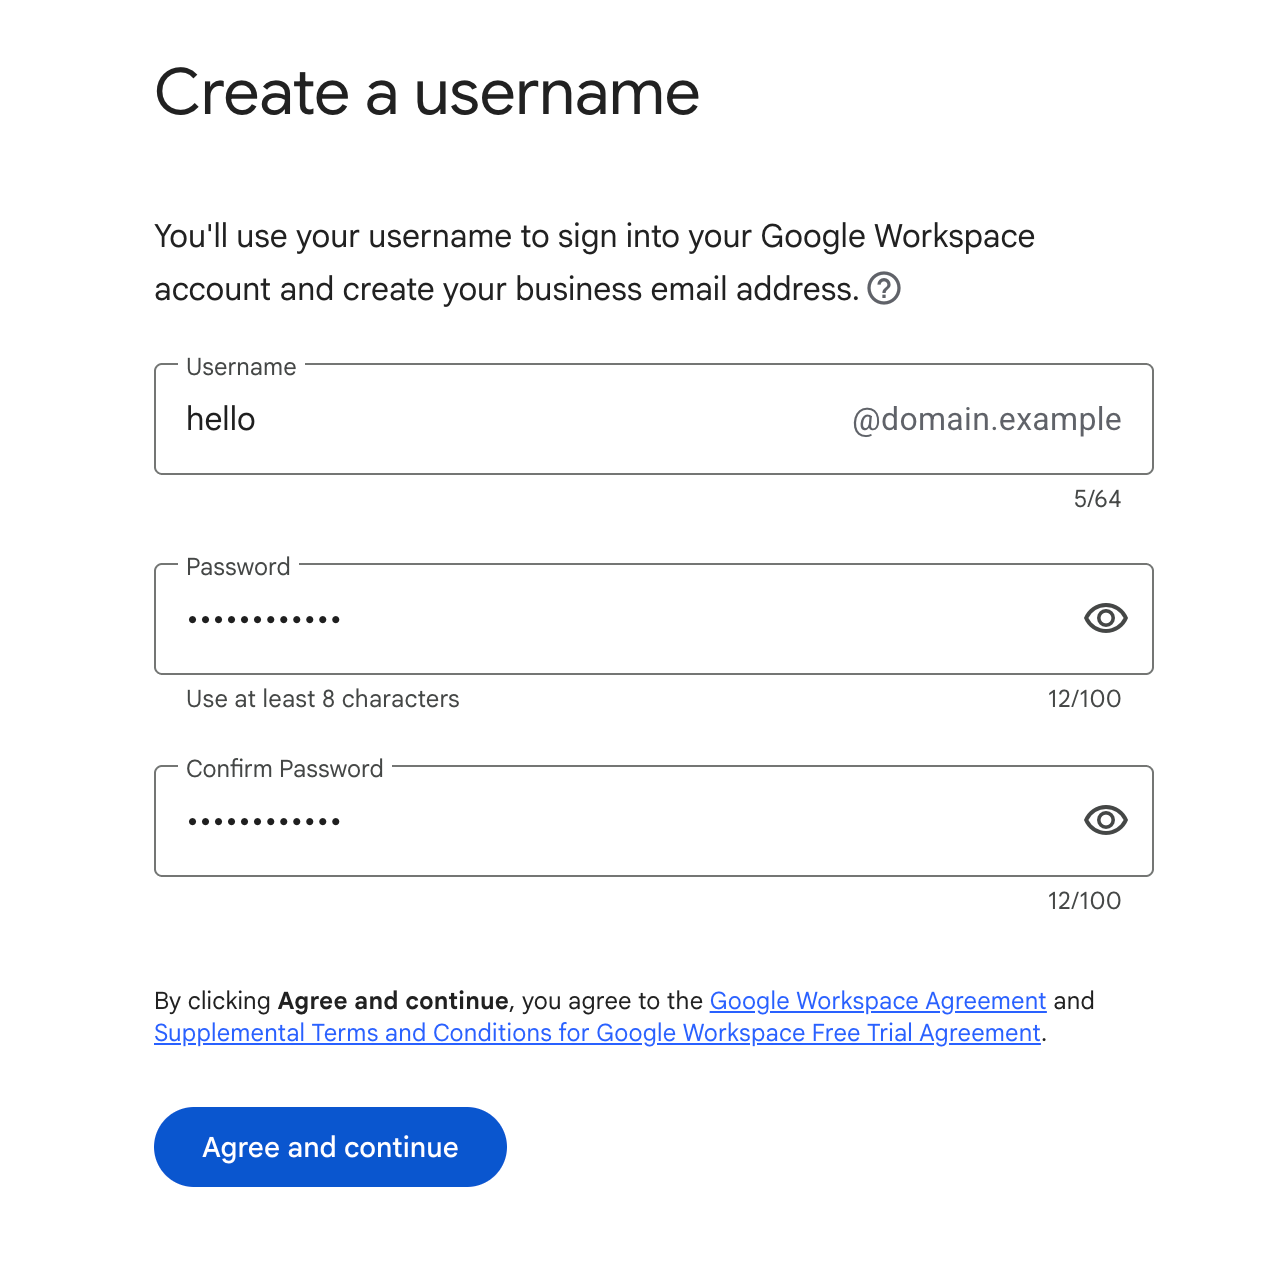
On the next page, you'll be prompted to create a "username" for the account. We recommend inputting the same email address you entered as the "current email" address in step 2. This ensures you'll use the email address on your domain as the login email address for Workspace, keeping everything simple.
Enter the email you'll use to log in to Workspace, and create a password for the account, then click "Agree and continue".
5
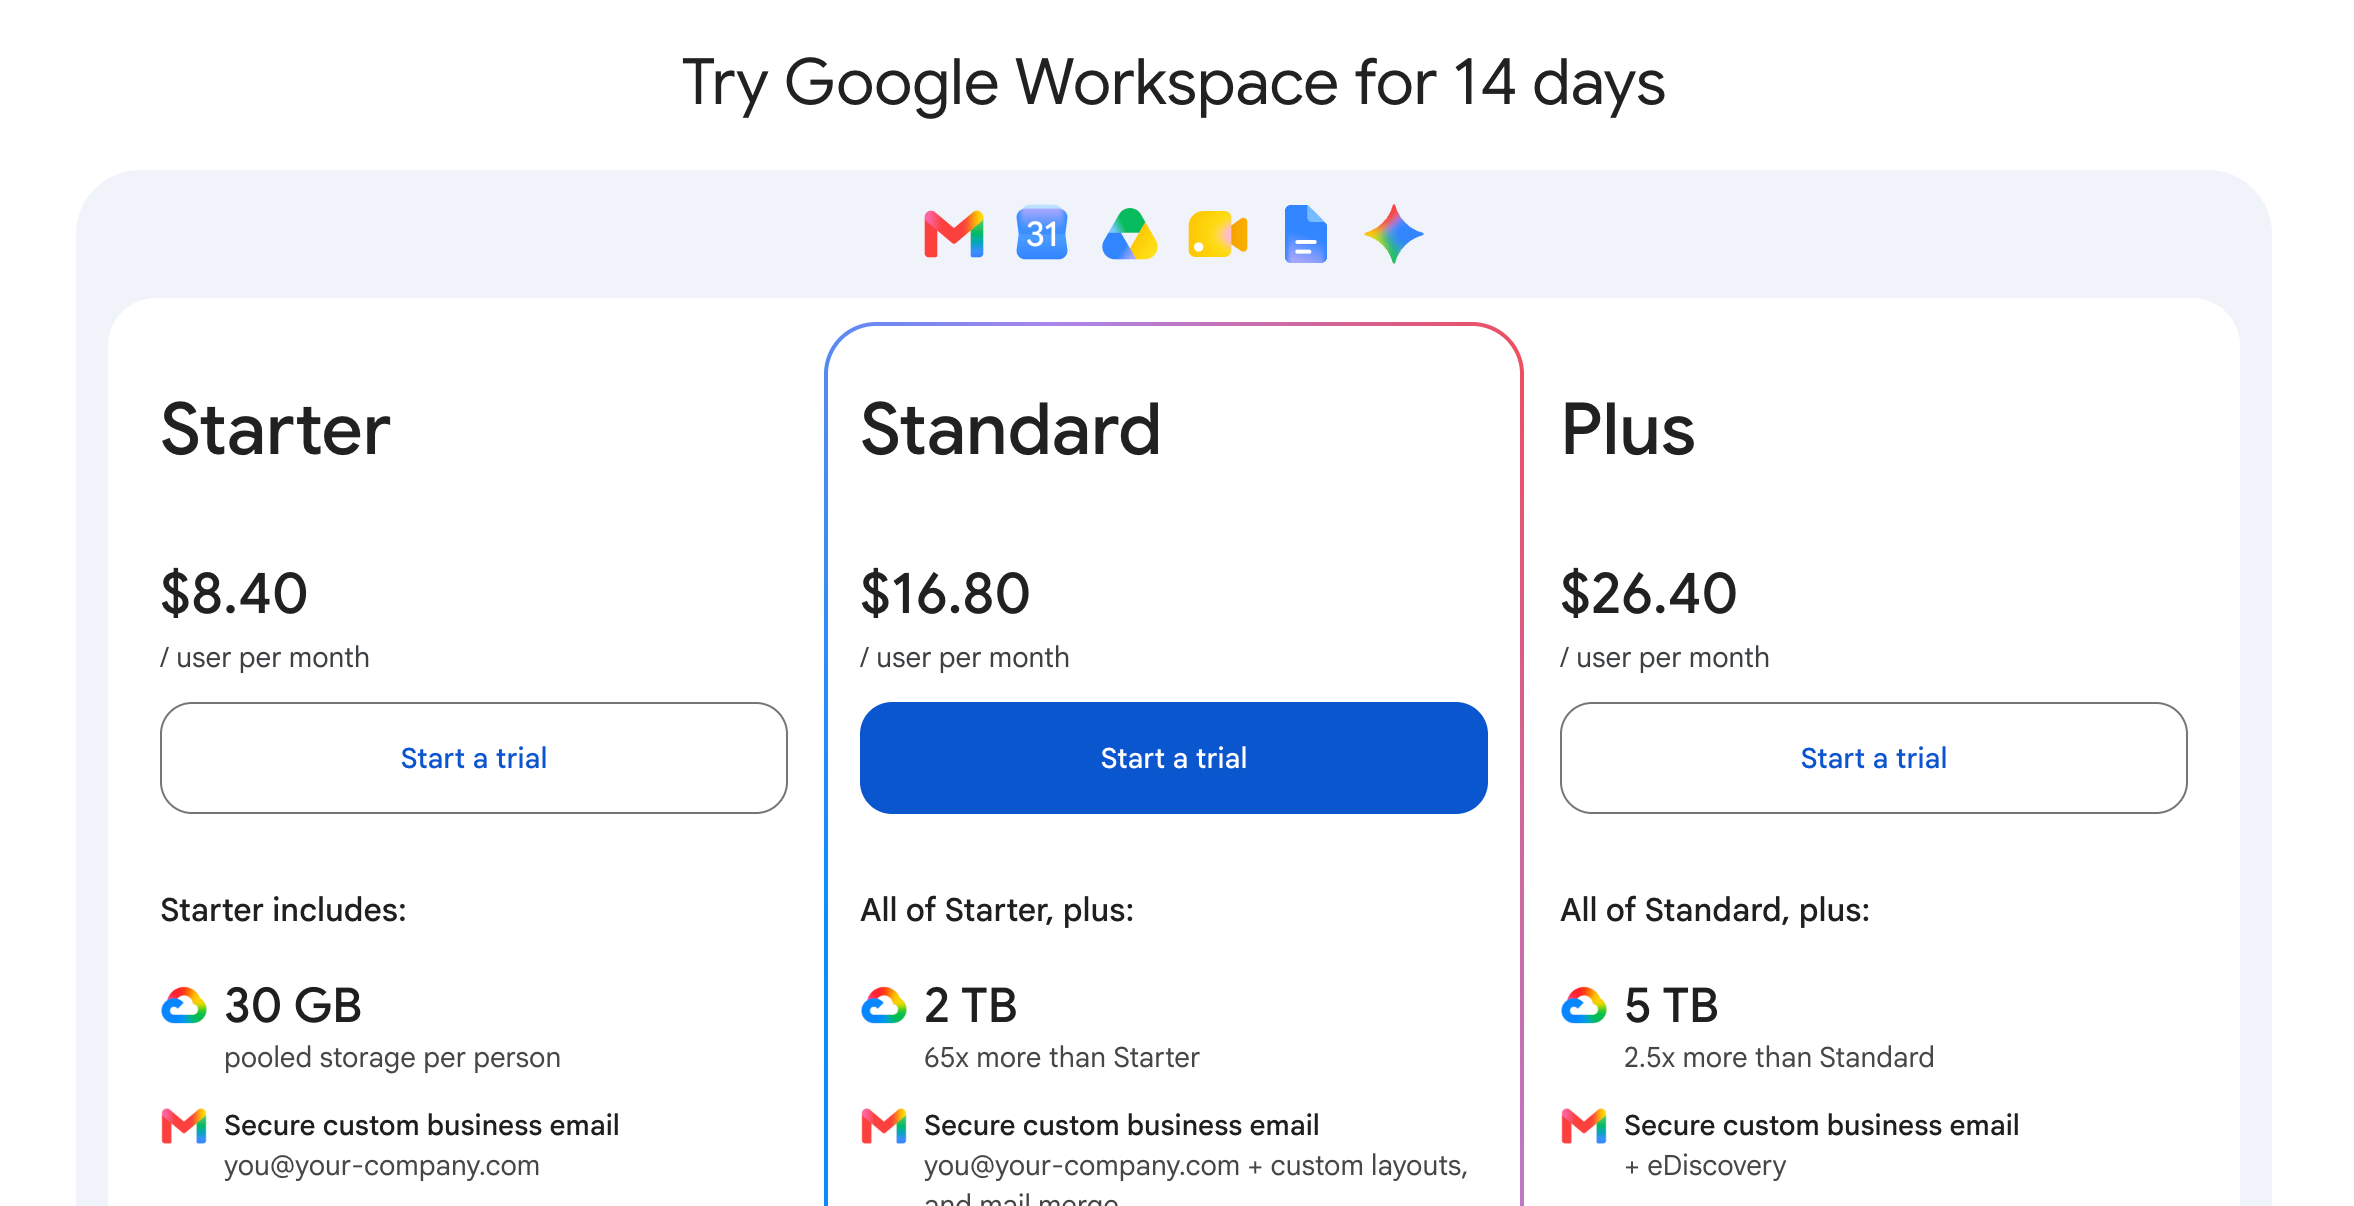
The next page will allow you to choose a plan for your email hosting service. If you only see one option on this page, you can scroll down to the bottom and click "Compare plans" to see all of the available options. Choose the plan you want to set up, and then click on "Start a trial" to continue.
6
On the next page you will be prompted to enter your contact details and to save a payment method for your account. Be aware that your payment method will automatically be charged for the Workspace subscription you chose after the 14 day free trial ends.
7
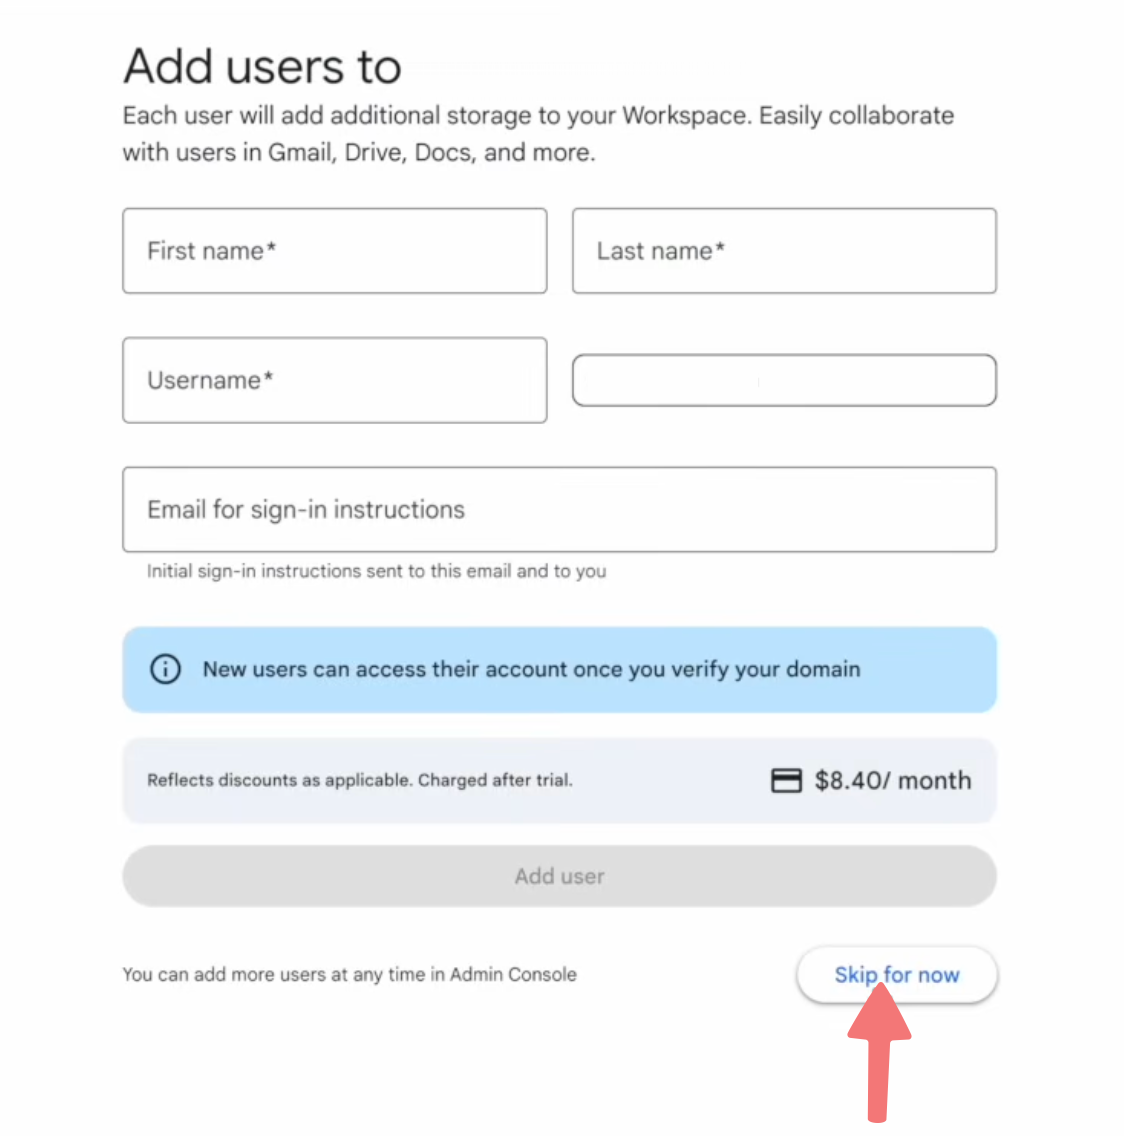
After you've entered your contact and payment info, you will be prompted to add any additional users to your account. If you are setting up multiple users with their own logins (such as employees for your organization), you can set those accounts up now. Just be aware that each user adds an additional fee per month.
If you just want to have a single user, click on "Skip for now".
8
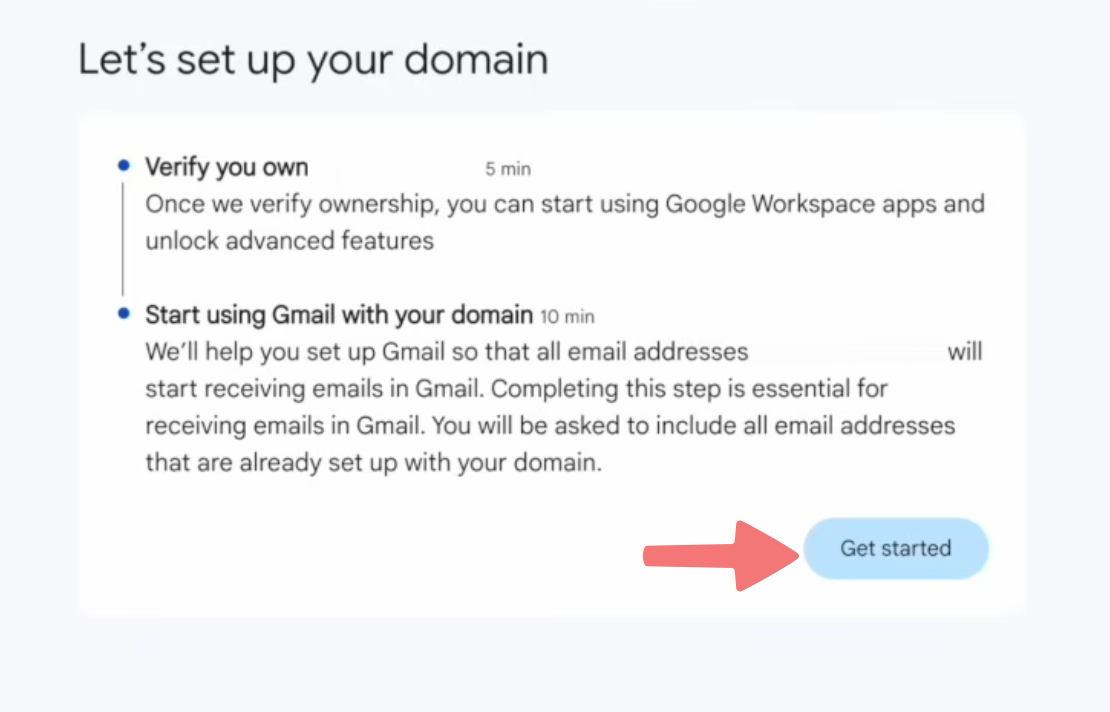
The next screen will indicate that you need to verify the ownership of the domain you're setting up. This is done by adding some DNS records to your domain on Porkbun. Click on "Get started".
9
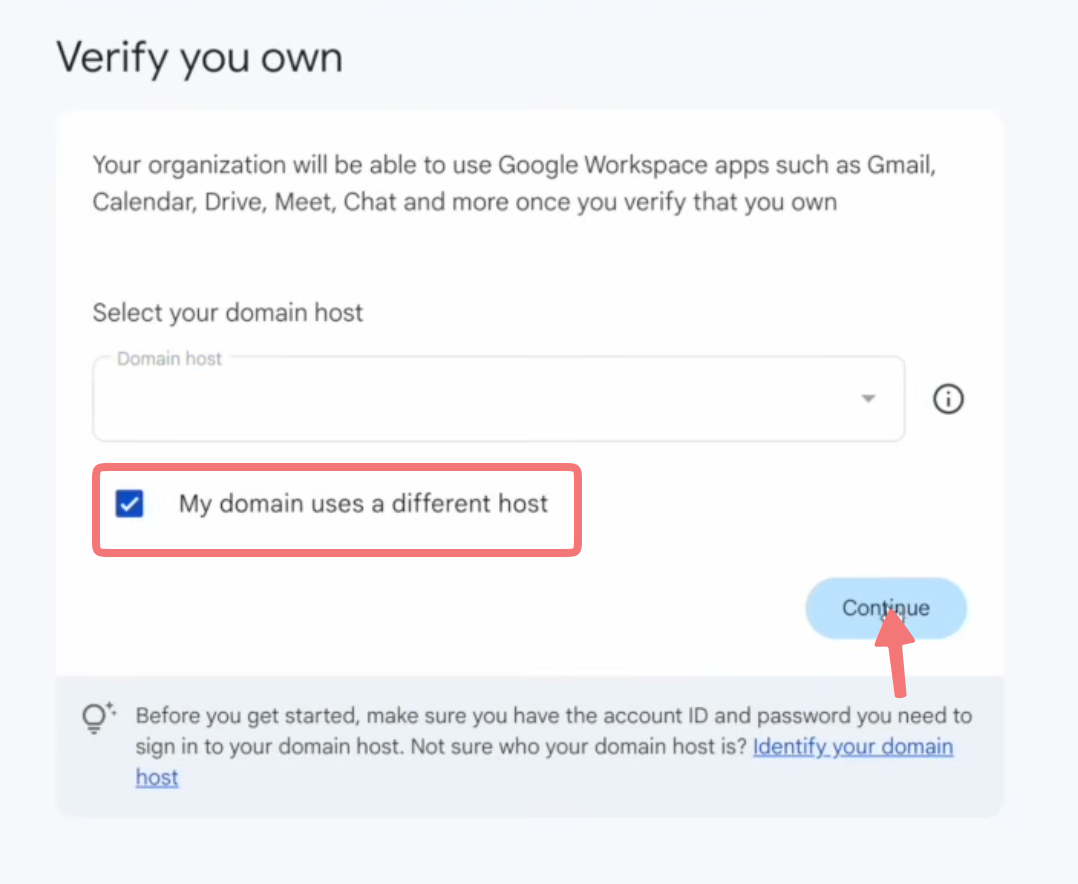
On the next page, you'll be prompted to choose your domain "host" or registrar. Click on "My domain uses a different host", then click "Continue".
10
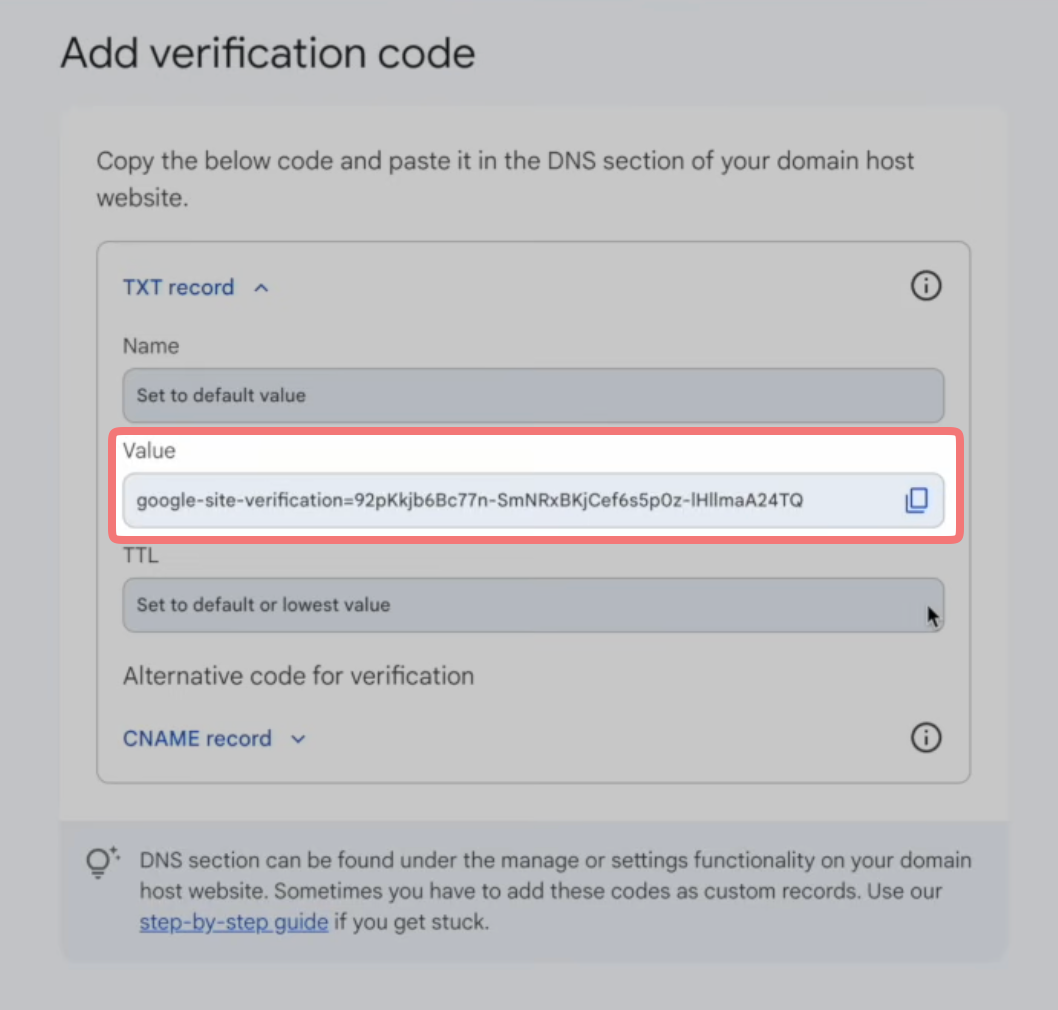
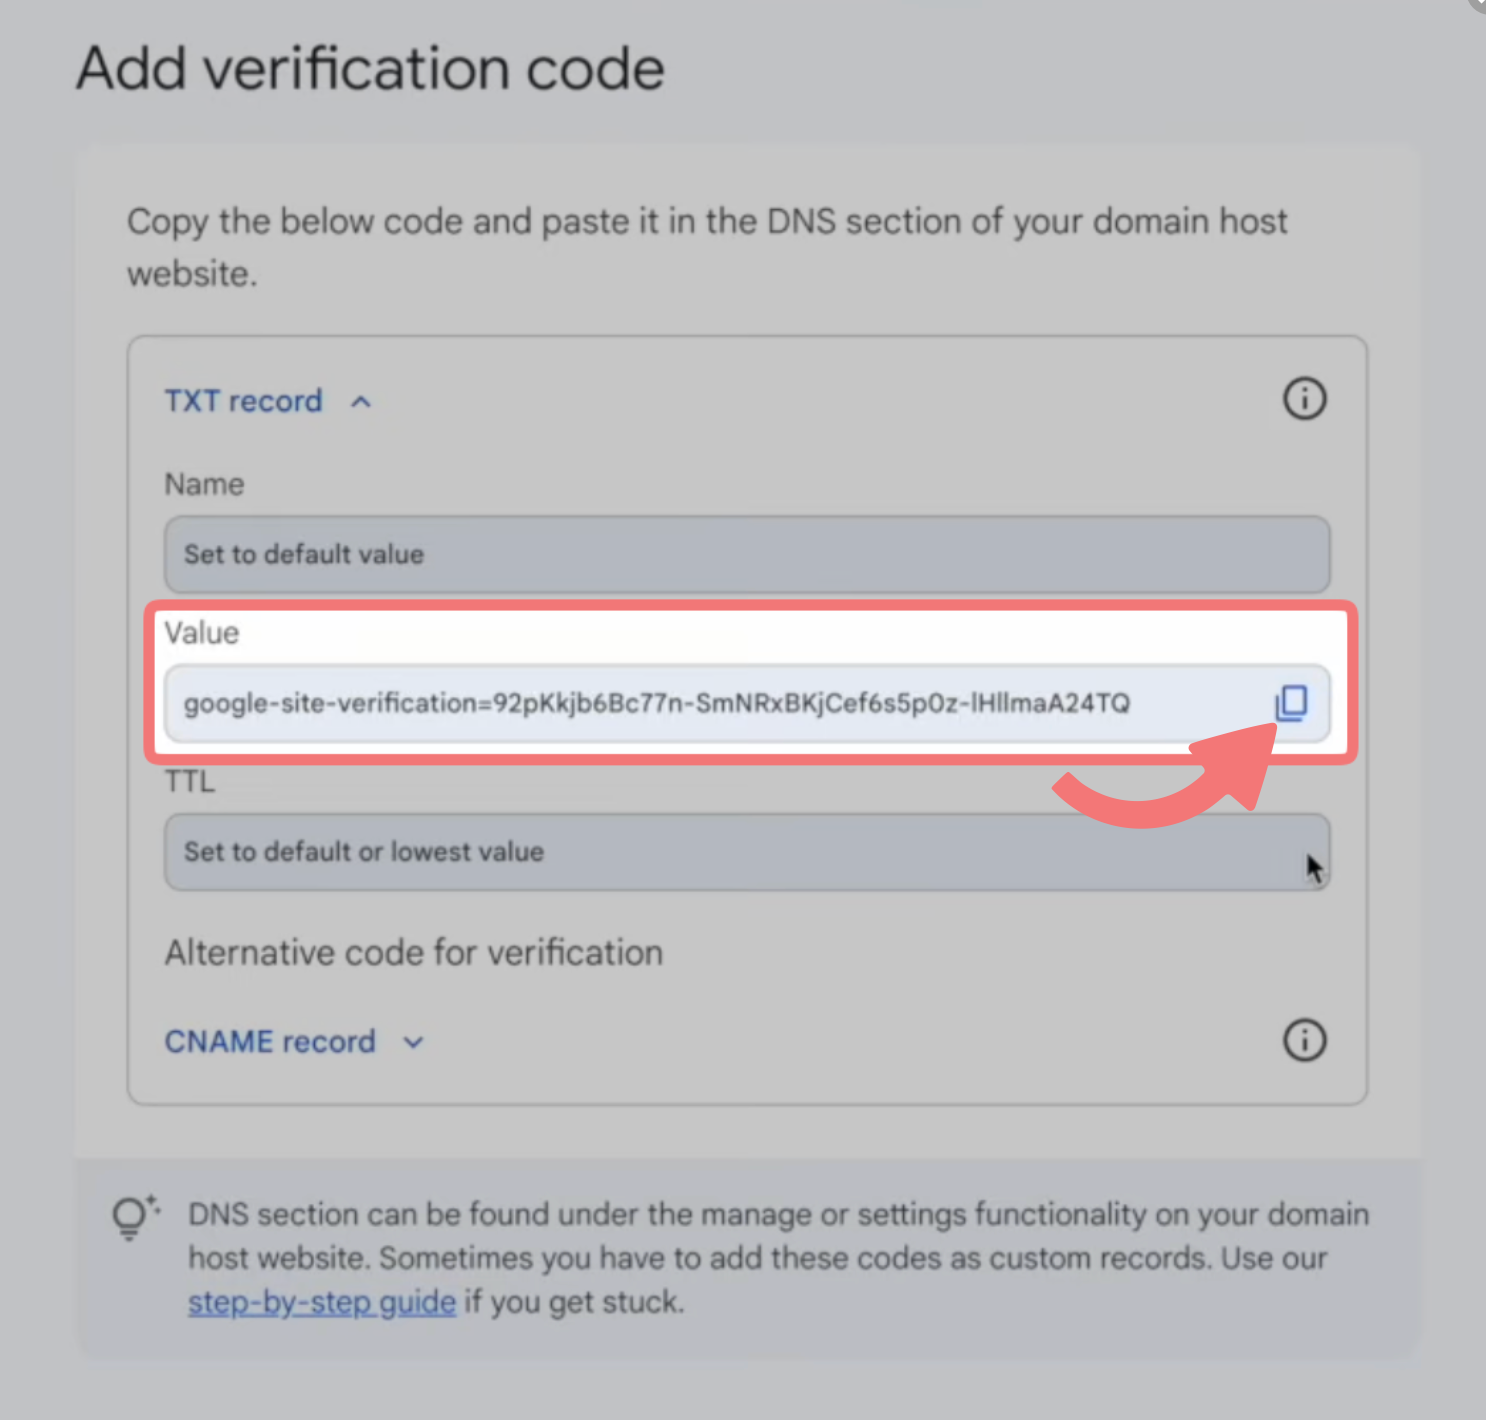
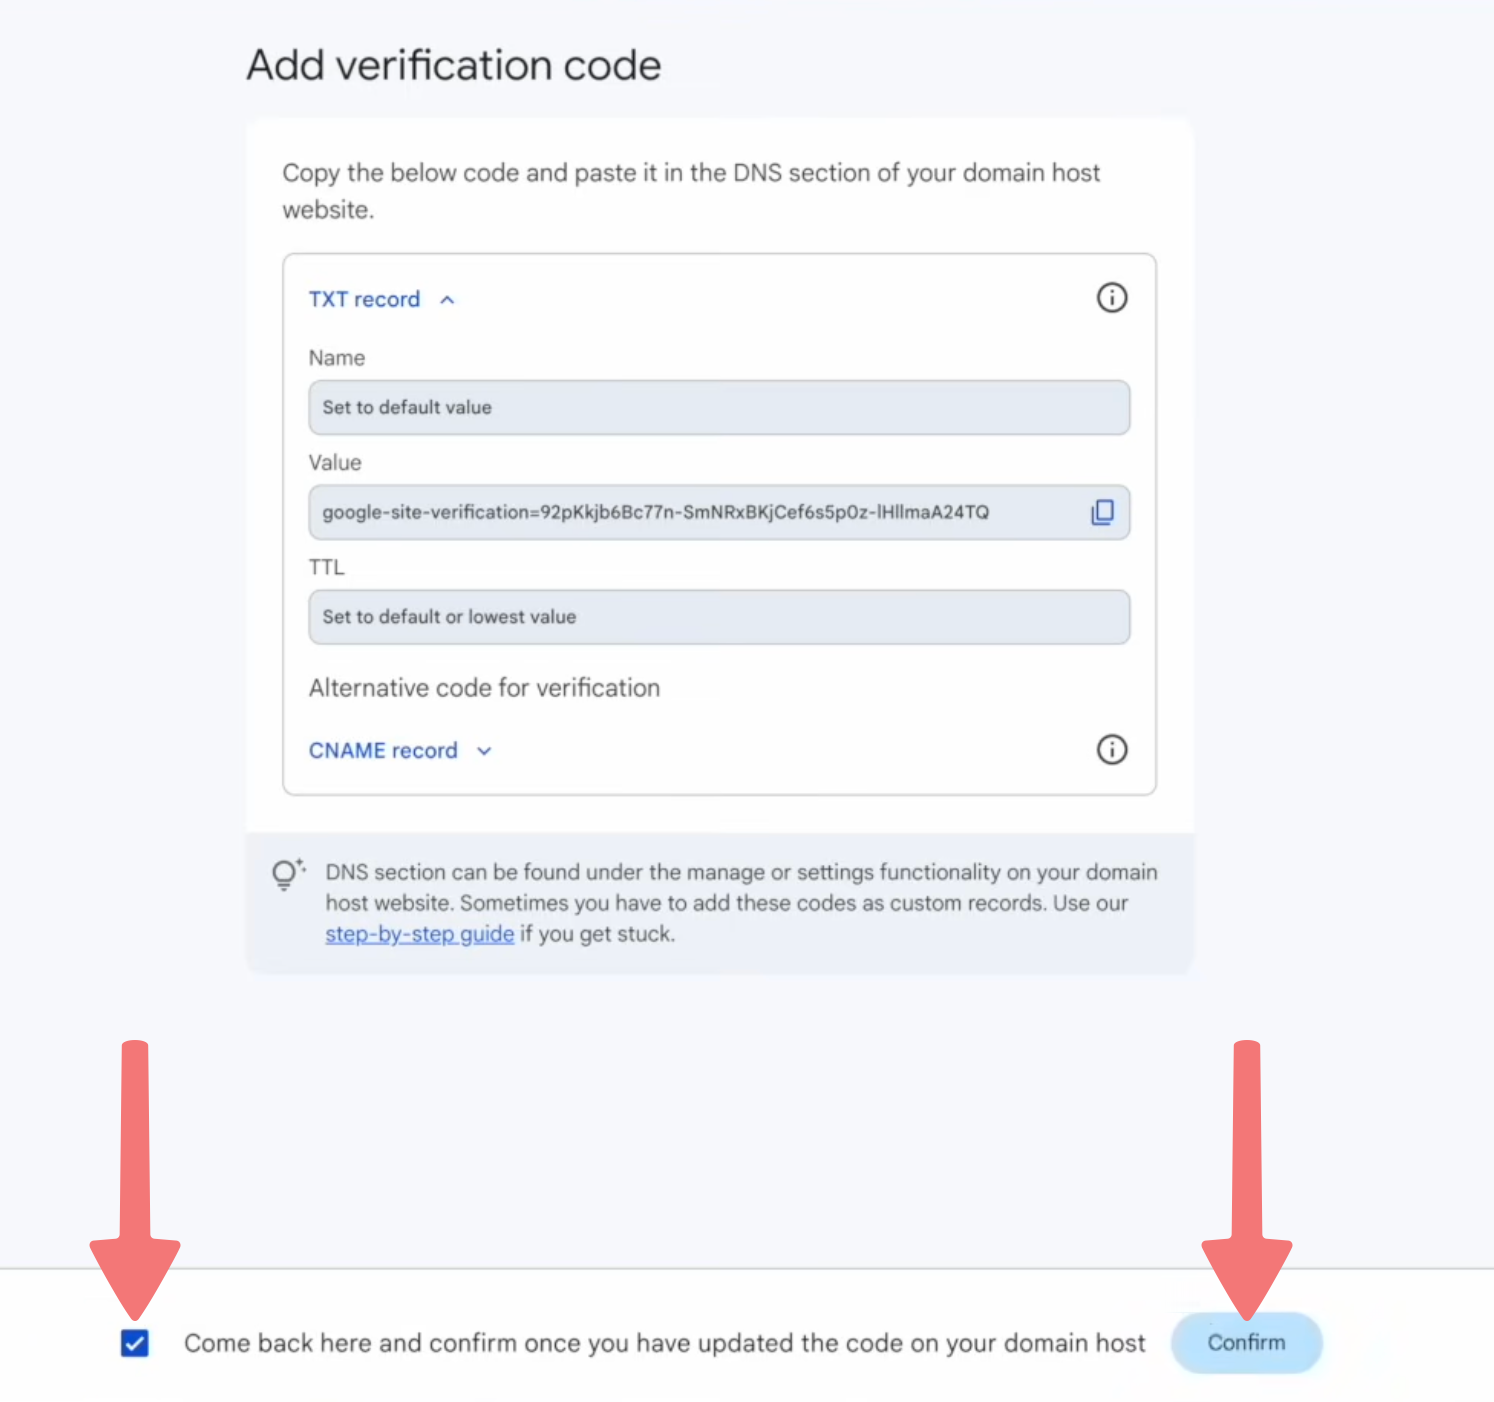
Here's the fun part! Google will now present you with a DNS record, which needs to be added to your domain on Porkbun. This will allow Google to verify that you own your domain, which is required in order to finish the setup process.
For now, just make note of the "Value" of the record you're provided. You can copy and paste the value somewhere safe, or you can just leave this window open while you proceed through the next section of the guide.
Note
If you get an error message saying your domain is "already in use" on Google Workspace, there are some extra steps you'll need to do. You can fill out this form from Google to verify you own the domain so their system will let you set it up on Google Workspace. You can also review more information and troubleshooting steps here.
How to configure and verify your domain on Porkbun
Now that you've started the setup for Google Workspace, the next section of this guide will show you how to configure your domain on Porkbun to get the email service working. Here's how it's done!
1
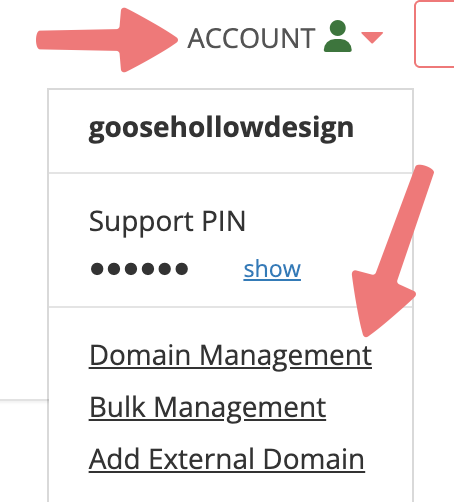
Log in. You should arrive at the Domain Management screen. If you're already logged in, click on ACCOUNT in the top-right corner and select Domain Management.
2
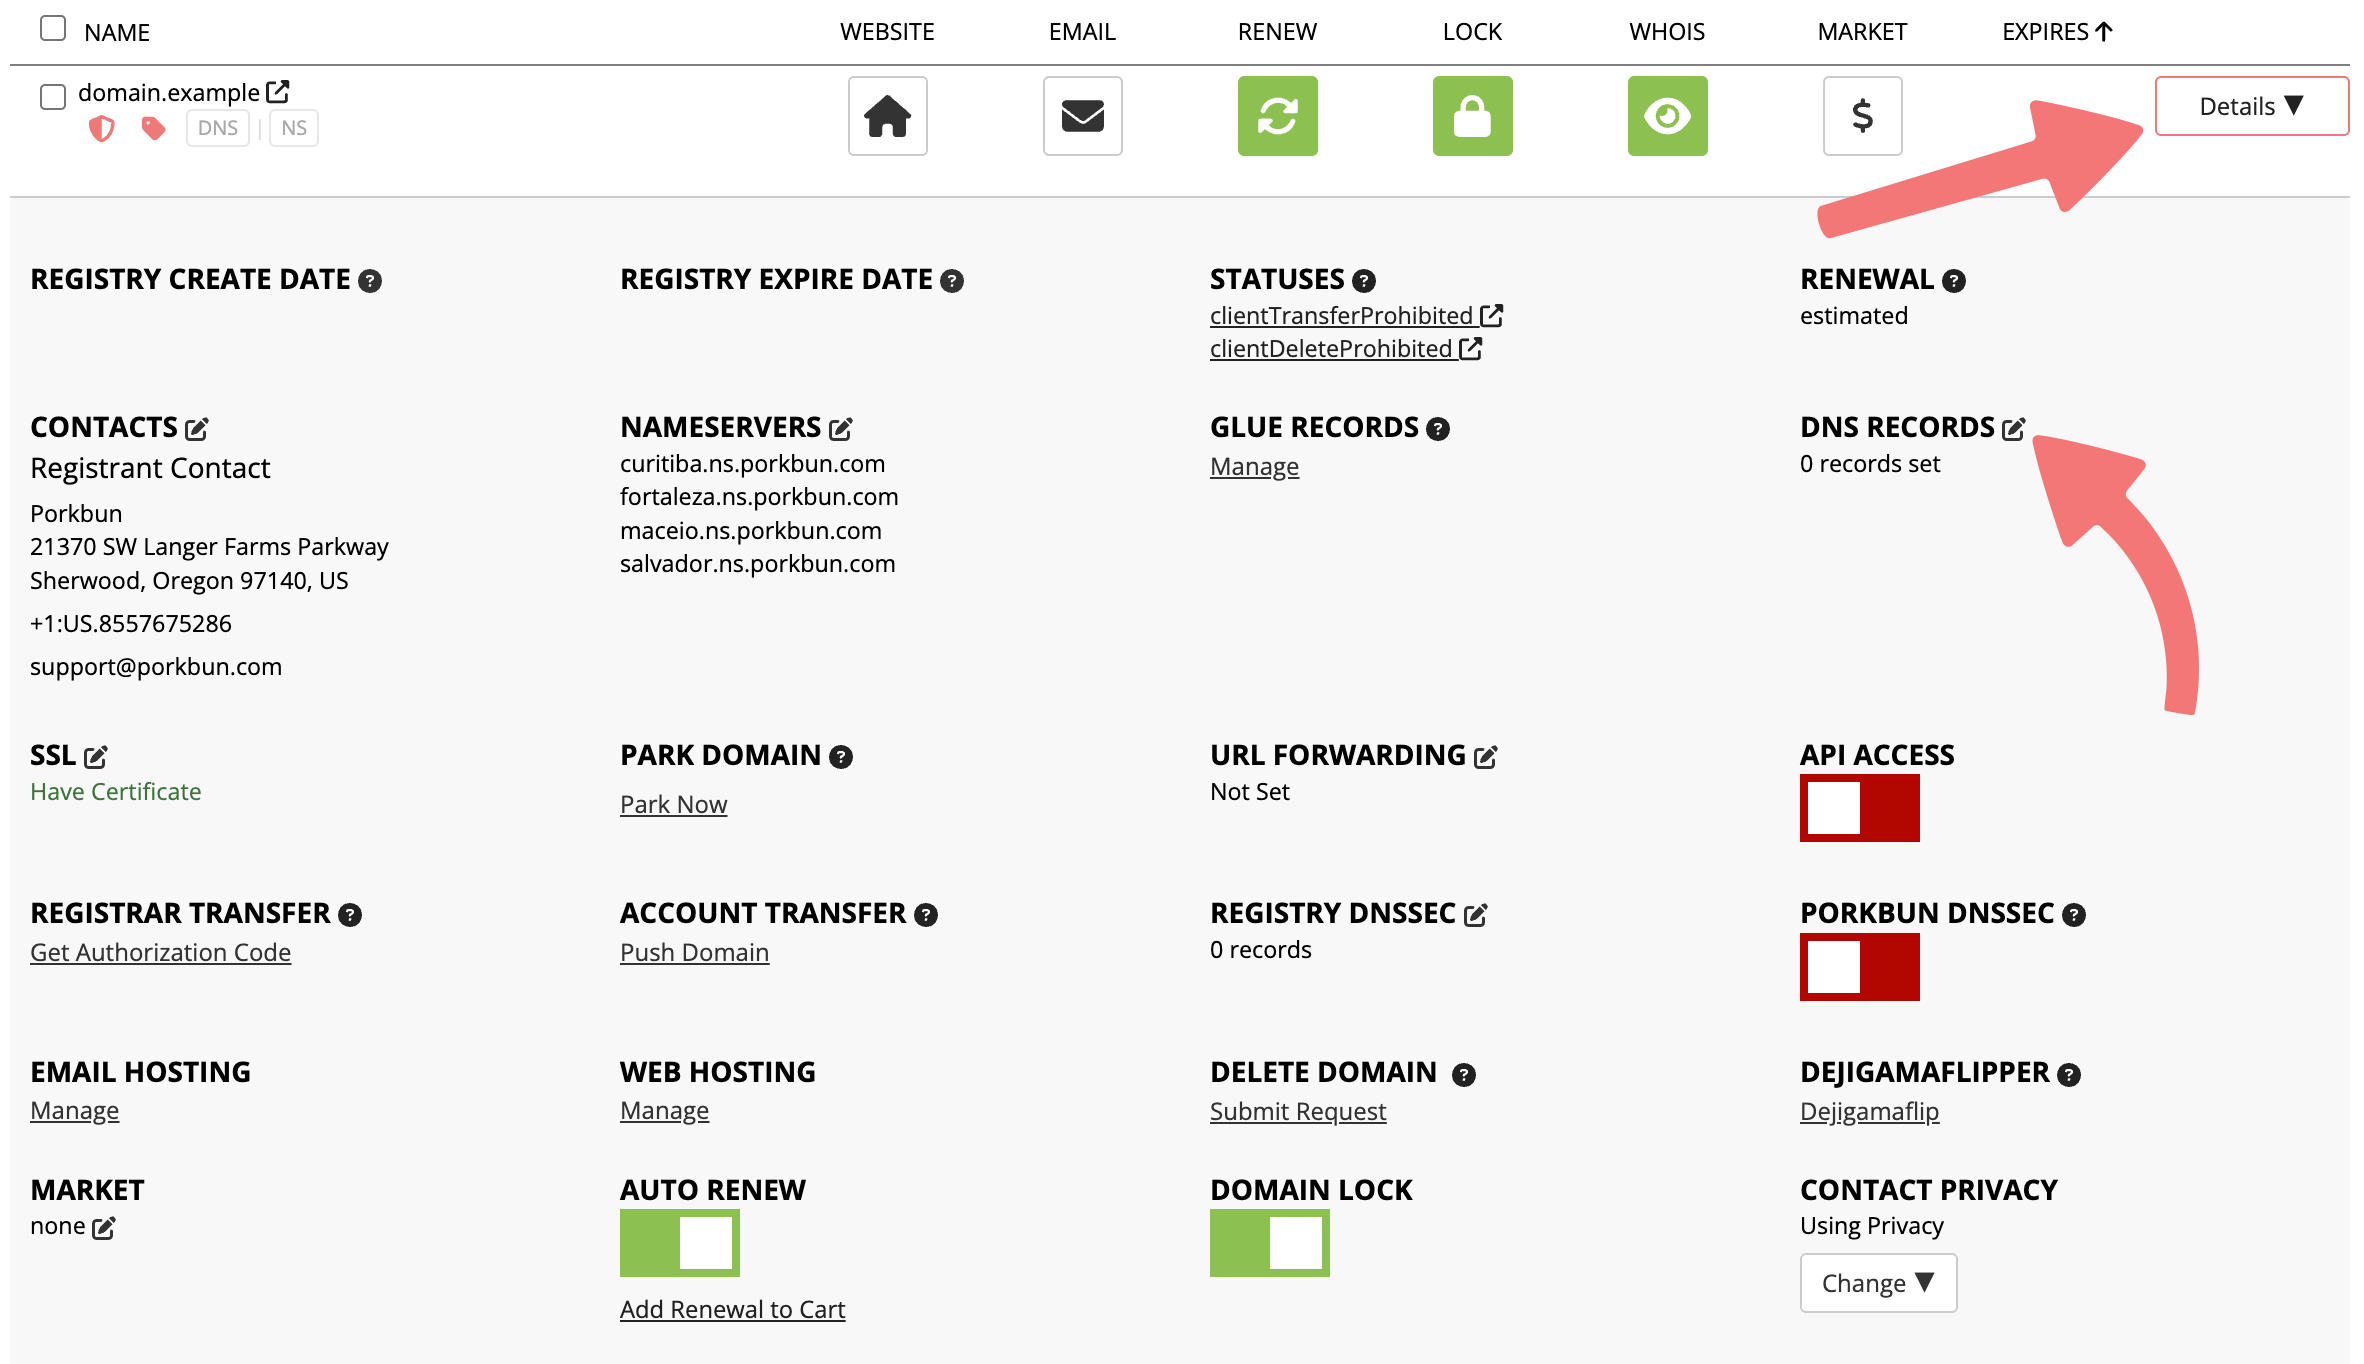
Locate the domain you're connecting to Google Workspace. Click the "Details" button to the far right of the domain name. On the domain details menu, locate "DNS RECORDS" and click the edit icon.
3
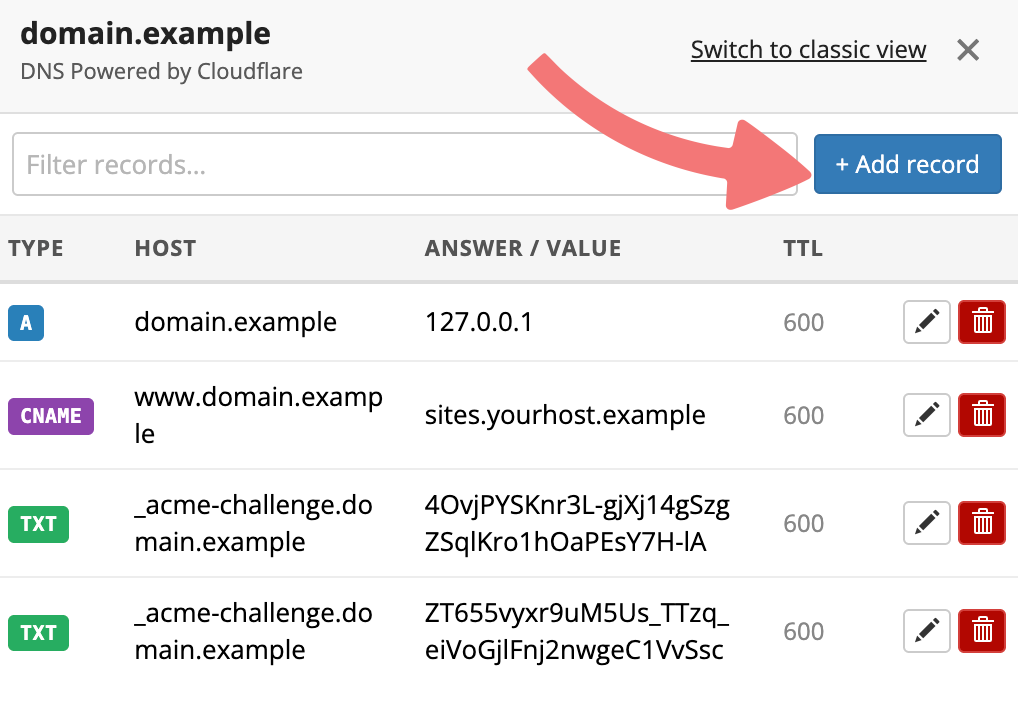
A menu will appear that shows all of the current DNS records on your domain. We are going to add a couple of records that will connect the domain to Google Workspace.
On the upper-right corner of the menu, click on the "Add record" button.
4
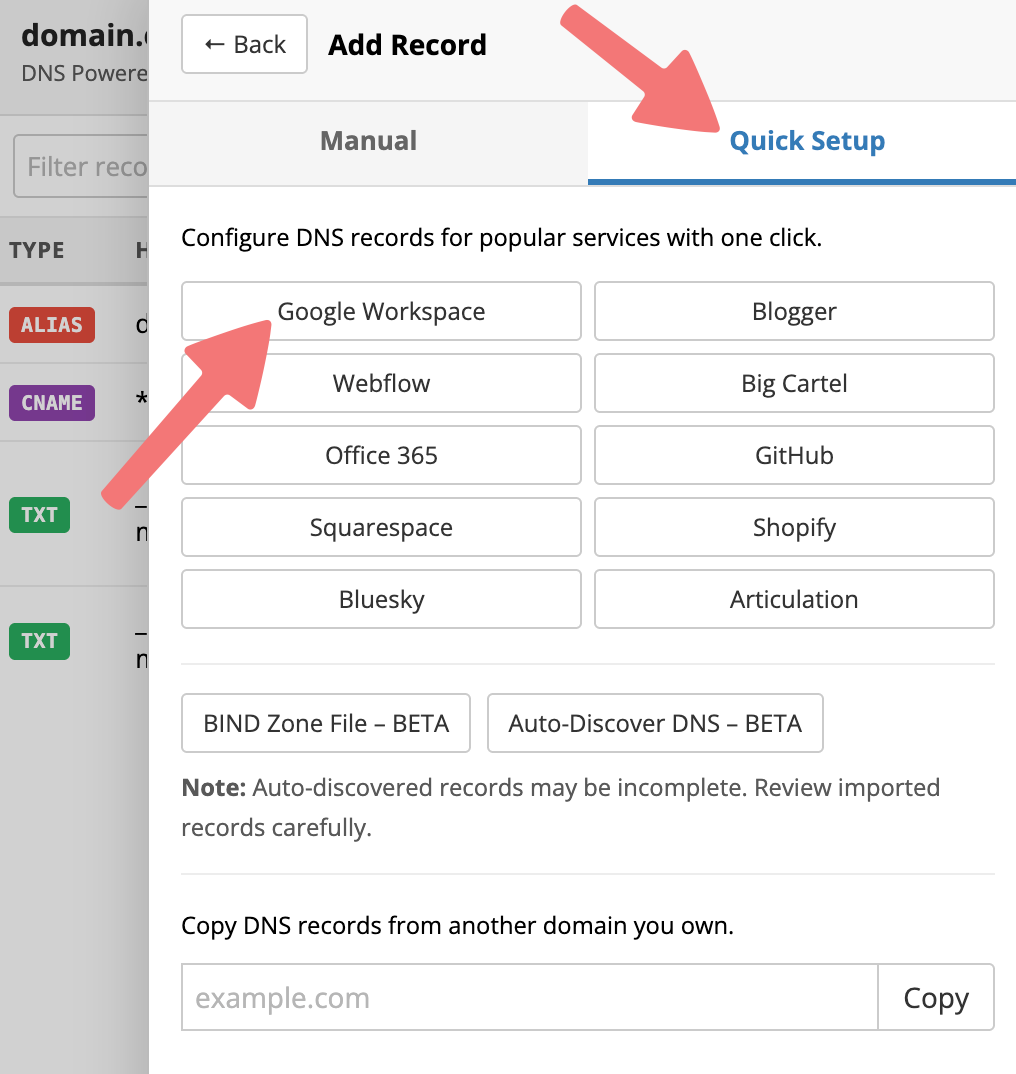
Another menu will appear, allowing you to add new records. Porkbun has a handy "Quick Setup" option that lets you connect your domain to commonly used services such as Google Workspace.
Click on the "Quick Setup" tab, then locate and click the "Google Workspace" option.
A pop-up will appear asking if you want to reconfigure your domain's DNS records. Select the "OK" button to continue.
5
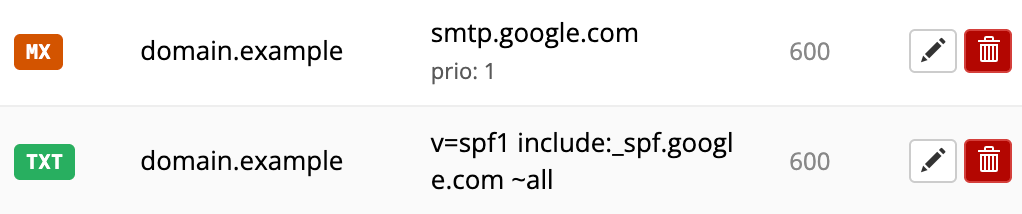
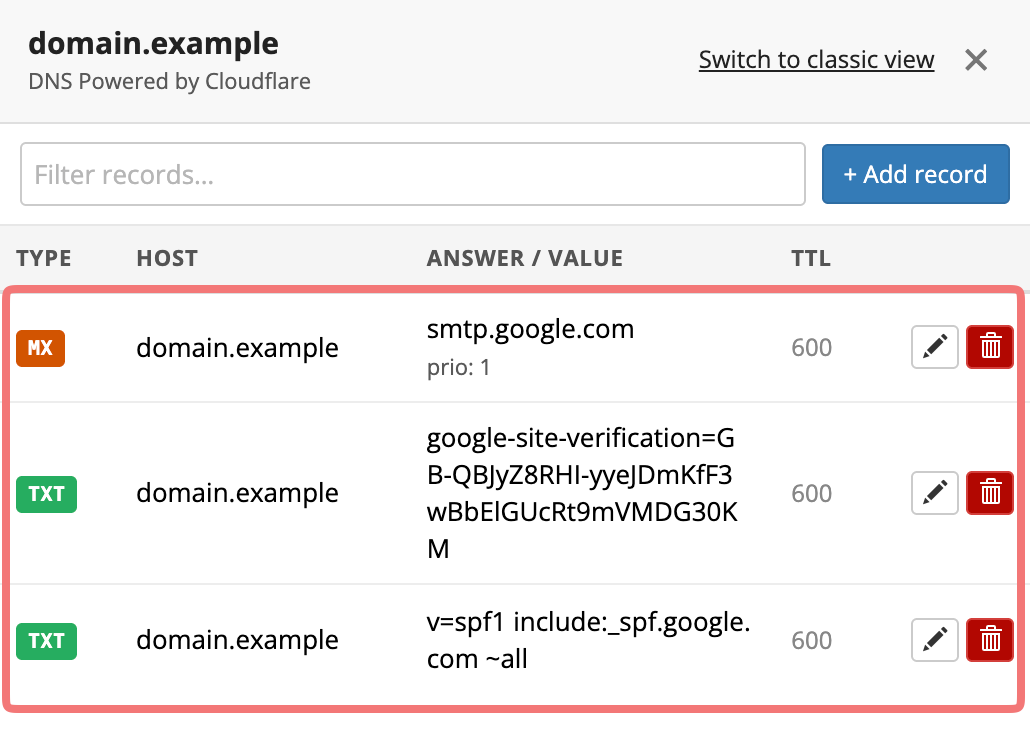
A success message will appear, letting you know that we were able to update your domain's DNS records. After clicking "OK", you'll be taken back to the first menu showing all of your domain's current records. You should see two new records on the domain, an MX (Mail Exchange) record and a TXT (or more specifically, an SPF) record. They'll look like this:
Tip
We have updated our Quick Setup button to reflect the new Google Workspace MX record. If your Google Workspace account was created before 2023, you may have been using the "ASPMX.L.GOOGLE.COM" set of records instead, but utilizing the new "SMTP.GOOGLE.COM" record should work for these accounts as well.
6
Next, we'll need to add the verification TXT record that Google provided you in the first section of this guide. From the DNS records menu, click on "Add record" in the upper-right corner again.
7
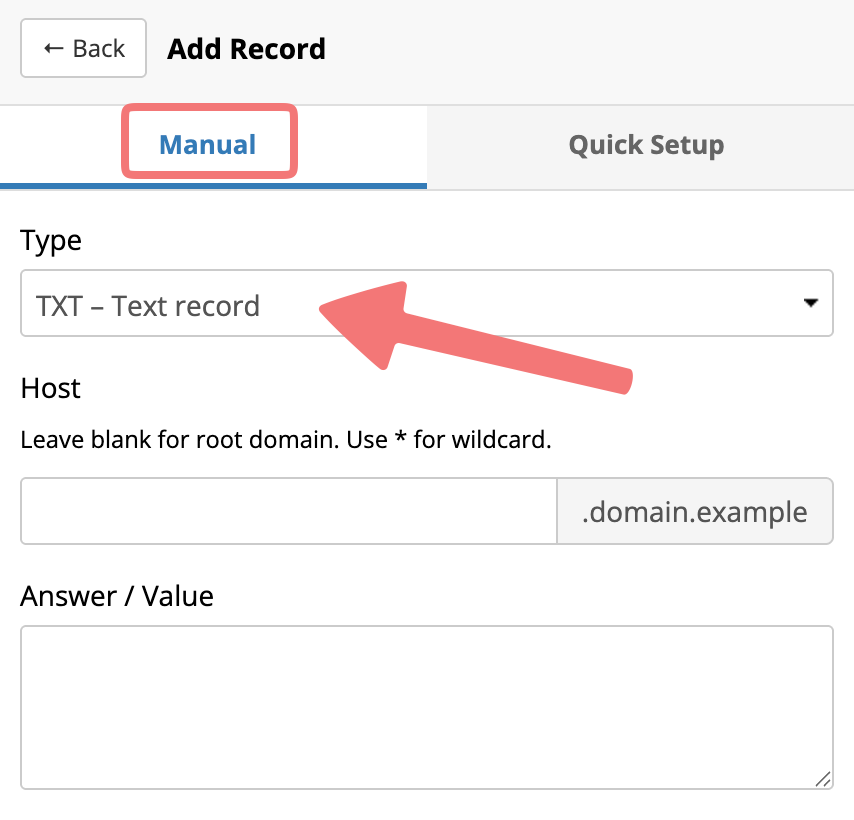
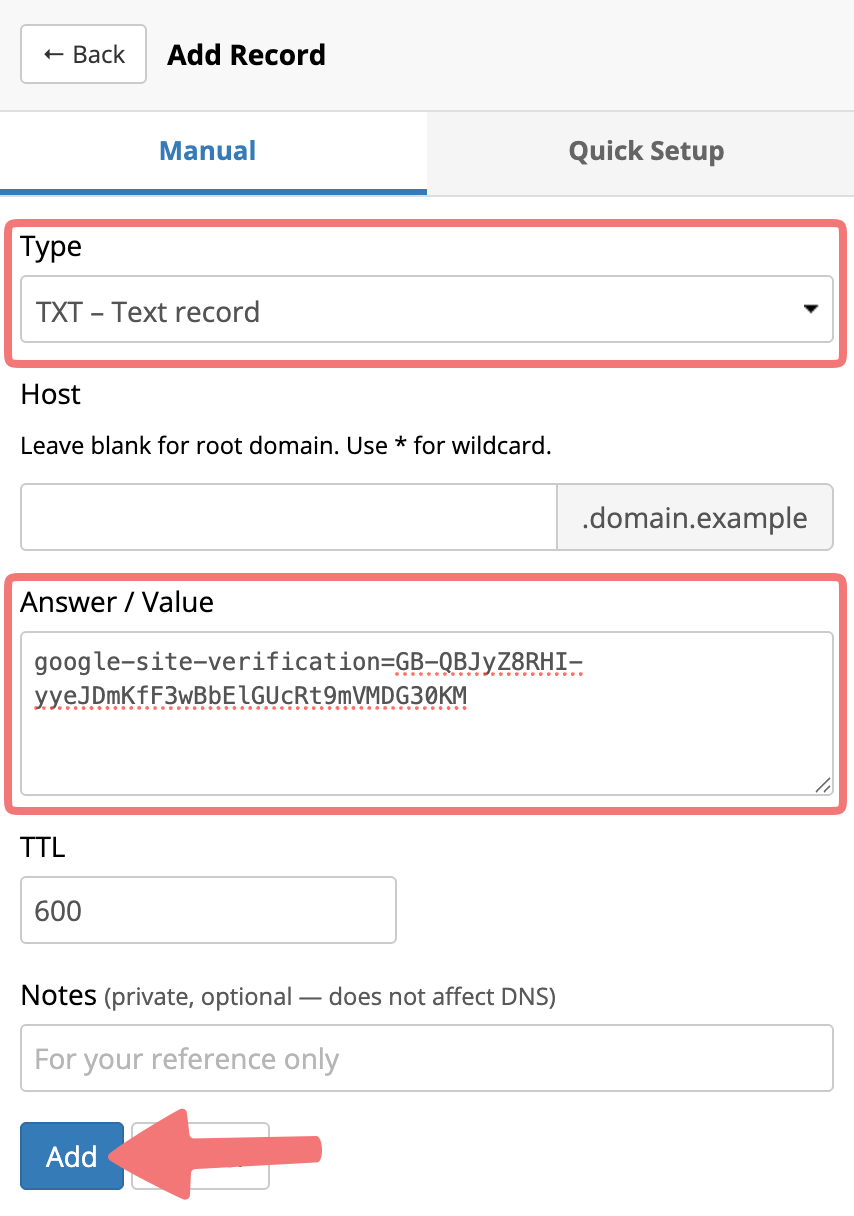
Keep the "Manual" tab open. Under the "Type" option, change the record type to "TXT - Text record".
8
Leave the "Host" field blank, and skip to the next field labeled "Answer/Value". In this field you need to paste the "Value" of the verification record that Google gave to you during the setup process.
Swap over to the window you left open previously which displays your TXT verification record. Click on the copy icon on the right side of the code to copy it to your clipboard.
9
With the code copied to your clipboard, swap back to the window on Porkbun where you're adding the DNS record. In the "Answer/Value" field, paste the value (CMD+V or CTRL+V on your keyboard, or right click and choose "Paste").
Your record should be formatted as shown below, with your specific code from Google. Once you've set it as a TXT record and pasted the value into the correct field, click on "Add" to finish adding it to your domain.
10
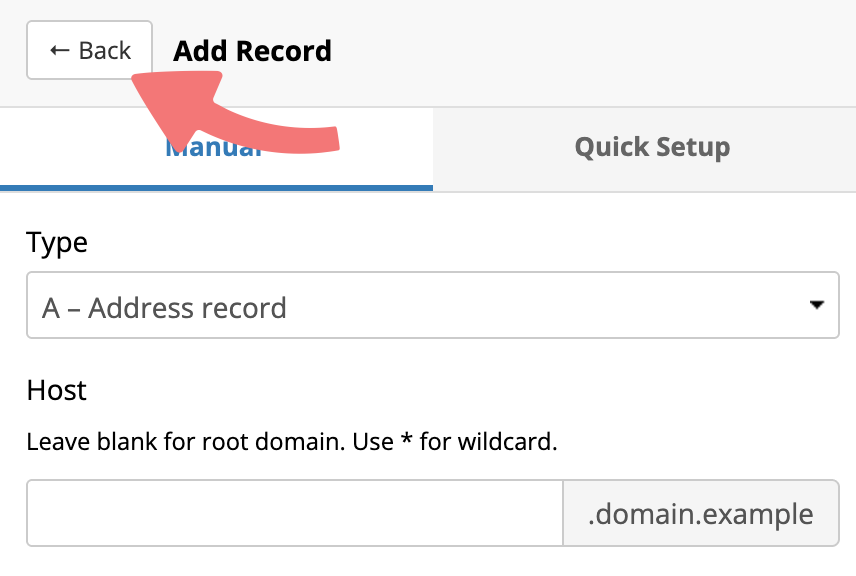
After a moment the info you entered will disappear from the menu. If you don't see any error messages, your record has been added successfully. You can click on the "Back" button at the top of the menu to return to your domain's DNS records, where you can confirm that your new record was added.
11
After a couple of minutes have passed for the new records to propagate, switch back to the Google Workspace setup page. On the bottom of the page, check the box to confirm you've added the DNS record to your domain, then click the "Confirm" button.
12
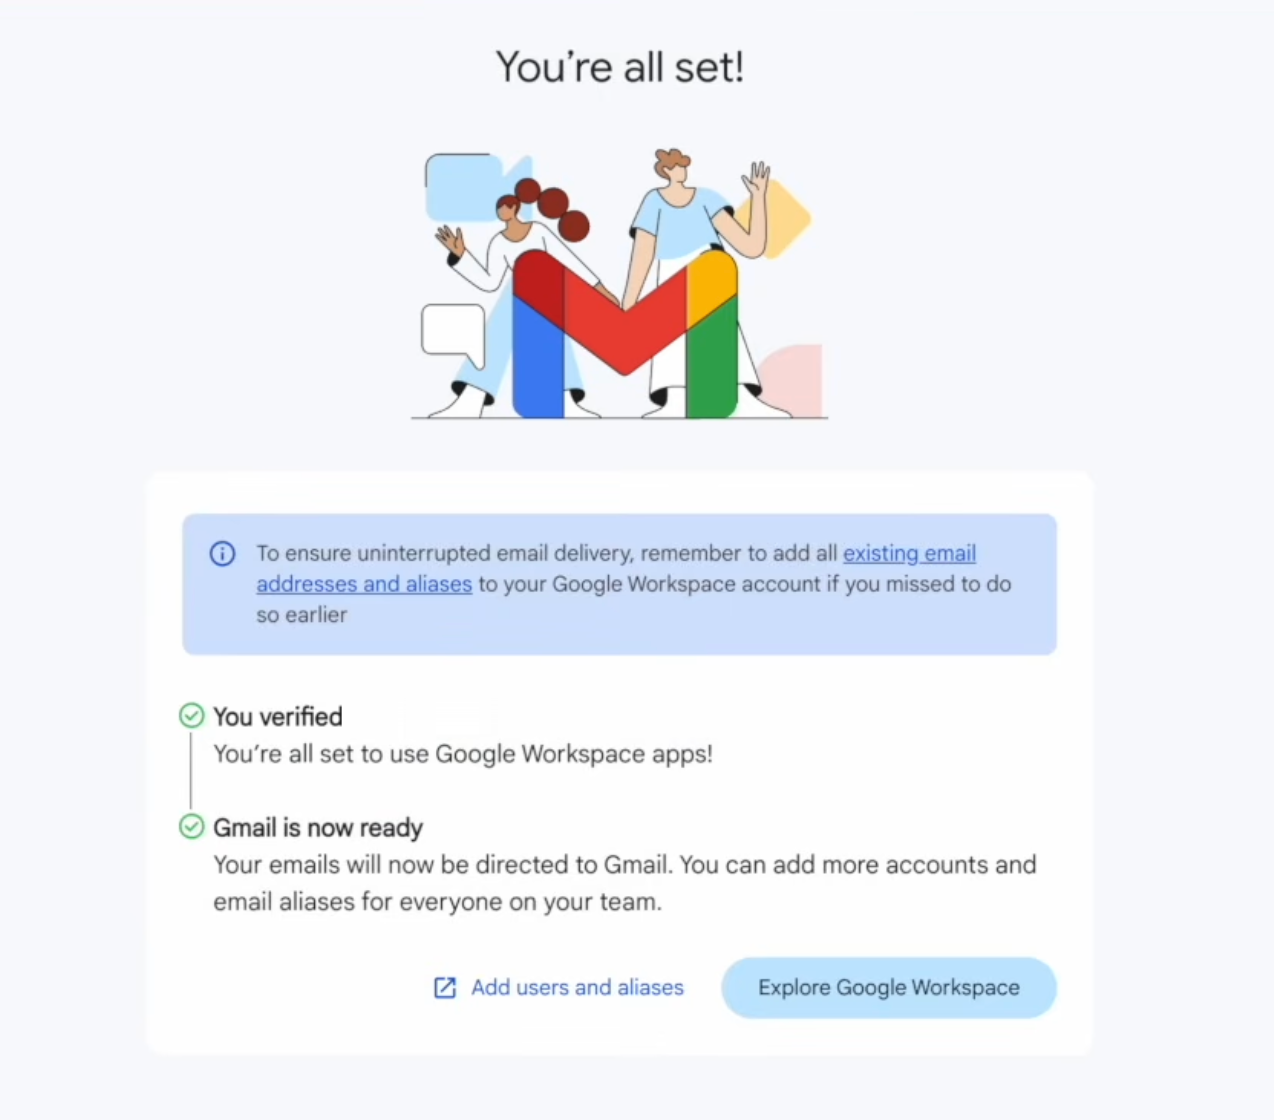
After a moment Google should display a success message, showing that your domain has been successfully connected and that Gmail has been activated!
Note
Since you already added the MX and SPF records to your domain earlier, Google Workspace should finish setting up and activating Gmail automatically. However, if you are prompted to finish activating Gmail at this step, you can click through the next few screens including any confirmation checkboxes, and afterwards you should get to the success screen shown below.
At this point, your domain's email address should be working. However, there are two more DNS records that you can add to your domain called DMARC and DKIM records. These records are technically optional, but they're important if you want to make sure your emails have a minimal chance of landing in recipient spam folders. The next section will show you how to add those records to your domain.
How to authenticate emails with DKIM and DMARC
This guide is long enough already, so we won't get into the weeds about what DKIM and DMARC records actually do. Just know that they're important for ensuring security and deliverability when it comes to the emails on your domain. Here's how to set those records up!
Setting up DKIM
The DKIM record will need to be generated from within your Google Workspace account, since it's specific to your domain.
1
Navigate to the page on your Google Workspace admin console where you can generate a DKIM record. For detailed instructions on finding that page, you can refer to step 1 of Google's guide on DKIM.
2
On the page where you can generate a DKIM record, you can leave all of the default options alone (such as the "prefix selector" and "key bit length") unless you need to make some specific changes. Click on the "Generate" button to create the DNS record.
3
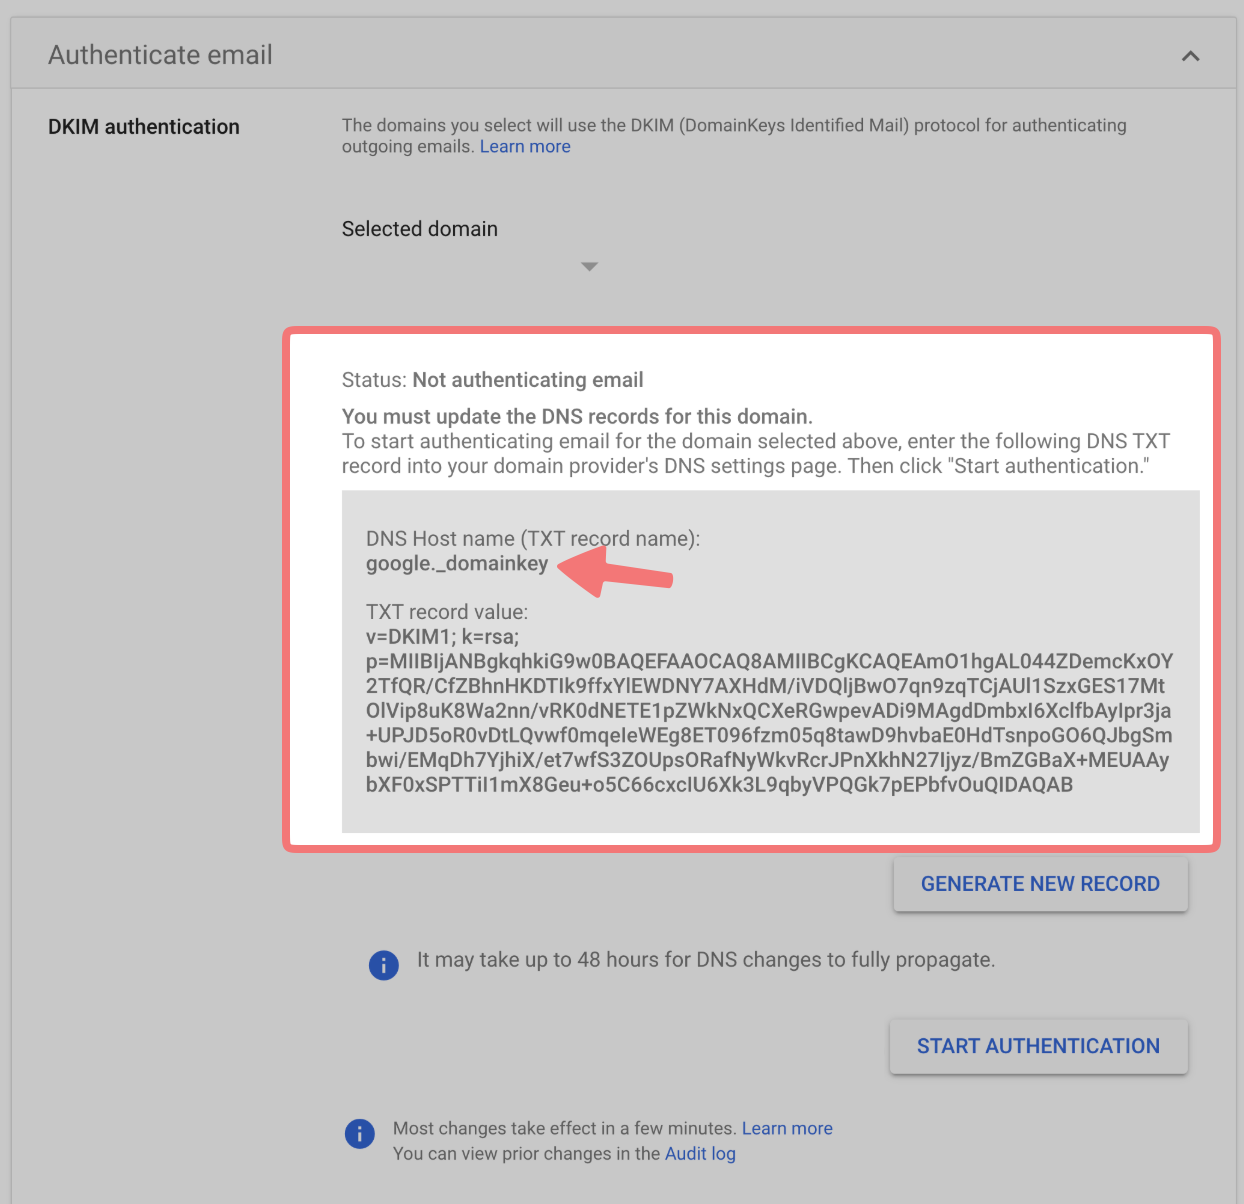
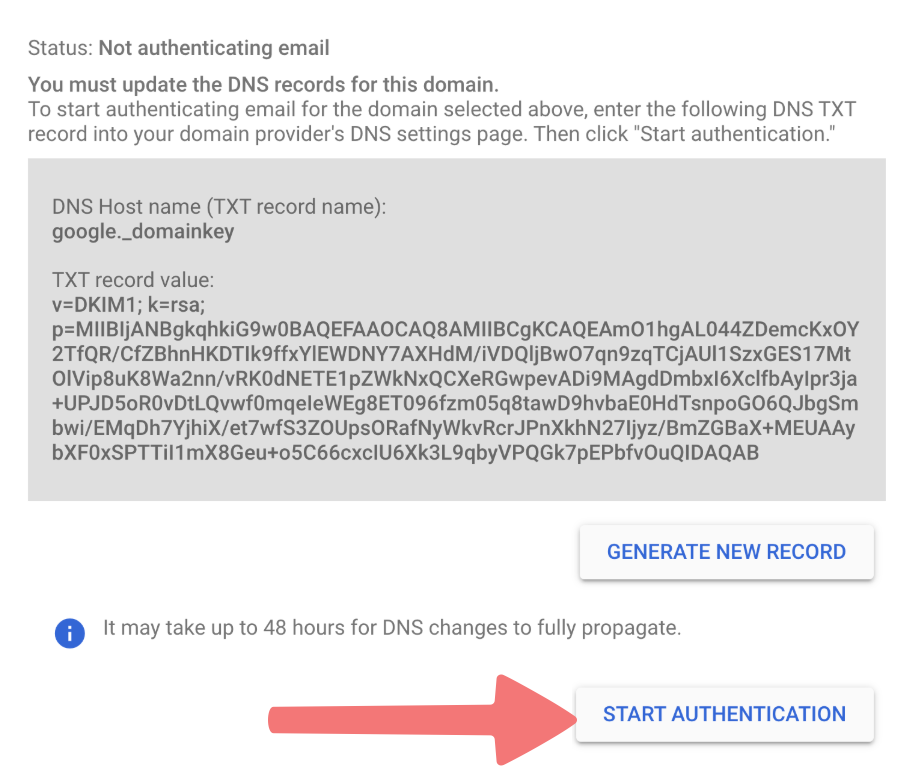
You'll be given a TXT record that needs to be added to your domain on Porkbun. Note that this record has a specific "Name" or "Host name", as well as a value.
For now, highlight and copy just the "Name" portion of the record. If you left the default value, that will most likely be "google._domainkey" (without the quotes).
4
With the "Name" of the record copied to your clipboard, swap back to your Porkbun account again. We are going to add a new DNS record to your domain like we did in the previous section.
5
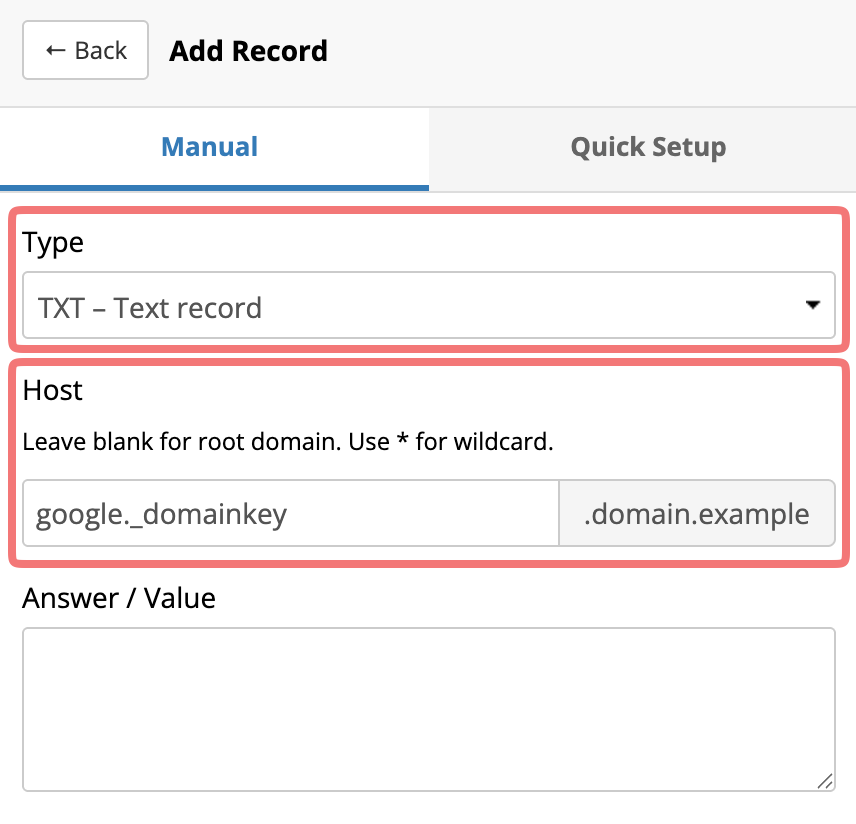
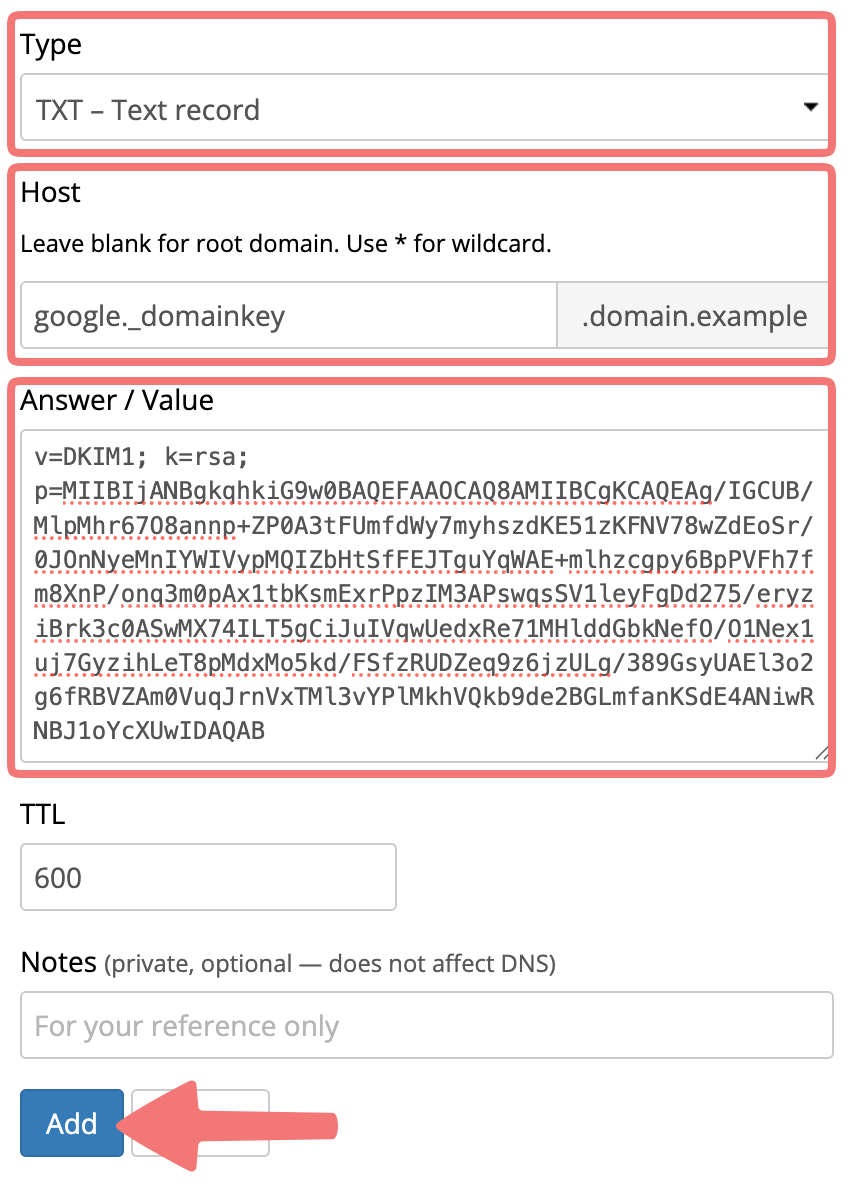
Change the "Type" to "TXT - Text record". In the "Host" field, paste the name that you copied from Google. So far, the record should look like this:
6
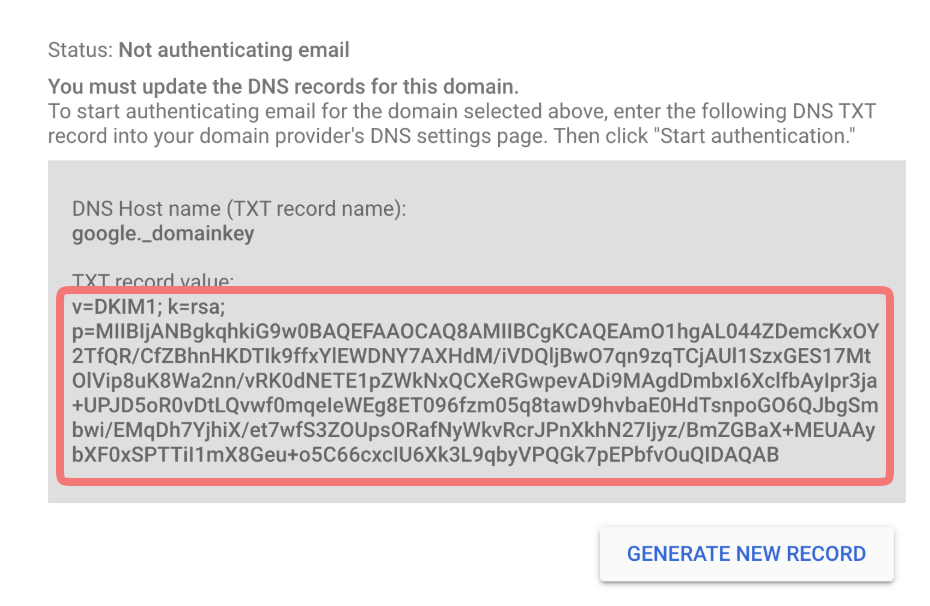
Before submitting anything, leave this window where it's at, and swap back to Google Workspace again. Highlight and copy the entirety of the "Value" that Google is displaying.
7
Come back to Porkbun, and paste that value into the "Answer/Value" field. Now that you've copied both the name and the value over, your record should appear like this:
Click the "Add" button to finish adding the record to your domain.
8
Wait a minute or two for the new DKIM record to propagate. Swap back to Google one more time, and click on the "Start Authentication" button.
9
After a moment, the Status at the top of the page should change from "Not authenticating email" to "Authenticating email with DKIM". You've now set up DKIM successfully on your domain!
Setting up DMARC
DMARC works a little bit differently. DMARC records are standardized, rather than being specifically generated for your domain. That means you get some choices when it comes to the way the record is formatted.
If you want more information about how to fine-tune your DMARC record for your needs, you can review Google's guide on DMARC or you can create a DMARC record using Porkbun's DMARC Record Generator.
If you want to just use a simple and reliable DMARC record without fussing with settings, the next few steps will show you how.
1
Return to the menu on Porkbun where you can add a new DNS record to your domain.
2
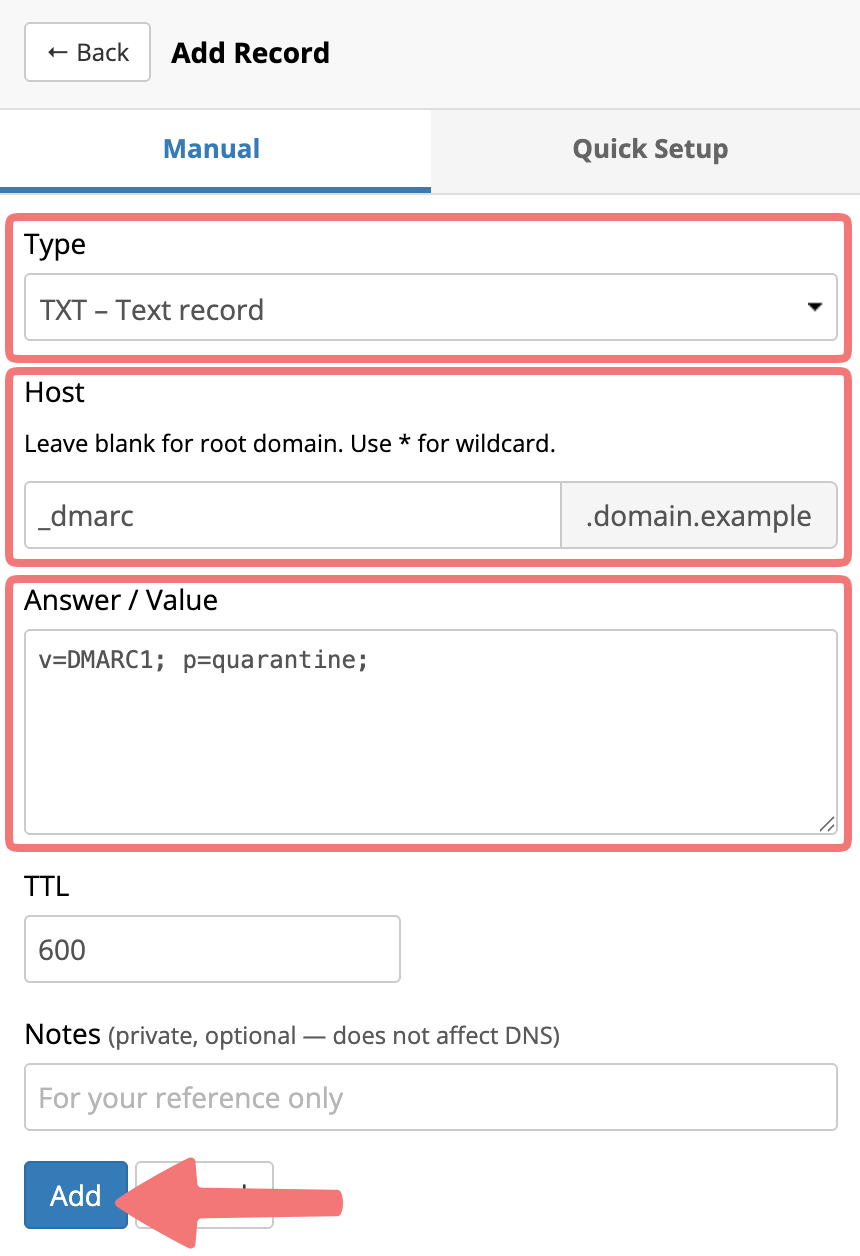
Change the record Type to "TXT - Text record". Then, input the following information in the "Host" and "Answer/Value fields":
- Host: _dmarc
- Answer/Value: v=DMARC1; p=quarantine;
Once you've entered those values (as shown below), click on "Add" to finish adding the record.
That's it! You've successfully connected your domain to Google Workspace, and you've gone above and beyond to secure it with DKIM and DMARC records. Your email should work at this point, and you can use an online tool like MXToolbox to check your domain and make sure there aren't any issues with the way you've formatted your records.
Feel free to reach out to our support team if you run into any issues connecting your domain to Google Workspace.